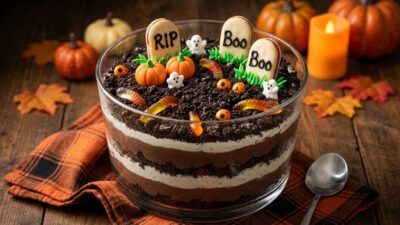
As the crisp autumn air settles in, there is no better time to head into the kitchen for some festive baking. Creating delicious treats is a wonderful way to celebrate the season with friends and family.
If you want to elevate your next gathering, themed cake pops are the perfect solution. These bite-sized delights are not only visually stunning but also surprisingly simple to assemble with the right guidance.

Whether you are a seasoned baker or a beginner, these projects offer a fun way to showcase your creativity. We have gathered six unique designs for halloween cake pops that will surely leave your guests impressed and asking for your secret recipe.
Key Takeaways
- Autumn is the ideal season to explore creative baking projects at home.
- Handcrafted sweets serve as the perfect centerpiece for any holiday gathering.
- Themed designs provide a professional look with minimal effort.
- Simple techniques allow bakers of all skill levels to achieve great results.
- Impressing your guests is easy when you focus on fun, seasonal aesthetics.
Setting the Scene for Spooky Treats
A well-decorated table turns simple treats into a centerpiece for your holiday celebration. Creating the right atmosphere is essential when preparing for a cozy night in or a festive gathering. By focusing on your display, you ensure that your halloween cake pops become the star of the show.
Start by choosing a cohesive color palette that reflects the spirit of the holiday. Deep purples, vibrant oranges, and classic blacks work together to create a striking visual impact. These colors help your seasonal sweets pop against any background, making them look professionally crafted.
Presentation is just as important as the flavor of your treats. Consider using tiered display stands or themed platters to add height and dimension to your dessert table. When you arrange your halloween cake pops with care, you invite guests to admire the artistry before they take their first bite.
Proper planning ensures that your seasonal sweets are not only delicious but also serve as a beautiful part of your home decor. By coordinating your serving pieces with your chosen color scheme, you create a polished look that feels both inviting and eerie. A little extra effort in the setup makes every bite feel like a special occasion.
Essential Tools and Ingredients for Halloween Cake Pops
Crafting perfect halloween cake pops begins with having the right equipment on hand. Before you start your baking journey, it is vital to gather all necessary supplies to ensure a smooth and stress-free process. Preparation is truly the secret ingredient to achieving professional results in your own kitchen.
To create stunning seasonal sweets, you will need high-quality candy melts, sturdy lollipop sticks, and a variety of edible decorations. Understanding the chemistry of melting chocolate is essential for a flawless finish. If your chocolate is too thick, it will not coat the cake balls evenly, which can lead to frustration.

Using a double boiler or a microwave-safe bowl helps maintain the perfect consistency for your halloween cake pops. Always work in small batches to keep the chocolate at the ideal temperature. This careful approach ensures that your seasonal sweets look as good as they taste.
The following table outlines the must-have items for your baking kit. Having these tools ready will allow you to focus entirely on the creative side of decorating.
| Tool or Ingredient | Purpose | Key Benefit |
|---|---|---|
| Candy Melts | Coating | Smooth, vibrant finish |
| Lollipop Sticks | Support | Sturdy structure |
| Edible Markers | Detailing | Precision artwork |
| Styrofoam Block | Drying | Prevents smudging |
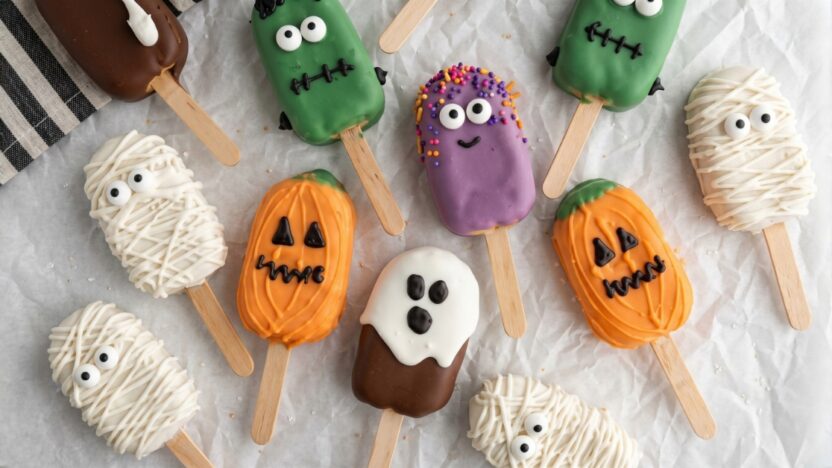
Mummy-Wrapped Cake Pops
If you want to add a touch of mystery to your dessert table, look no further than these adorable mummy-wrapped treats. These spooky cake pops are a classic choice that brings a playful, eerie vibe to any collection of halloween-themed desserts. They are perfect for beginners because they rely on texture rather than intricate drawing skills.

Achieving the Perfect Bandaged Look
To create the iconic mummy effect, you will need a piping bag fitted with a flat, ribbon-style tip. Start by drizzling your melted candy back and forth across the cake pop in an overlapping pattern. Do not worry about making the lines perfectly straight, as the slightly messy look actually adds to the charm.
Leave a small gap near the top of the pop to place two candy eyes. This simple technique creates a realistic bandaged appearance that will impress your guests. Once the eyes are set, you can add a few more “bandages” around them to make the mummy look like it is peeking out.
Choosing the Right Candy Melts
The secret to success lies in the consistency of your white candy melts. If the mixture is too thick, the bandages will look clumpy and uneven. You should aim for a smooth, flowing consistency that holds its shape once piped onto the cake pop.
If your melts are too stiff, try adding a small amount of vegetable oil or paramount crystals to thin them out. Using high-quality candy melts ensures that your halloween-themed desserts have a professional finish. With the right tools, these spooky cake pops will become the highlight of your holiday party.
Jack-o’-Lantern Pumpkin Cake Pops
Nothing captures the spirit of autumn quite like a classic jack-o’-lantern sitting on your dessert table. These halloween-themed desserts are a staple for any festive gathering, bringing a touch of seasonal charm to your party spread. Whether you are hosting a neighborhood bash or a small family dinner, these treats are sure to delight guests of all ages.

Sculpting the Perfect Pumpkin Shape
To begin, roll your prepared cake mixture into smooth, uniform balls. You can use a small cookie scoop to ensure every pumpkin is the same size for a professional look. Gently press the sides of each ball to create a slightly flattened, round shape that mimics a real pumpkin.
For an extra touch of realism, use a toothpick to press vertical lines around the sides of the cake ball. These ridges give your spooky cake pops that authentic, textured appearance. Once shaped, chill them in the refrigerator to ensure they hold their form during the dipping process.
Adding Character with Edible Markers
After your orange candy coating has fully set, it is time to bring your pumpkins to life. Using food-safe edible markers, you can draw unique faces on each pop. Feel free to experiment with classic triangle eyes or silly, crooked grins to give every pumpkin its own distinct personality.
If you prefer a more detailed look, consider using a fine-tip black marker for intricate outlines. This simple step transforms basic orange spheres into charming characters that stand out on any dessert platter.
| Decoration Method | Difficulty Level | Best For |
|---|---|---|
| Edible Markers | Beginner | Expressive Faces |
| Candy Melts | Intermediate | 3D Texture |
| Sprinkles | Easy | Quick Accents |
Creepy Eyeball Cake Pops
For those who enjoy a macabre twist, these eyeball-themed snacks are the perfect way to elevate your party spread. These festive treats offer a fun and unsettling addition to any dessert table, guaranteed to grab everyone’s attention. With just a few simple techniques, you can transform basic round shapes into lifelike, staring eyes that look almost too real to eat.

Creating Realistic Bloodshot Details
To achieve that authentic, spooky look, you will need a set of fine-tipped food-safe brushes and concentrated gel food coloring. Start by dipping your pops in bright white candy melts and letting them set completely. Once the surface is firm, use a tiny amount of red food coloring to paint delicate, jagged lines radiating from the center.
Pro tip: Keep your lines thin and irregular to mimic the appearance of natural veins. You can add a touch of blue or green coloring in the center to create the iris, followed by a small dot of black for the pupil. This attention to detail makes your delicious cake pops stand out as professional-grade party snacks.
Selecting the Best Candy Centers
Choosing the right base is crucial for maintaining the structural integrity of your creations during the dipping process. A dense, moist cake crumb mixed with just enough frosting ensures the pop stays firmly on the stick. If the mixture is too soft, the weight of the candy coating may cause the pop to slide or fall off.
| Center Type | Texture | Stability |
|---|---|---|
| Dense Pound Cake | Firm | Excellent |
| Standard Sponge | Light | Moderate |
| Brownie Base | Rich | High |
Always chill your shaped centers in the refrigerator for at least thirty minutes before dipping. This simple step helps the candy shell harden quickly, ensuring your delicious cake pops remain perfectly round and creepy for your guests to enjoy.
Ghostly White Chocolate Cake Pops
Ghostly white chocolate cake pops offer a sophisticated touch to any Halloween dessert table. These festive treats are surprisingly simple to assemble, making them a fantastic option for a refined holiday display. Their clean, minimalist aesthetic brings a touch of elegance to your spooky celebration.

Mastering the Drip Technique
To achieve that signature ethereal appearance, you must focus on the consistency of your white chocolate coating. Melt your chocolate slowly to ensure a smooth, flowing texture that mimics a floating spirit. Dip your cake ball into the chocolate and gently tap off the excess to create thin, cascading drips down the sides.
Allow the coating to set slightly before adding any final details. This patience ensures the drips stay in place, creating a beautiful, ghostly silhouette that looks professional and polished.
Adding Expressive Ghostly Faces
Once your base is set, it is time to bring your creations to life with personality. Using a fine-tipped edible marker or a small amount of melted dark chocolate, you can draw various expressions on these delicious cake pops. Whether you prefer silly, surprised, or spooky faces, the choice is entirely yours.
These charming designs are highly versatile and allow you to customize the mood of your event. By varying the eyes and mouths, you can create a whole family of ghosts that are sure to delight your guests. These delicious cake pops are truly the perfect way to serve festive treats that look as good as they taste.
Witch Hat and Broomstick Cake Pops
Witch-themed sweets bring a playful and magical vibe to any festive gathering. These halloween party desserts are perfect for those who want to showcase their creativity through structural baking techniques. By combining simple shapes, you can transform standard cake pops into iconic symbols of the season.
Constructing the Hat Structure
To build the perfect witch hat, you will need a standard cake pop base and a small, pointed chocolate cone. Simply attach the cone to the top of your cake sphere using a small amount of melted chocolate as glue. Once the structure is firm, dip the entire piece into colored candy melts to create a seamless, uniform look.
You can add extra flair by piping a thin band of icing around the base of the cone. This creates a realistic brim that makes your spooky treats stand out on any dessert platter. Ensure the chocolate sets completely in the refrigerator before you begin adding final decorative details.
Using Pretzels for Broomstick Handles
Broomsticks are a fantastic way to add a satisfying crunch to your collection of holiday sweets. Instead of using traditional sticks, insert a sturdy pretzel rod into the bottom of a rectangular cake pop. This clever swap provides both a rustic aesthetic and a delicious salty contrast to the sweet cake interior.
To finish the broom, use a fork to gently texture the bottom of the cake pop to mimic straw bristles. These spooky treats are sure to delight guests of all ages at your next event. Below is a quick guide to help you choose the right components for your halloween party desserts.
| Treat Type | Primary Base | Structural Element | Flavor Profile |
|---|---|---|---|
| Witch Hat | Cake Sphere | Chocolate Cone | Sweet & Rich |
| Broomstick | Rectangular Cake | Pretzel Rod | Sweet & Salty |
| Classic Pop | Cake Sphere | Paper Stick | Sweet |
Spider Web and Critter Cake Pops
Bring a touch of the macabre to your dessert table with these creepy crawly cake pops. Spiders and webs are essential motifs for creating a truly immersive and eerie dessert experience. These halloween party desserts are guaranteed to impress your guests with their attention to detail and thematic consistency.
Piping Intricate Web Designs
To achieve the perfect look, you will need a steady hand and a piping bag filled with melted chocolate. Start by drawing a simple cross on the surface of your coated cake pop. Then, connect the lines with small, curved arches to create the classic web effect.
Consistency is key when working with melted chocolate. If the chocolate is too thick, it will not flow smoothly, making your webs look jagged. Keep your movements fluid and confident to ensure your spooky treats look professional and clean.
Incorporating Edible Spiders and Insects
Once your webs are set, it is time to add the final, chilling touch. You can easily find edible sugar spiders or plastic-style candy insects at most baking supply stores. These small additions transform a simple cake pop into a frightening masterpiece.
Place the spiders near the edge of the web to make it look like they are crawling across the surface. This extra step adds depth and texture to your display. Your guests will surely appreciate the effort put into these detailed halloween party desserts.
| Decoration Type | Best Use Case | Difficulty Level |
|---|---|---|
| Piped Chocolate | Web patterns | Medium |
| Sugar Spiders | Top accents | Easy |
| Candy Insects | Base detailing | Easy |
| Edible Glitter | Highlighting webs | Low |
Conclusion
Crafting your own holiday-themed sweets offers a rewarding way to celebrate the season. You can delight your guests by mastering these unique designs. Building a diverse collection of themed cake pops allows you to cater to every taste and style at your party.
This guide provides the inspiration and technical knowledge needed to make your next event a success. You have the tools to transform simple ingredients into professional-looking desserts. Your kitchen becomes a creative studio for producing memorable spooky treats.
The most important part of making these snacks involves having fun. Let your creativity shine through in every bite you serve. Share your favorite designs with friends or post your creations on social media to inspire other bakers.
Do you have a favorite design from this list? Try experimenting with different colors of Wilton candy melts to customize your spooky treats even further. Your guests will appreciate the effort you put into these themed cake pops.