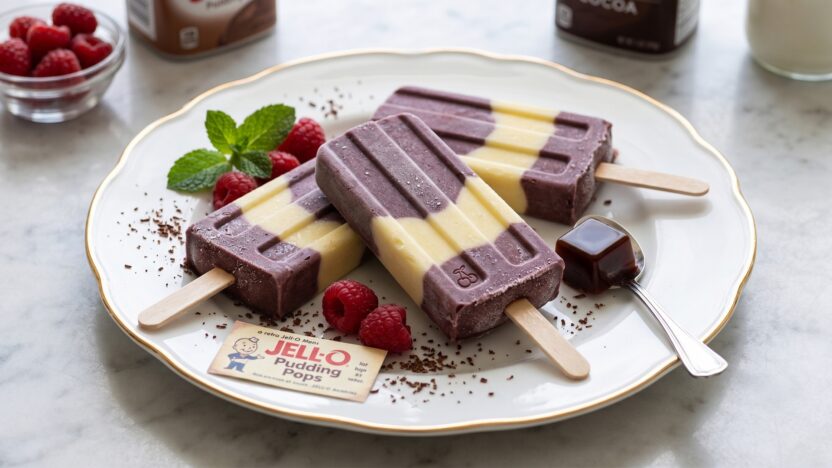
Summer heat calls for refreshing snacks that bring a smile to everyone’s face. Whether you are hosting a backyard barbecue or a simple family gathering, Jello Pudding Pops offer the perfect solution for a cool, creamy treat.

These frozen delights are incredibly easy to prepare using basic pantry staples. You can transform simple ingredients into sophisticated desserts that appeal to both children and adults alike. The process is straightforward, allowing you to spend less time in the kitchen and more time enjoying the sunshine.
We encourage you to experiment with various flavor profiles and textures to create your own signature version. With just a few creative tweaks, you can turn a classic snack into a memorable highlight of any event. Let’s dive into these simple ideas to elevate your dessert game this season.
Key Takeaways
- Frozen treats are ideal for beating the summer heat at any gathering.
- Preparation is simple and requires only basic pantry ingredients.
- These snacks are versatile enough to please both kids and adults.
- Home cooks can easily customize flavors to suit any personal preference.
- Creative additions can turn a standard recipe into a sophisticated dessert.
Essential Ingredients and Equipment for Homemade Jello Pudding Pops
Building the perfect frozen dessert requires a few foundational elements and tools. When you prepare your kitchen for this fun project, you ensure that every batch turns out smooth, creamy, and delicious. Focusing on quality jello pudding pops ingredients is the secret to achieving that professional taste at home.
Selecting the Right Pudding Mixes
The base of your treat starts with the pudding mix itself. You should choose high-quality instant pudding brands that offer a strong flavor profile, as freezing can slightly dull the intensity of the taste. Consistency is key, so ensure you follow the package instructions for the initial mix to guarantee the right set.
Consider these popular flavor options for your homemade jello pudding pops:
- Classic Chocolate Fudge for a rich, deep cocoa experience.
- Creamy Vanilla Bean for a versatile and smooth base.
- Butterscotch or Pistachio for unique, crowd-pleasing variations.
Choosing Your Dairy Base
The liquid you choose significantly impacts the mouthfeel of your jello pudding popsicles. While standard milk works well, you can elevate the texture by experimenting with different dairy options. Using a combination of milk and heavy cream creates a decadent, ice-cream-like quality that melts slowly on the tongue.
If you have dietary restrictions, you can easily swap traditional dairy for plant-based alternatives. Almond, oat, or coconut milk provide excellent results, though they may slightly alter the final flavor profile. Always aim for a higher fat content to ensure your pops remain creamy rather than icy.
Must-Have Tools for Perfect Popsicles
To achieve professional-looking results, you need the right gear in your kitchen. Investing in a high-quality mold is the most important step for any homemade jello pudding pops enthusiast. Silicone molds are particularly helpful because they allow you to remove the treats without damaging their shape.
Beyond the molds, keep these essential items on your counter:
- Sturdy popsicle sticks: Choose wooden or reusable plastic sticks that won’t bend under the weight of the pudding.
- Whisk: A balloon whisk is necessary to remove all lumps from your jello pudding pops ingredients.
- Mixing bowls: Use glass or stainless steel bowls to keep your mixture chilled during the preparation process.
By gathering these supplies, you set yourself up for success. Whether you are making jello pudding popsicles for a summer party or a simple family snack, having the right tools makes the process enjoyable and efficient.
Mastering the Basic Jello Pudding Pops Recipe
If you want to learn how to make jello pudding pops that taste like childhood, you have come to the right place. Mastering the core technique is vital for ensuring your frozen treats have the perfect texture and flavor profile every single time.
Preparing the Pudding Mixture
The secret to a great dessert starts with a smooth base. Begin by whisking your pudding mix and cold milk together in a large bowl until the powder is completely dissolved.
You should whisk for at least two minutes to ensure no lumps remain. This step is essential for a consistent, velvety mouthfeel in your final jello pudding pops recipe.
Achieving the Ideal Consistency
To get that signature creamy bite, you must balance your dairy base correctly. If the mixture is too thin, your pops will turn out icy rather than smooth.
Aim for a thick, pourable consistency before you transfer the liquid into your molds. When you use jello instant pudding pops as your base, the mixture should coat the back of a spoon easily.
Tips for Avoiding Air Bubbles
Nobody likes finding large air pockets in their frozen desserts. To prevent this, gently tap your filled molds against the counter several times before inserting the sticks.
This simple action forces trapped air to rise to the surface. By removing these bubbles, you ensure a uniform and aesthetically pleasing final product that looks just as good as it tastes.
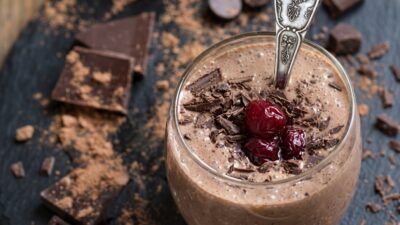
Classic Chocolate Fudge Pudding Pops
If you are looking for the ultimate crowd-pleaser, look no further than the classic chocolate fudge pudding pop. This timeless treat remains a staple among various jello pudding pop flavors because it offers a rich, velvety experience that satisfies any sweet tooth. By starting with a high-quality base, you can easily elevate this simple dessert into something truly extraordinary.

Enhancing the Cocoa Flavor
To achieve a deeper, more intense chocolate profile, consider adding a tablespoon of high-quality Dutch-processed cocoa powder to your mixture. This small adjustment creates a bold and sophisticated taste that stands out from standard store-bought versions. You might also stir in a small amount of melted dark chocolate to provide a luxurious, silky mouthfeel that lingers on the palate.
Adding Texture with Chocolate Chips
Texture plays a vital role in making your dessert memorable. Folding in a handful of mini chocolate chips just before pouring the mixture into molds adds a delightful crunch in every bite. Using mini chips ensures they distribute evenly throughout the pop, preventing them from sinking to the bottom during the cooling process.
Freezing and Unmolding Techniques
Patience is essential when preparing frozen jello pudding pops for your guests. Allow your molds to sit in the freezer for at least six hours, though overnight is ideal for the best structural integrity. When you are ready to serve, briefly run the outside of the mold under warm water for about ten seconds.
This simple trick helps the pops slide out effortlessly without losing their shape or breaking. Gently pull on the sticks, and your perfectly formed, decadent chocolate treats will be ready to enjoy immediately.
Creamy Vanilla Bean and Cookie Crunch Pops
If you are looking for refined jello pudding pop flavors, this vanilla bean and cookie recipe is a must-try. It perfectly balances a luxurious, velvety base with the satisfying snap of your favorite sandwich cookies. This combination elevates a simple frozen treat into a sophisticated dessert that feels like a gourmet indulgence.
Infusing Vanilla Flavor
To achieve a deep, aromatic profile, skip the imitation extracts. Instead, reach for high-quality vanilla bean paste or pure Madagascar vanilla extract. The paste is particularly effective because it adds those beautiful, tiny black specks that signal a premium, authentic flavor.
Whisk the vanilla directly into your dairy base before heating. This ensures the essence permeates every drop of the mixture, creating a rich foundation that stands out among other jello pudding pop flavors.

Incorporating Cookie Crumbles
The biggest challenge with adding cookies to frozen treats is preventing them from becoming soggy. To keep your cookie bits delightfully crunchy, try tossing them in a tiny amount of melted coconut oil before folding them into the pudding. This creates a moisture barrier that protects the texture during the freezing process.
Wait until your pudding mixture has cooled to room temperature before adding the crumbles. If the mixture is too warm, the cookies will absorb the liquid too quickly and lose their bite. Gently fold them in at the very last second to maintain their structural integrity.
Layering for Visual Appeal
You can create a stunning, professional look by layering your pops. Start by pouring a small amount of plain vanilla pudding into the mold, then add a layer of cookie crumbles. Repeat this process until the mold is full, using a thin skewer to gently swirl the layers if you prefer a marbled effect.
This technique ensures that every bite contains a perfect balance of creamy pudding and crunchy cookie. It is a simple way to make your homemade treats look like they came straight from a high-end bakery. Visual presentation is just as important as taste when serving these to guests.
Refreshing Strawberry Cheesecake Pudding Pops
Elevate your dessert game with the vibrant flavors of strawberry cheesecake in a convenient popsicle form. These frozen jello pudding pops offer a bright and refreshing twist that is perfect for warm weather occasions. They combine the comfort of a classic dessert with the cooling sensation of a summer treat.
Blending Fresh Fruit Puree
To achieve the best results, start by selecting ripe, sweet strawberries. Blending them into a smooth puree ensures a vibrant color and an authentic fruit flavor in every bite. You can strain the mixture if you prefer a silky texture without any seeds.

Creating the Cheesecake Base
The secret to a great cheesecake profile lies in the cream cheese. Incorporate softened cream cheese into your pudding base to replicate that signature, rich mouthfeel. Using a whisk or a blender helps ensure the cheese is fully integrated, resulting in perfectly smooth frozen jello pudding pops every time.
Balancing Sweet and Tangy Notes
Achieving the right flavor profile requires a careful balance between the sweetness of the fruit and the slight acidity of the cheese. You might consider adding a small splash of lemon juice to brighten the mixture. This simple step creates a harmonious dessert that keeps your guests coming back for more of these delicious frozen jello pudding pops.
Decadent Peanut Butter and Banana Swirl Pops
Elevate your dessert game with the rich, creamy profile of peanut butter and banana swirl pops. This classic flavor pairing transforms simple frozen jello pudding pops into a sophisticated treat that everyone will love. By balancing salty and sweet notes, you create a snack that feels truly indulgent.

Mixing Creamy Peanut Butter
To achieve a smooth base, start by whisking your peanut butter with a small amount of warm milk before adding it to the pudding mixture. This essential step prevents clumping and ensures the peanut flavor distributes evenly. You want a silky consistency that coats the back of a spoon perfectly.
Adding Fresh Banana Elements
For the best results, mash your bananas until they are nearly liquid to avoid large, icy chunks. You can also fold in tiny, diced pieces if you prefer a bit of texture in your frozen jello pudding pops. Always use ripe bananas to ensure the natural sweetness shines through the creamy base.
Swirling Techniques for Professional Results
Creating that beautiful, marbled look is easier than it appears. Simply pour your plain pudding base into the molds, then add a spoonful of your peanut butter and banana mixture. Use a thin skewer or a butter knife to gently swirl the colors together in a figure-eight motion.
Be careful not to over-mix, or you will lose the distinct layers that make these pops look so professional. A few light passes are all you need to achieve a stunning, bakery-style finish. Once swirled, freeze them completely to lock in that delicious, marbled aesthetic.
Zesty Lemon Cream Pudding Pops
Lemon cream pudding pops offer a vibrant, citrus-forward twist on the classic frozen dessert experience. These treats provide an invigorating flavor profile that stands out from traditional chocolate or vanilla options. When gathering your jello pudding pops ingredients, focus on high-quality citrus to ensure the best results.
Using Citrus Zest for Brightness
The secret to a truly aromatic pop lies in the zest rather than just the juice. Freshly grated lemon peel contains essential oils that provide a bright, sunny quality to your mixture. By using only the yellow part of the skin, you avoid the bitter white pith that can ruin the flavor.
Adjusting Sugar Levels for Tartness
Balancing the sharp acidity of fresh lemon juice with the sweetness of the pudding base is essential. You may need to slightly increase your sweetener if the lemons are particularly tart. Always taste your mixture before freezing to ensure the jello pudding pops ingredients are perfectly harmonized for your palate.
Pairing with Shortbread Crust Bits
To mimic the experience of eating a classic lemon tart, consider adding small pieces of buttery shortbread. These bits provide a delightful, crumbly texture that contrasts beautifully with the smooth, creamy pudding. Simply fold the cookie pieces into the mixture just before pouring it into your molds.
| Ingredient Type | Purpose | Flavor Impact |
|---|---|---|
| Lemon Zest | Aroma | Bright and Floral |
| Pudding Base | Creaminess | Sweet and Velvety |
| Shortbread Bits | Texture | Buttery and Crunchy |
| Lemon Juice | Tartness | Sharp and Refreshing |
Creative Customization and Flavor Variations
You can transform your kitchen into a gourmet dessert lab by customizing your favorite frozen snacks. Once you have mastered the foundational techniques, it is time to let your culinary imagination run wild with unique flavor combinations. Whether you are making homemade jello pudding pops for a party or a quiet night in, these small tweaks make a big difference.
Experimenting with Extracts and Spices
Adding a splash of extract can completely change the profile of your jello instant pudding pops. A drop of almond extract adds a sophisticated, nutty depth, while peppermint extract provides a refreshing, cool finish. You might also consider stirring in a pinch of ground cinnamon or nutmeg to create a warm, comforting spice blend that surprises your guests.
Adding Nutty Toppings and Drizzles
Presentation is key when you want to impress your friends and family. After unmolding your treats, try dipping the tops into melted chocolate or a caramel drizzle for a decadent touch. You can also roll the edges in crushed walnuts, pecans, or toasted almonds to add a satisfying crunch that contrasts beautifully with the creamy center.
Healthy Substitutions for Dietary Needs
Adjusting your recipes to fit specific dietary preferences is easier than you might think. You can swap traditional dairy for almond milk or soy milk to create a lighter, dairy-free version of your favorite homemade jello pudding pops. For a protein-packed boost, try whisking in Greek yogurt, which adds a pleasant tang and a luxuriously creamy texture to your jello instant pudding pops. These simple swaps ensure that everyone can enjoy a delicious, chilled treat regardless of their nutritional goals.
Troubleshooting Common Pudding Pop Challenges
Even the most skilled home cooks occasionally run into trouble when preparing frozen treats. Whether you are a beginner or a pro, crafting Jello Pudding Pops can sometimes lead to minor kitchen mishaps. Fortunately, most of these issues are easy to fix with a few simple adjustments.
Fixing Icy Textures
If your dessert feels too icy rather than creamy, the culprit is usually the water content. To achieve a smoother mouthfeel, you should increase the fat content of your base. Try substituting a portion of the milk with heavy cream or full-fat Greek yogurt.
You can also adjust your sugar ratios to improve the texture. Sugar acts as an antifreeze, which helps prevent large ice crystals from forming. If your mixture is too lean, it will freeze into a hard block instead of a smooth, scoopable treat.
Solving Unmolding Difficulties
Struggling to get your jello pudding popsicles out of the mold is a common frustration. The best way to release them is to dip the mold into a bowl of warm water for about ten to fifteen seconds. Be careful not to use hot water, as this will melt the exterior too quickly.
If the pops still refuse to budge, try these quick tips:
- Run the mold under lukewarm tap water for a few extra seconds.
- Gently twist the stick to break the vacuum seal.
- Let the mold sit at room temperature for one minute before pulling.
Storage Tips for Long-Lasting Freshness
Proper storage is essential to keep your Jello Pudding Pops tasting fresh for weeks. Once the pops are fully frozen, remove them from the molds and wrap each one individually in plastic wrap. This prevents freezer burn and keeps them from absorbing other odors in your freezer.
For the best results, store your wrapped pops in an airtight container or a heavy-duty freezer bag. Keeping them in the back of the freezer, away from the door, ensures a consistent temperature. Follow this quick guide to maintain quality:
| Storage Method | Benefit | Duration |
|---|---|---|
| Plastic Wrap | Prevents freezer burn | Up to 2 weeks |
| Airtight Container | Blocks odors | Up to 4 weeks |
| Freezer Bag | Saves space | Up to 3 weeks |
Conclusion
Mastering the art of frozen desserts turns your kitchen into a personal ice cream parlor. You now possess the skills to craft professional treats using a reliable jello pudding pops recipe that delights guests of all ages.
Experimenting with fresh ingredients and bold flavor combinations makes every batch unique. Understanding how to make jello pudding pops allows you to adjust sweetness and texture to suit your specific preferences. These small adjustments lead to big rewards when you serve your chilled masterpieces.
Gather your favorite Jell-O mixes and high-quality dairy to begin your next culinary project. Sharing these homemade snacks creates lasting memories with your friends and family during warm afternoons. Grab your popsicle molds and start your journey toward becoming a home dessert expert today.
Summer heat calls for refreshing snacks that bring a smile to everyone’s face. Whether you are hosting a backyard barbecue or a simple family gathering, Jello Pudding Pops offer the perfect solution for a cool, creamy treat.
These frozen delights are incredibly easy to prepare using basic pantry staples. You can transform simple ingredients into sophisticated desserts that appeal to both children and adults alike. The process is straightforward, allowing you to spend less time in the kitchen and more time enjoying the sunshine.
We encourage you to experiment with various flavor profiles and textures to create your own signature version. With just a few creative tweaks, you can turn a classic snack into a memorable highlight of any event. Let’s dive into these simple ideas to elevate your dessert game this season.
Key Takeaways
- Frozen treats are ideal for beating the summer heat at any gathering.
- Preparation is simple and requires only basic pantry ingredients.
- These snacks are versatile enough to please both kids and adults.
- Home cooks can easily customize flavors to suit any personal preference.
- Creative additions can turn a standard recipe into a sophisticated dessert.
Essential Ingredients and Equipment for Homemade Jello Pudding Pops
Building the perfect frozen dessert requires a few foundational elements and tools. When you prepare your kitchen for this fun project, you ensure that every batch turns out smooth, creamy, and delicious. Focusing on quality jello pudding pops ingredients is the secret to achieving that professional taste at home.
Selecting the Right Pudding Mixes
The base of your treat starts with the pudding mix itself. You should choose high-quality instant pudding brands that offer a strong flavor profile, as freezing can slightly dull the intensity of the taste. Consistency is key, so ensure you follow the package instructions for the initial mix to guarantee the right set.
Consider these popular flavor options for your homemade jello pudding pops:
- Classic Chocolate Fudge for a rich, deep cocoa experience.
- Creamy Vanilla Bean for a versatile and smooth base.
- Butterscotch or Pistachio for unique, crowd-pleasing variations.
Choosing Your Dairy Base
The liquid you choose significantly impacts the mouthfeel of your jello pudding popsicles. While standard milk works well, you can elevate the texture by experimenting with different dairy options. Using a combination of milk and heavy cream creates a decadent, ice-cream-like quality that melts slowly on the tongue.
If you have dietary restrictions, you can easily swap traditional dairy for plant-based alternatives. Almond, oat, or coconut milk provide excellent results, though they may slightly alter the final flavor profile. Always aim for a higher fat content to ensure your pops remain creamy rather than icy.
Must-Have Tools for Perfect Popsicles
To achieve professional-looking results, you need the right gear in your kitchen. Investing in a high-quality mold is the most important step for any homemade jello pudding pops enthusiast. Silicone molds are particularly helpful because they allow you to remove the treats without damaging their shape.
Beyond the molds, keep these essential items on your counter:
- Sturdy popsicle sticks: Choose wooden or reusable plastic sticks that won’t bend under the weight of the pudding.
- Whisk: A balloon whisk is necessary to remove all lumps from your jello pudding pops ingredients.
- Mixing bowls: Use glass or stainless steel bowls to keep your mixture chilled during the preparation process.
By gathering these supplies, you set yourself up for success. Whether you are making jello pudding popsicles for a summer party or a simple family snack, having the right tools makes the process enjoyable and efficient.
Mastering the Basic Jello Pudding Pops Recipe
If you want to learn how to make jello pudding pops that taste like childhood, you have come to the right place. Mastering the core technique is vital for ensuring your frozen treats have the perfect texture and flavor profile every single time.
Preparing the Pudding Mixture
The secret to a great dessert starts with a smooth base. Begin by whisking your pudding mix and cold milk together in a large bowl until the powder is completely dissolved.
You should whisk for at least two minutes to ensure no lumps remain. This step is essential for a consistent, velvety mouthfeel in your final jello pudding pops recipe.
Achieving the Ideal Consistency
To get that signature creamy bite, you must balance your dairy base correctly. If the mixture is too thin, your pops will turn out icy rather than smooth.
Aim for a thick, pourable consistency before you transfer the liquid into your molds. When you use jello instant pudding pops as your base, the mixture should coat the back of a spoon easily.
Tips for Avoiding Air Bubbles
Nobody likes finding large air pockets in their frozen desserts. To prevent this, gently tap your filled molds against the counter several times before inserting the sticks.
This simple action forces trapped air to rise to the surface. By removing these bubbles, you ensure a uniform and aesthetically pleasing final product that looks just as good as it tastes.
Classic Chocolate Fudge Pudding Pops
If you are looking for the ultimate crowd-pleaser, look no further than the classic chocolate fudge pudding pop. This timeless treat remains a staple among various jello pudding pop flavors because it offers a rich, velvety experience that satisfies any sweet tooth. By starting with a high-quality base, you can easily elevate this simple dessert into something truly extraordinary.
Enhancing the Cocoa Flavor
To achieve a deeper, more intense chocolate profile, consider adding a tablespoon of high-quality Dutch-processed cocoa powder to your mixture. This small adjustment creates a bold and sophisticated taste that stands out from standard store-bought versions. You might also stir in a small amount of melted dark chocolate to provide a luxurious, silky mouthfeel that lingers on the palate.
Adding Texture with Chocolate Chips
Texture plays a vital role in making your dessert memorable. Folding in a handful of mini chocolate chips just before pouring the mixture into molds adds a delightful crunch in every bite. Using mini chips ensures they distribute evenly throughout the pop, preventing them from sinking to the bottom during the cooling process.
Freezing and Unmolding Techniques
Patience is essential when preparing frozen jello pudding pops for your guests. Allow your molds to sit in the freezer for at least six hours, though overnight is ideal for the best structural integrity. When you are ready to serve, briefly run the outside of the mold under warm water for about ten seconds.
This simple trick helps the pops slide out effortlessly without losing their shape or breaking. Gently pull on the sticks, and your perfectly formed, decadent chocolate treats will be ready to enjoy immediately.
Creamy Vanilla Bean and Cookie Crunch Pops
If you are looking for refined jello pudding pop flavors, this vanilla bean and cookie recipe is a must-try. It perfectly balances a luxurious, velvety base with the satisfying snap of your favorite sandwich cookies. This combination elevates a simple frozen treat into a sophisticated dessert that feels like a gourmet indulgence.
Infusing Vanilla Flavor
To achieve a deep, aromatic profile, skip the imitation extracts. Instead, reach for high-quality vanilla bean paste or pure Madagascar vanilla extract. The paste is particularly effective because it adds those beautiful, tiny black specks that signal a premium, authentic flavor.
Whisk the vanilla directly into your dairy base before heating. This ensures the essence permeates every drop of the mixture, creating a rich foundation that stands out among other jello pudding pop flavors.
Incorporating Cookie Crumbles
The biggest challenge with adding cookies to frozen treats is preventing them from becoming soggy. To keep your cookie bits delightfully crunchy, try tossing them in a tiny amount of melted coconut oil before folding them into the pudding. This creates a moisture barrier that protects the texture during the freezing process.
Wait until your pudding mixture has cooled to room temperature before adding the crumbles. If the mixture is too warm, the cookies will absorb the liquid too quickly and lose their bite. Gently fold them in at the very last second to maintain their structural integrity.
Layering for Visual Appeal
You can create a stunning, professional look by layering your pops. Start by pouring a small amount of plain vanilla pudding into the mold, then add a layer of cookie crumbles. Repeat this process until the mold is full, using a thin skewer to gently swirl the layers if you prefer a marbled effect.
This technique ensures that every bite contains a perfect balance of creamy pudding and crunchy cookie. It is a simple way to make your homemade treats look like they came straight from a high-end bakery. Visual presentation is just as important as taste when serving these to guests.
Refreshing Strawberry Cheesecake Pudding Pops
Elevate your dessert game with the vibrant flavors of strawberry cheesecake in a convenient popsicle form. These frozen jello pudding pops offer a bright and refreshing twist that is perfect for warm weather occasions. They combine the comfort of a classic dessert with the cooling sensation of a summer treat.
Blending Fresh Fruit Puree
To achieve the best results, start by selecting ripe, sweet strawberries. Blending them into a smooth puree ensures a vibrant color and an authentic fruit flavor in every bite. You can strain the mixture if you prefer a silky texture without any seeds.
Creating the Cheesecake Base
The secret to a great cheesecake profile lies in the cream cheese. Incorporate softened cream cheese into your pudding base to replicate that signature, rich mouthfeel. Using a whisk or a blender helps ensure the cheese is fully integrated, resulting in perfectly smooth frozen jello pudding pops every time.
Balancing Sweet and Tangy Notes
Achieving the right flavor profile requires a careful balance between the sweetness of the fruit and the slight acidity of the cheese. You might consider adding a small splash of lemon juice to brighten the mixture. This simple step creates a harmonious dessert that keeps your guests coming back for more of these delicious frozen jello pudding pops.
Decadent Peanut Butter and Banana Swirl Pops
Elevate your dessert game with the rich, creamy profile of peanut butter and banana swirl pops. This classic flavor pairing transforms simple frozen jello pudding pops into a sophisticated treat that everyone will love. By balancing salty and sweet notes, you create a snack that feels truly indulgent.
Mixing Creamy Peanut Butter
To achieve a smooth base, start by whisking your peanut butter with a small amount of warm milk before adding it to the pudding mixture. This essential step prevents clumping and ensures the peanut flavor distributes evenly. You want a silky consistency that coats the back of a spoon perfectly.
Adding Fresh Banana Elements
For the best results, mash your bananas until they are nearly liquid to avoid large, icy chunks. You can also fold in tiny, diced pieces if you prefer a bit of texture in your frozen jello pudding pops. Always use ripe bananas to ensure the natural sweetness shines through the creamy base.
Swirling Techniques for Professional Results
Creating that beautiful, marbled look is easier than it appears. Simply pour your plain pudding base into the molds, then add a spoonful of your peanut butter and banana mixture. Use a thin skewer or a butter knife to gently swirl the colors together in a figure-eight motion.
Be careful not to over-mix, or you will lose the distinct layers that make these pops look so professional. A few light passes are all you need to achieve a stunning, bakery-style finish. Once swirled, freeze them completely to lock in that delicious, marbled aesthetic.
Zesty Lemon Cream Pudding Pops
Lemon cream pudding pops offer a vibrant, citrus-forward twist on the classic frozen dessert experience. These treats provide an invigorating flavor profile that stands out from traditional chocolate or vanilla options. When gathering your jello pudding pops ingredients, focus on high-quality citrus to ensure the best results.
Using Citrus Zest for Brightness
The secret to a truly aromatic pop lies in the zest rather than just the juice. Freshly grated lemon peel contains essential oils that provide a bright, sunny quality to your mixture. By using only the yellow part of the skin, you avoid the bitter white pith that can ruin the flavor.
Adjusting Sugar Levels for Tartness
Balancing the sharp acidity of fresh lemon juice with the sweetness of the pudding base is essential. You may need to slightly increase your sweetener if the lemons are particularly tart. Always taste your mixture before freezing to ensure the jello pudding pops ingredients are perfectly harmonized for your palate.
Pairing with Shortbread Crust Bits
To mimic the experience of eating a classic lemon tart, consider adding small pieces of buttery shortbread. These bits provide a delightful, crumbly texture that contrasts beautifully with the smooth, creamy pudding. Simply fold the cookie pieces into the mixture just before pouring it into your molds.
| Ingredient Type | Purpose | Flavor Impact |
|---|---|---|
| Lemon Zest | Aroma | Bright and Floral |
| Pudding Base | Creaminess | Sweet and Velvety |
| Shortbread Bits | Texture | Buttery and Crunchy |
| Lemon Juice | Tartness | Sharp and Refreshing |
Creative Customization and Flavor Variations
You can transform your kitchen into a gourmet dessert lab by customizing your favorite frozen snacks. Once you have mastered the foundational techniques, it is time to let your culinary imagination run wild with unique flavor combinations. Whether you are making homemade jello pudding pops for a party or a quiet night in, these small tweaks make a big difference.
Experimenting with Extracts and Spices
Adding a splash of extract can completely change the profile of your jello instant pudding pops. A drop of almond extract adds a sophisticated, nutty depth, while peppermint extract provides a refreshing, cool finish. You might also consider stirring in a pinch of ground cinnamon or nutmeg to create a warm, comforting spice blend that surprises your guests.
Adding Nutty Toppings and Drizzles
Presentation is key when you want to impress your friends and family. After unmolding your treats, try dipping the tops into melted chocolate or a caramel drizzle for a decadent touch. You can also roll the edges in crushed walnuts, pecans, or toasted almonds to add a satisfying crunch that contrasts beautifully with the creamy center.
Healthy Substitutions for Dietary Needs
Adjusting your recipes to fit specific dietary preferences is easier than you might think. You can swap traditional dairy for almond milk or soy milk to create a lighter, dairy-free version of your favorite homemade jello pudding pops. For a protein-packed boost, try whisking in Greek yogurt, which adds a pleasant tang and a luxuriously creamy texture to your jello instant pudding pops. These simple swaps ensure that everyone can enjoy a delicious, chilled treat regardless of their nutritional goals.
Troubleshooting Common Pudding Pop Challenges
Even the most skilled home cooks occasionally run into trouble when preparing frozen treats. Whether you are a beginner or a pro, crafting Jello Pudding Pops can sometimes lead to minor kitchen mishaps. Fortunately, most of these issues are easy to fix with a few simple adjustments.
Fixing Icy Textures
If your dessert feels too icy rather than creamy, the culprit is usually the water content. To achieve a smoother mouthfeel, you should increase the fat content of your base. Try substituting a portion of the milk with heavy cream or full-fat Greek yogurt.
You can also adjust your sugar ratios to improve the texture. Sugar acts as an antifreeze, which helps prevent large ice crystals from forming. If your mixture is too lean, it will freeze into a hard block instead of a smooth, scoopable treat.
Solving Unmolding Difficulties
Struggling to get your jello pudding popsicles out of the mold is a common frustration. The best way to release them is to dip the mold into a bowl of warm water for about ten to fifteen seconds. Be careful not to use hot water, as this will melt the exterior too quickly.
If the pops still refuse to budge, try these quick tips:
- Run the mold under lukewarm tap water for a few extra seconds.
- Gently twist the stick to break the vacuum seal.
- Let the mold sit at room temperature for one minute before pulling.
Storage Tips for Long-Lasting Freshness
Proper storage is essential to keep your Jello Pudding Pops tasting fresh for weeks. Once the pops are fully frozen, remove them from the molds and wrap each one individually in plastic wrap. This prevents freezer burn and keeps them from absorbing other odors in your freezer.
For the best results, store your wrapped pops in an airtight container or a heavy-duty freezer bag. Keeping them in the back of the freezer, away from the door, ensures a consistent temperature. Follow this quick guide to maintain quality:
| Storage Method | Benefit | Duration |
|---|---|---|
| Plastic Wrap | Prevents freezer burn | Up to 2 weeks |
| Airtight Container | Blocks odors | Up to 4 weeks |
| Freezer Bag | Saves space | Up to 3 weeks |
Conclusion
Mastering the art of frozen desserts turns your kitchen into a personal ice cream parlor. You now possess the skills to craft professional treats using a reliable jello pudding pops recipe that delights guests of all ages.
Experimenting with fresh ingredients and bold flavor combinations makes every batch unique. Understanding how to make jello pudding pops allows you to adjust sweetness and texture to suit your specific preferences. These small adjustments lead to big rewards when you serve your chilled masterpieces.
Gather your favorite Jell-O mixes and high-quality dairy to begin your next culinary project. Sharing these homemade snacks creates lasting memories with your friends and family during warm afternoons. Grab your popsicle molds and start your journey toward becoming a home dessert expert today.