Introduction
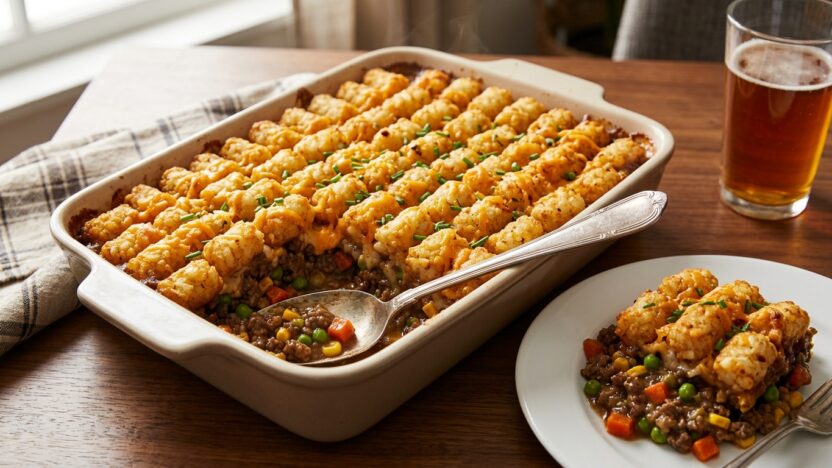
Picture a deep, savory filling bubbling away under a blanket of golden, crispy tater tots — each one perfectly browned and crunchy on top while staying soft and pillowy underneath. That’s exactly what tater tot shepherd’s pie delivers, and the moment you pull it from the oven, you’ll understand why this dish has quietly become one of the most beloved comfort food mashups in American home cooking.
This recipe takes everything you love about classic shepherd’s pie — a rich, hearty meat and vegetable filling — and swaps the traditional mashed potato topping for something genuinely unexpected: crispy frozen tater tots. Surprisingly, the result shouldn’t work as well as it does, yet it absolutely does. Once you taste that contrast between the savory filling and crunchy potato topping, you’ll wonder why anyone bothers with plain mashed potatoes at all.
The challenge most home cooks run into with this dish is texture control — filling that’s too watery, tater tots that turn soggy instead of crispy, or a casserole that falls apart the moment you try to serve it. Fortunately, this guide solves every one of those problems. You’ll learn the exact technique for building a filling with the right consistency, how to get genuinely crispy tater tots even when they’re sitting on top of a moist filling, and six completely different flavor directions that keep this dish exciting every single time you make it.
Whether you’re feeding a hungry family on a weeknight, meal prepping for the week ahead, or just craving the kind of dinner that makes the whole house smell incredible, this guide has everything you need to make tater tot shepherd’s pie that genuinely earns its spot in your regular rotation.
Key Takeaways
- Tater tot shepherd’s pie combines a savory meat and vegetable filling with a crispy tater tot topping for the ultimate comfort food mashup
- Thickening the filling properly before adding tater tots is the single most important step for avoiding a watery, soggy casserole
- Baking uncovered at 400°F gives tater tots the best chance at turning genuinely crispy and golden
- Browning your ground meat thoroughly and draining excess fat prevents a greasy filling underneath the topping
- All six recipes use accessible, beginner-friendly ingredients and come together in under an hour total
- This casserole reheats beautifully, though tater tots are always crispiest the day they’re baked
What You’ll Need
Choosing the Right Ground Meat
Ground Beef vs. Ground Lamb vs. Alternatives
Traditional shepherd’s pie is made with ground lamb, while the closely related cottage pie uses ground beef. For this American comfort food take, ground beef is the most commonly used and widely accessible option, though ground lamb delivers a more traditional, slightly richer flavor if you can find it. Additionally, ground turkey works beautifully as a leaner alternative, and plant-based ground “meat” substitutes work well in the vegetarian variation included in this guide.
Whichever protein you choose, browning it thoroughly and draining excess fat before building your filling is essential — fatty, greasy filling underneath a layer of tater tots creates a heavy, oily final dish rather than a clean, savory one.
The Tater Tot Factor
Frozen tater tots are the star of the topping, and not all brands behave identically. Some brands are slightly smaller and crisp more evenly; others are larger and take a few extra minutes in the oven. Regardless of brand, the key technique stays the same: don’t thaw them first. When frozen tater tots are placed directly onto a warm filling and baked at high heat, they develop the best crispy exterior. Thawed tater tots, by contrast, tend to turn mushy rather than crisp.
Core Ingredients Used Across All Six Recipes
- Ground beef, turkey, or lamb — 1.5 lbs per recipe, the foundation of the filling
- Frozen tater tots — one standard 28–32 oz bag covers a 9×13-inch casserole generously
- Yellow onion and garlic — essential aromatics for a flavorful filling base
- Frozen mixed vegetables — peas, carrots, and corn are classic; thaw before adding
- Beef broth or stock — for building the gravy-like base of the filling
- Tomato paste — adds depth, color, and a subtle richness to the filling
- Worcestershire sauce — a small amount adds significant savory depth
- Flour or cornstarch — for thickening the filling to the right consistency
- Shredded cheddar cheese — optional but extremely popular as a layer under the tots
Equipment
- 9×13-inch baking dish
- Large skillet or Dutch oven for the filling
- Wooden spoon or spatula
- Measuring cups and spoons
- Aluminum foil (for covering during part of the bake, if needed)
Step-by-Step Guide: How to Build the Perfect Tater Tot Shepherd’s Pie
Step 1 — Brown Your Meat Thoroughly
Start by heating a large skillet or Dutch oven over medium-high heat. Then add your ground meat and break it apart with a wooden spoon as it cooks. Brown thoroughly — about 6–8 minutes — until no pink remains and the meat has developed some genuine color and texture, not just turned grey. Browning properly develops flavor through caramelization, which is the foundation of a deeply savory filling.
Once browned, drain excess fat from the meat. If there’s a significant amount of grease in the pan (more than 2–3 tablespoons), spoon it out before continuing. Otherwise, excess fat left in the pan makes for a greasy, heavy filling that sits poorly under a crispy tater tot topping.
Step 2 — Build Your Aromatic Base
Next, add diced onion directly to the pan with the browned meat (or push the meat to one side and sauté the onion separately if you prefer more control). Cook for 4–5 minutes until the onion softens and turns translucent. Afterward, add minced garlic and cook for 1 more minute until fragrant.
This aromatic base is where a huge amount of the dish’s flavor comes from. Therefore, don’t rush this step — properly softened onion and fragrant garlic create a foundation that plain broth and seasoning alone can’t replicate.
Step 3 — Thicken the Filling Properly
This is the step that separates a great tater tot shepherd’s pie from a watery, disappointing one. Sprinkle 2–3 tablespoons of flour directly over the browned meat and onion mixture. Stir constantly for 1 minute — this coats the meat in flour and creates the base for a thickened gravy, similar to making a roux.
Once that’s done, gradually pour in your beef broth, stirring constantly to prevent lumps. Then add tomato paste and Worcestershire sauce. Bring the mixture to a gentle simmer and cook for 5–7 minutes, stirring occasionally, until the filling has thickened to a consistency similar to a thick stew or chili — it should coat the back of a spoon and hold its shape rather than pooling like soup.
In my experience, this thickening step is the one most commonly rushed or skipped entirely, and it’s exactly why so many tater tot casseroles turn out watery. A properly thickened filling holds its structure under the tater tot layer and doesn’t seep up and make the tots soggy from underneath.
Step 4 — Add Vegetables and Season
Now, stir in your thawed frozen mixed vegetables (peas, carrots, corn) directly into the thickened filling. Cook for 2–3 more minutes just to heat the vegetables through — they don’t need long since they’ll continue cooking in the oven. Finally, season with salt, pepper, and any additional herbs your specific recipe calls for. Taste and adjust — the filling should taste rich, savory, and well-seasoned on its own, since it’s the dominant flavor in the entire dish.
Step 5 — Transfer to Baking Dish and Layer Cheese (Optional)
Once seasoned, pour the thickened filling into a greased 9×13-inch baking dish, spreading it into an even layer. If your recipe calls for a cheese layer, sprinkle shredded cheddar evenly across the surface of the filling at this point — before the tater tots go on. As a result, this creates a gooey, cheesy layer between the savory filling and the crispy potato topping that many people consider non-negotiable.
Step 6 — Arrange Tater Tots in an Even Layer
After that, arrange frozen tater tots directly from the freezer in a single, even layer across the entire surface of the filling. Don’t thaw them first — frozen tots crisp up far better than thawed ones, which tend to turn mushy and pale rather than golden and crunchy. Place them close together but not overlapping, covering as much of the surface as possible for even crisping and full coverage in every bite.
Step 7 — Bake Until Golden and Bubbling
Finally, bake uncovered at 400°F for 35–40 minutes, until the tater tots are deeply golden brown and crispy on top, and the filling is visibly bubbling around the edges of the dish. Doneness signs: tots should look crunchy and golden, not pale or soft; filling should be bubbling, not sitting flat and cool-looking at the edges.
If the tots are browning too quickly before the filling is fully heated through, loosely tent the dish with foil for the final 10 minutes. Afterward, let the casserole rest for 5–10 minutes before serving — this allows the filling to set slightly, making it much easier to serve clean portions rather than a sloppy scoop.
Recipe 1: Classic Beef Tater Tot Pie

This is the foundational version — the one that captures everything wonderful about this dish in its purest form. A rich, savory ground beef and vegetable filling thickened into a hearty gravy, topped with a generous layer of crispy golden tater tots. It’s the recipe that started the trend, and it remains the most requested version in households across the country for very good reason.
Ingredients
- 1.5 lbs ground beef
- 1 medium yellow onion, diced
- 3 garlic cloves, minced
- 2½ tablespoons flour
- 1¾ cups beef broth
- 2 tablespoons tomato paste
- 1 tablespoon Worcestershire sauce
- 2 cups frozen mixed vegetables (peas, carrots, corn), thawed
- 1 cup shredded cheddar cheese
- 1 bag (28–32 oz) frozen tater tots
- Salt and cracked black pepper to taste
Instructions
- Preheat oven to 400°F. Grease a 9×13-inch baking dish.
- Brown ground beef in a large skillet over medium-high heat for 6–8 minutes, breaking it apart as it cooks. Then drain excess fat.
- Add diced onion to the beef and cook for 4–5 minutes until softened. Next, add garlic and cook 1 more minute.
- Sprinkle flour over the mixture and stir for 1 minute. Gradually pour in beef broth while stirring, then add tomato paste and Worcestershire sauce. Simmer for 5–7 minutes until thickened to a stew-like consistency.
- Stir in thawed mixed vegetables. Season with salt and pepper, then taste and adjust.
- Transfer filling to the prepared baking dish. Sprinkle shredded cheddar evenly over the top, then arrange frozen tater tots in a single even layer covering the entire surface.
- Bake uncovered for 35–40 minutes until tots are golden and crispy and the filling is bubbling. Rest 5–10 minutes before serving.
In my experience, taking the extra two minutes to properly thicken the filling before it goes into the baking dish makes an enormous difference. Skipping this step is the number one reason people end up with a soupy casserole that makes the tater tots soggy from underneath.
Recipe 2: Cheesy Bacon Ranch Tater Tot Pie
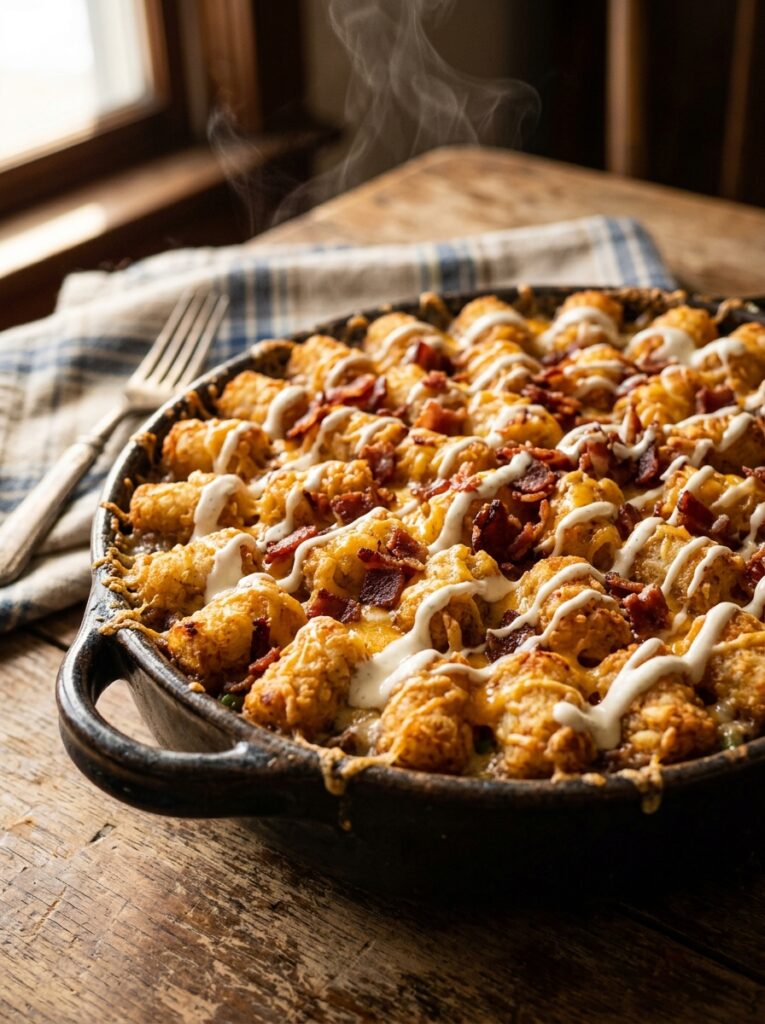
This version takes the classic in a richer, more indulgent direction with crispy bacon, a double layer of melted cheese, and a ranch drizzle that ties everything together. It tastes like a loaded baked potato and a hearty casserole had a delicious collision, and it’s become one of the most requested versions whenever I bring it to a potluck or family dinner.
Ingredients
- 1.5 lbs ground beef
- 1 medium yellow onion, diced
- 3 garlic cloves, minced
- 2½ tablespoons flour
- 1¾ cups beef broth
- 1 tablespoon Worcestershire sauce
- 1 packet ranch seasoning mix, divided
- 6 strips bacon, cooked crisp and chopped, divided
- 1½ cups shredded cheddar cheese, divided
- 1 bag frozen tater tots
- ¼ cup ranch dressing, for drizzling
Instructions
- Preheat oven to 400°F. Grease a 9×13-inch baking dish.
- Brown ground beef for 6–8 minutes, then drain excess fat. Afterward, add onion and cook 4–5 minutes until softened, then add garlic and cook 1 more minute.
- Sprinkle flour over the mixture, stir for 1 minute, then gradually add beef broth while stirring. Add Worcestershire sauce and half the ranch seasoning. Simmer for 5–7 minutes until thickened.
- Stir in half the cooked bacon. Transfer filling to the baking dish.
- Sprinkle 1 cup of cheddar cheese over the filling, then arrange frozen tater tots in an even layer on top. Sprinkle remaining ranch seasoning lightly over the tots.
- Bake uncovered for 35–40 minutes until golden and crispy.
- Remove from oven, immediately top with remaining cheddar and remaining bacon, and drizzle generously with ranch dressing before serving.
Recipe 3: Southwest Beef and Black Bean Pie
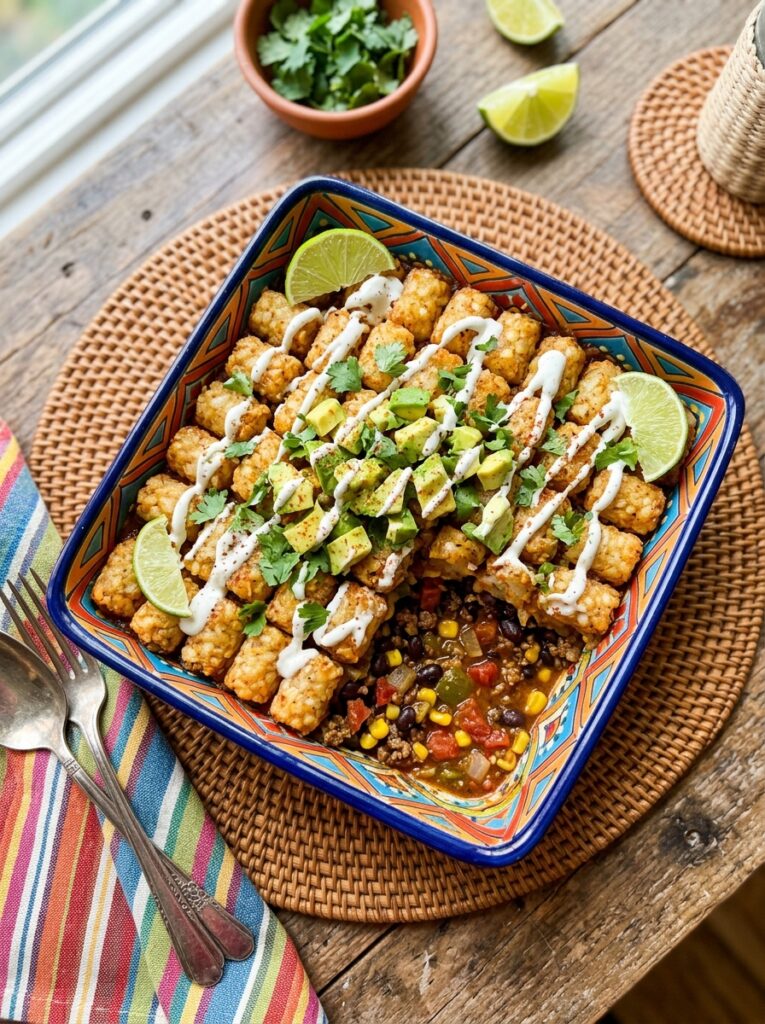
This version swaps traditional gravy-style seasoning for bold Southwest flavors — cumin, chili powder, black beans, and corn — creating a filling that feels distinctly different from the classic while keeping that same satisfying crispy tater tot topping. Furthermore, fresh toppings like avocado and cilantro added after baking give this version a genuinely vibrant, fresh finish.
Ingredients
- 1.5 lbs ground beef
- 1 medium yellow onion, diced
- 3 garlic cloves, minced
- 1 can (15 oz) black beans, drained and rinsed
- 1 cup corn kernels (fresh, frozen, or canned)
- 1 cup beef broth
- ½ cup salsa
- 1 tablespoon chili powder
- 1 teaspoon cumin
- 1½ cups shredded Mexican blend cheese
- 1 bag frozen tater tots
- Avocado, cilantro, and lime crema for topping
Instructions
- Preheat oven to 400°F. Grease a 9×13-inch baking dish.
- Brown ground beef for 6–8 minutes, draining excess fat. Then add onion and cook 4–5 minutes, followed by garlic for 1 more minute.
- Add chili powder and cumin, stirring for 30 seconds until fragrant. Pour in beef broth and salsa, then stir in black beans and corn. Simmer for 6–8 minutes until thickened and well combined.
- Transfer filling to the baking dish. Sprinkle shredded cheese evenly over the surface, then arrange tater tots in a single even layer.
- Bake uncovered for 35–40 minutes until tots are golden and crispy and filling is bubbling.
- Remove from oven and rest 5 minutes. Finally, top with diced avocado, fresh cilantro, and a drizzle of lime crema (sour cream mixed with lime juice and a pinch of salt) before serving.
A helpful trick is to pat your corn and black beans dry with paper towels before adding them to the filling. Otherwise, excess moisture from canned vegetables can thin out an otherwise well-thickened filling, undoing all the work of that careful thickening step.
Recipe 4: Turkey and Mushroom Pie

This lighter, earthier version uses ground turkey and sautéed mushrooms in place of beef, creating a filling that’s deeply savory thanks to the umami richness of the mushrooms, while staying noticeably lighter overall. Additionally, fresh thyme adds a fragrant, herbaceous note that makes this version feel a little more elevated than the others, without sacrificing any of the cozy comfort that makes this dish so satisfying.
Ingredients
- 1.5 lbs ground turkey
- 8 oz cremini mushrooms, sliced
- 1 medium yellow onion, diced
- 3 garlic cloves, minced
- 2½ tablespoons flour
- 1¾ cups chicken or beef broth
- 1 tablespoon Worcestershire sauce
- 1 teaspoon fresh thyme leaves (or ½ teaspoon dried)
- 1 cup frozen peas, thawed
- 1 bag frozen tater tots
- Salt and cracked black pepper to taste
Instructions
- Preheat oven to 400°F. Grease a 9×13-inch baking dish.
- Cook ground turkey in a large skillet over medium-high heat for 6–7 minutes, breaking it apart as it browns. Since turkey releases less fat than beef, draining is usually unnecessary.
- Add sliced mushrooms and diced onion to the pan. Cook for 6–7 minutes until the mushrooms have released their moisture and started to brown, and the onion has softened.
- Next, add garlic and thyme, cooking 1 more minute until fragrant. Sprinkle flour over the mixture and stir for 1 minute.
- Gradually pour in broth while stirring, then add Worcestershire sauce. Simmer for 5–7 minutes until thickened. Afterward, stir in thawed peas and season with salt and pepper.
- Transfer filling to the baking dish and arrange frozen tater tots evenly across the surface.
- Bake uncovered for 35–40 minutes until golden and crispy. Rest 5 minutes, garnish with extra fresh thyme, and serve.
Recipe 5: Loaded Buffalo Chicken Tater Tot Pie

For buffalo wing lovers, this version transforms shredded chicken in a spicy buffalo sauce base into a hearty casserole topped with the same crispy tater tots you know and love. The tangy heat of the buffalo sauce, balanced by a cooling ranch drizzle, makes every bite feel like your favorite wing night flavor reimagined as comfort food dinner.
Ingredients
- 3 cups cooked, shredded chicken (rotisserie works great)
- 1 medium yellow onion, diced
- 3 garlic cloves, minced
- 2 tablespoons butter
- 1 cup chicken broth
- ½ cup buffalo sauce (plus extra for drizzling)
- 4 oz cream cheese, softened
- 1½ cups shredded cheddar or Monterey Jack cheese
- 1 bag frozen tater tots
- ¼ cup ranch dressing and chopped green onion for topping
Instructions
- Preheat oven to 400°F. Grease a 9×13-inch baking dish.
- Melt butter in a large skillet over medium heat. Add diced onion and cook for 4–5 minutes until softened, then add garlic and cook 1 more minute.
- Add chicken broth and buffalo sauce, stirring to combine. Next, add softened cream cheese and whisk until fully melted and smooth, about 2–3 minutes.
- Fold in the shredded chicken until well coated in the buffalo cream sauce. Simmer for 3–4 minutes to heat through and let the sauce thicken slightly.
- Transfer the filling to the baking dish. Sprinkle shredded cheese evenly over the top, then arrange frozen tater tots in a single layer across the surface.
- Bake uncovered for 35–40 minutes until tots are golden and crispy and the filling is bubbling at the edges.
- Remove from oven, drizzle generously with extra buffalo sauce and ranch dressing, and finally top with chopped green onion before serving.
I’ve noticed that whisking the cream cheese into the warm broth mixture rather than adding it cold makes it melt in far more smoothly, with no lumps. Cold cream cheese added directly, on the other hand, tends to clump rather than incorporate evenly.
Recipe 6: Vegetarian Lentil and Veggie Pie
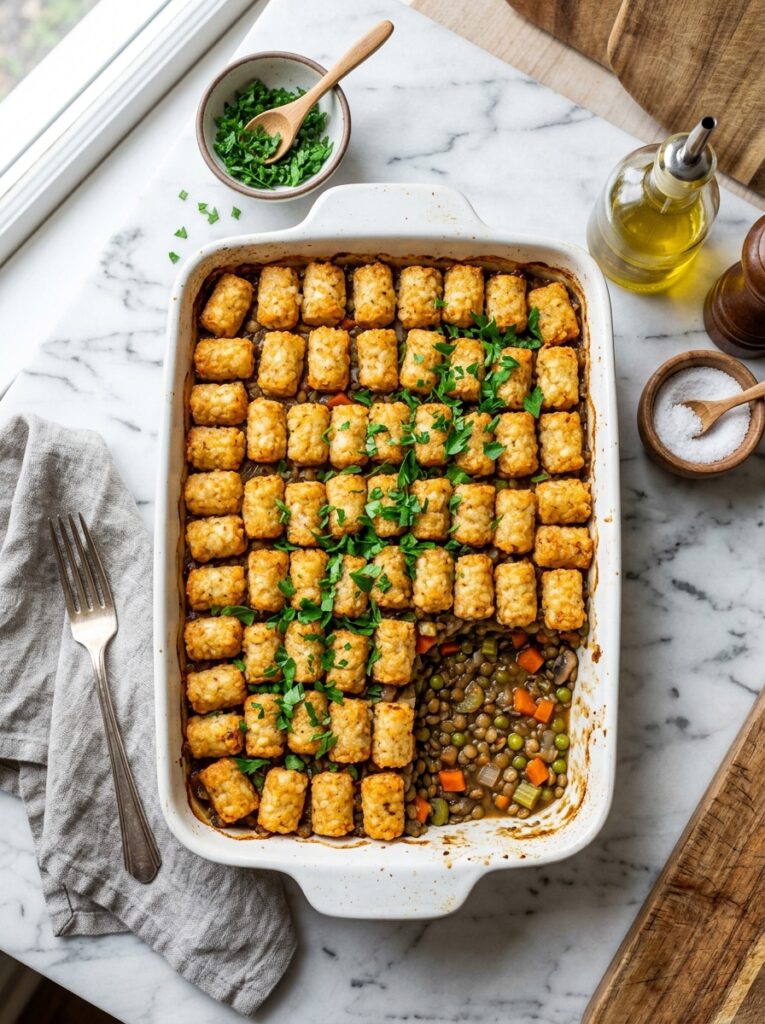
This plant-based version proves that a satisfying, hearty tater tot pie doesn’t require meat at all. Brown or green lentils provide a substantial, protein-rich base that holds together beautifully under the crispy tater tot topping, while a rich vegetable broth and tomato paste base delivers all the deep, savory flavor you’d expect from the meat-based versions. Overall, it’s a genuinely filling, comforting dinner that happens to be entirely vegetarian.
Ingredients
- 1½ cups dried brown or green lentils, rinsed
- 1 medium yellow onion, diced
- 2 carrots, diced small
- 3 garlic cloves, minced
- 2 tablespoons olive oil
- 3 cups vegetable broth
- 2 tablespoons tomato paste
- 1 teaspoon smoked paprika
- 1 cup frozen peas, thawed
- 1 bag frozen tater tots
- Salt and cracked black pepper to taste
Instructions
- Preheat oven to 400°F. Grease a 9×13-inch baking dish.
- Heat olive oil in a large pot over medium heat. Add diced onion and carrot, cooking for 5–6 minutes until softened. Then add garlic and smoked paprika, cooking 1 more minute until fragrant.
- Add rinsed lentils, vegetable broth, and tomato paste. Stir to combine and bring to a simmer. Cover and cook for 20–25 minutes, stirring occasionally, until lentils are tender and the mixture has thickened to a hearty, stew-like consistency. If it becomes too thick before the lentils are fully cooked, add a splash more broth.
- Stir in thawed peas. Season generously with salt and pepper, then taste and adjust.
- Transfer the lentil filling to the prepared baking dish, spreading it into an even layer.
- Arrange frozen tater tots in a single layer across the entire surface of the filling.
- Bake uncovered for 35–40 minutes until tots are golden and crispy. Rest 5–10 minutes, garnish with fresh parsley, and serve.
Tips for Best Results
Never Skip the Thickening Step
A properly thickened filling is the foundation of a great tater tot shepherd’s pie. Whether you’re using a flour-based thickener for the meat versions or relying on the natural starchiness of lentils, the filling needs to hold its shape and not run watery before it ever meets the tater tots. As a result, this single step prevents the single most common failure point in this entire dish.
Use Frozen Tater Tots, Never Thawed
Frozen tater tots crisp far better than thawed ones. Since they bake directly from frozen on top of a warm filling, the exterior crisps up beautifully while the inside stays soft and fluffy. Thawed tater tots, however, tend to turn soft and pale, lacking that signature crunch that makes this dish so satisfying.
Bake Uncovered for Maximum Crispiness
Covering the dish during baking traps steam, which softens the tater tot topping rather than crisping it. Therefore, always bake uncovered at 400°F. If the tots are browning faster than the filling is heating through, a loose foil tent for the final 10 minutes is fine — but the majority of the bake should happen uncovered.
Let It Rest Before Serving
Five to ten minutes of resting time after baking allows the filling to set slightly. Otherwise, a casserole served immediately from the oven tends to be loose and difficult to portion cleanly. That short rest makes scooping clean, presentable servings significantly easier, and it’s a step worth the small wait every time.
Common Mistakes to Avoid
Skipping the Flour or Thickener
This is the most common reason tater tot shepherd’s pie turns out soggy. Without a proper thickener, the filling stays thin and watery, which seeps upward into the tater tots during baking and turns them soft rather than crispy. So always thicken your filling — whether with flour, cornstarch, or the natural starch from lentils — before it goes into the baking dish.
Adding Tater Tots Before the Filling Is Ready
Tater tots should go on top of a fully cooked, properly thickened, hot filling — never a cold or undercooked one. Otherwise, adding them too early or to an unfinished filling means they’ll bake unevenly and absorb excess moisture before they have a chance to crisp.
Overcrowding or Layering Tots Too Thick
A single, even layer of tater tots crisps far better than a double-thick pile. When tots are stacked on top of each other, the bottom layer never gets proper airflow and stays soft while the top layer browns. For this reason, spread them in one even layer, edge to edge, for the most consistent, crispy result.
Using Too Much Liquid in the Filling
More broth doesn’t mean more flavor — it usually means a wetter, less stable filling. Instead, stick close to the measurements in each recipe and rely on the simmering and thickening process to develop deep flavor rather than adding excessive liquid hoping it will reduce on its own in the oven. Unfortunately, it often doesn’t reduce enough during baking, since the tater tot layer on top traps moisture rather than letting it evaporate.
Variations and Swaps
| Variation Goal | Swap or Adjustment | Effect |
|---|---|---|
| Gluten-free | Use cornstarch instead of flour; check tater tot brand for GF certification | Naturally GF with minor substitution |
| Lower calorie | Use ground turkey; reduce cheese; add extra vegetables | Lighter version, similar satisfaction |
| Dairy-free | Omit cheese layer or use dairy-free shredded cheese | Same comfort, fully dairy-free |
| Extra vegetables | Add diced bell pepper, zucchini, or green beans | More nutrients, more texture |
| Spicier version | Add diced jalapeño or a dash of cayenne to the filling | Gentle to bold heat depending on quantity |
| Sweet potato tots | Substitute frozen sweet potato tots for regular | Slightly sweeter flavor, similar crispy texture |
| Smaller portions | Bake in individual ramekins or mini cast iron skillets | Personal-sized servings, great for meal prep |
Storage and Reheating Guide
| Method | Duration | Tips |
|---|---|---|
| Refrigerator (covered) | Up to 4 days | Cover tightly; tots will soften somewhat but flavor stays great |
| Freezer (baked) | Up to 2 months | Cool completely; portion before freezing for easier reheating |
| Freezer (unbaked, filling only) | Up to 3 months | Freeze filling without tots; add fresh frozen tots before baking |
| Reheating (oven) | 20–25 min at 375°F | Best method for restoring some crispiness to the tater tots |
| Reheating (toaster oven) | 12–15 min at 375°F | Great for smaller portions; produces crispier results than microwave |
| Reheating (microwave) | 2–3 min on medium power | Fastest method but tots will be soft rather than crispy |
FAQs
Can I make tater tot shepherd’s pie ahead of time?
Yes, with one adjustment. Prepare the filling completely, let it cool, and refrigerate it separately from the tater tots for up to 2 days. When ready to bake, spread the cold filling into your baking dish, top with frozen tater tots, and bake as directed, adding 5–10 extra minutes since you’re starting from a cold filling rather than a hot one. Consequently, adding the tots fresh right before baking, rather than days in advance, gives you the crispiest possible result.
Why are my tater tots soggy instead of crispy?
This almost always comes down to one of two issues: the filling underneath wasn’t properly thickened and is too watery, or the tater tots were thawed before baking rather than added frozen. Therefore, make sure your filling holds its shape on a spoon before transferring it to the baking dish, and always use tater tots straight from the freezer. Baking uncovered at a high temperature (400°F) also helps significantly with crisping.
Can I use sweet potato tots instead of regular tater tots?
Absolutely. Frozen sweet potato tots work as a direct swap in any of these six recipes and add a slightly sweeter flavor that pairs particularly well with the Southwest and buffalo chicken variations. Meanwhile, the baking time and technique remain the same — just check for golden, crispy color as your visual cue for doneness, since sweet potato tots can brown slightly differently than regular potato tots.
What’s the best ground meat for this recipe?
Ground beef is the most popular and widely used option for an American-style tater tot shepherd’s pie, offering a rich, classic flavor. Alternatively, ground turkey is a leaner option that works beautifully, especially in the mushroom version. For the most traditional shepherd’s pie flavor, ground lamb is worth seeking out if you can find it. All three work with the same technique and similar cooking times.
Can I freeze tater tot shepherd’s pie?
Yes — both baked and unbaked versions freeze well, though with slightly different approaches. For unbaked freezing, prepare the filling, let it cool completely, and freeze it in a freezer-safe container without the tater tots for up to 3 months. Afterward, thaw overnight in the fridge, then top with fresh frozen tots and bake as directed. For baked leftovers, cool completely, portion, and freeze for up to 2 months, then reheat in the oven for the best texture.
Conclusion
From the classic beef version to a bold buffalo chicken twist and a hearty plant-based lentil option, every one of these six recipes proves just how versatile and genuinely satisfying tater tot shepherd’s pie can be. I’ve seen how recipes like these can turn an ordinary weeknight into something the whole family actually gets excited about — crispy, cheesy, savory comfort food that never feels like a compromise. So pick the version that speaks to you most, save this guide to your Pinterest boards for your next comfort food craving, and share it with someone who deserves a dinner that tastes shockingly good for how little effort it takes. Your kitchen is about to smell absolutely incredible.