
Key Takeaways
- Total recipes: 7 Halloween Oreo dirt cake variations from classic graveyard to individual flowerpot cups
- Base ingredients across all versions: crushed Oreos, cream cheese, butter, powdered sugar, Cool Whip or whipped cream, and vanilla pudding
- No baking required: every recipe in this list is completely no-bake — the oven stays off
- Skill level: beginner-friendly; if you can crush cookies and fold whipped cream, you can make all seven
- Make-ahead advantage: all versions taste better after overnight refrigeration when the layers have fully set
- Creepy surprise element: each recipe has a hidden component buried under the “dirt” — gummy worms, candy eyeballs, slime, or a colored layer nobody sees until they scoop
- Best occasions: Halloween parties, school dessert tables, trick-or-treat spreads, and any October gathering that needs something that looks wickedly good
Introduction
A Halloween Oreo Dirt Cake is the dessert that earns screams of delight rather than terror — from kids and adults alike. Crushed Oreos over a creamy vanilla pudding and cream cheese filling, decorated with whatever spooky element fits your theme, and hiding something nobody expects to find when they dig their spoon in. That’s the appeal. The “dirt” is the delivery mechanism. The surprise underneath is the conversation.
The base recipe takes about twenty minutes and requires zero baking, which makes it genuinely practical during the chaos of October party planning. But what you do on top — and what you hide inside — is where it gets interesting. A plain dirt cake is nice. A graveyard with crumbling tombstone cookies is a dessert centerpiece. Individual flowerpot cups with a gummy worm crawling out are the reason kids circle back to the dessert table three times.
This article covers seven distinct versions, each with its own creepy surprise, decoration concept, and personality. Some work best as a single large dish for a crowd; others are designed as individual servings. All of them start from the same simple no-bake base, and all of them look far more difficult to pull off than they actually are.
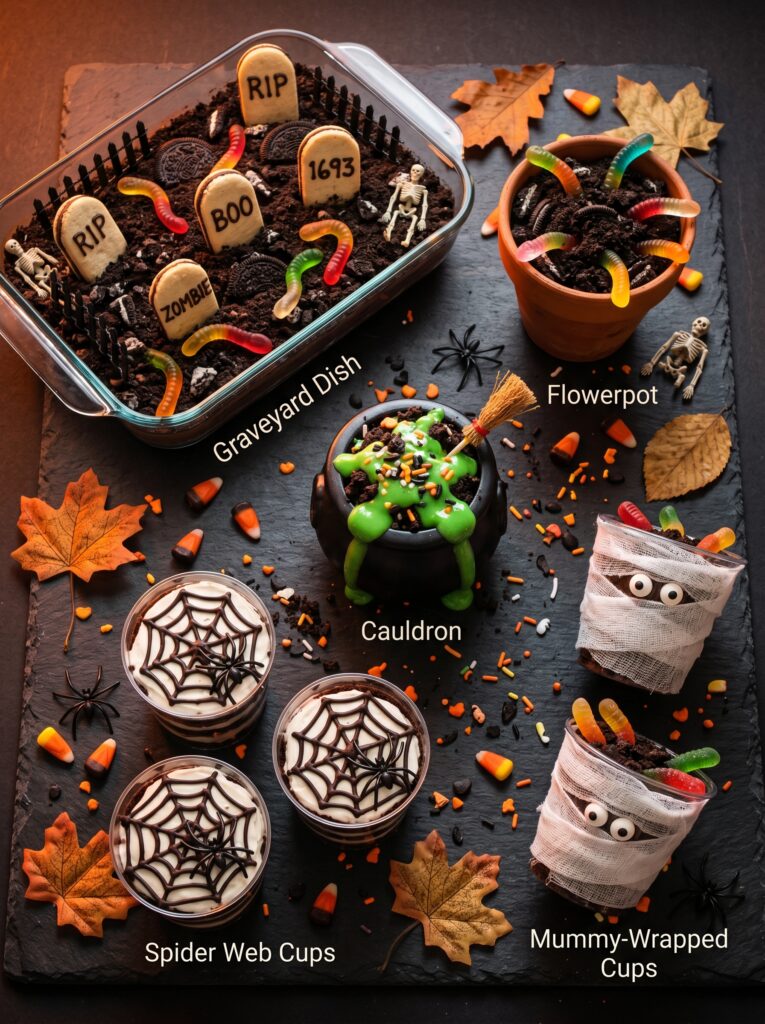
Quick Comparison: All 7 Halloween Dirt Cake Ideas
| Recipe | Serving Style | Creepy Surprise | Best For | Difficulty |
|---|---|---|---|---|
| Classic Graveyard Dirt Cake | 9×13 dish | Gummy worms underground | Large parties, buffet tables | Easy |
| Haunted Dirt Cup Flowerpots | Individual terracotta pots | Gummy worm emerging | Kids’ parties, individual servings | Easy |
| Witch Cauldron Dirt Cake | Black cauldron bowl | Green slime layer | Halloween centerpiece | Medium |
| Monster Slime Dirt Cups | Individual clear cups | Green cream cheese layer | School parties, kids | Easy |
| Spider Web Dirt Cake | 9×13 dish | White chocolate web on surface | Adult parties, decoration focus | Medium |
| Mummy Dirt Cake Cups | Individual cups | White chocolate drizzle mummies | Party favors, to-go cups | Medium |
| Black Cat Dirt Cake | Rectangular dish | Orange cream layer | Cat lovers, themed parties | Easy |
Classic Graveyard Dirt Cake
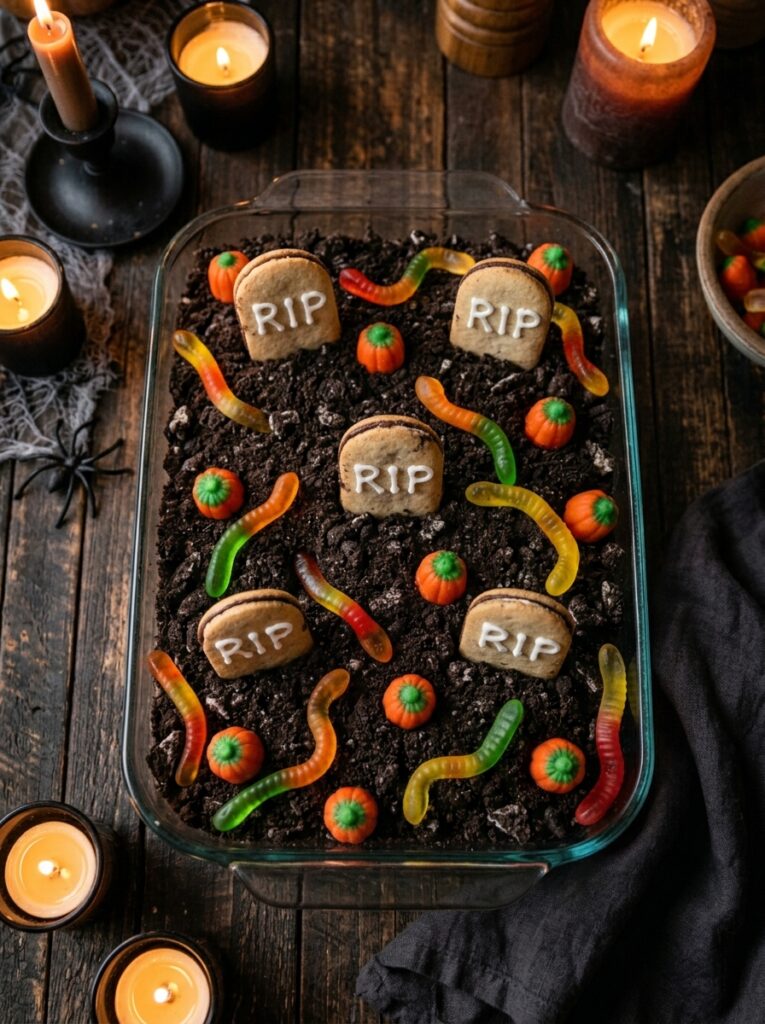
This is the original — the Halloween dirt cake that launched a thousand October Pinterest boards. A creamy vanilla pudding and cream cheese layer hides under a thick blanket of crushed Oreos, with Milano cookie tombstones standing upright across the surface and gummy worms buried just beneath the dirt level so they appear to crawl out when someone scoops in. It’s the kind of dessert that gets photographed before it gets eaten, and the kind that kids talk about for weeks after the party.
Ingredients
- 36 Oreo cookies, divided (about 1 package)
- 8 oz cream cheese, softened
- ¼ cup unsalted butter, softened
- 1 cup powdered sugar
- 2 packages (3.4 oz each) instant vanilla pudding mix
- 3½ cups cold whole milk
- 12 oz Cool Whip (or 1½ cups heavy cream, whipped to stiff peaks)
- 1 teaspoon vanilla extract
For the graveyard decorations:
- 8–10 Milano cookies (for tombstones)
- White icing pen or tube (for writing “RIP” on tombstones)
- Gummy worms, about 12–15
- Candy pumpkins or Halloween sprinkles (optional)
Instructions
- Crush 28 of the Oreos in a zip bag using a rolling pin until you have fine, even crumbs. Set aside — these become the “dirt” topping. Crush the remaining 8 Oreos more coarsely and set those aside too for mixing into the cream layer.
- In a large bowl, beat softened cream cheese and butter together until smooth with no lumps. Add powdered sugar and vanilla and beat again until fluffy.
- In a separate bowl, whisk the pudding mix with cold milk for 2 minutes until the pudding begins to set. Let it rest for 5 minutes until thickened.
- Fold the pudding into the cream cheese mixture, then fold in the Cool Whip in two additions. Stir in the coarsely crushed Oreos.
- Spread the cream layer evenly into a 9×13 dish. Cover the surface completely with the fine Oreo crumbs to resemble dark dirt.
- Decorate with Milano tombstones (write on them before pressing into the cake), press gummy worms in at various angles so some appear to be crawling out, and add candy pumpkins between the graves.
- Refrigerate for at least 4 hours — overnight is better. The layers firm up significantly and the Oreo crumbs absorb just enough moisture to become perfectly textured.
In my experience, writing on the Milano tombstones with a white icing pen before pressing them into the cake is much easier than trying to write on them in place. Once they’re standing upright in the dirt, your hand has no stable surface to rest on and the letters end up wobbly.
Haunted Dirt Cup Flowerpots
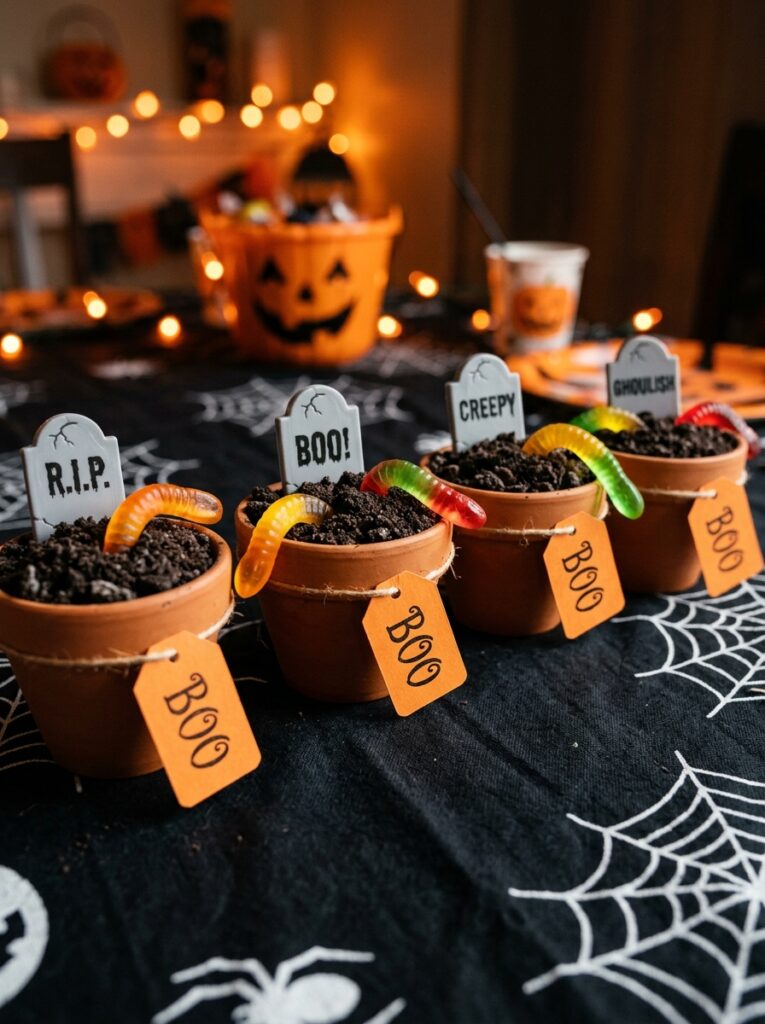
Individual dirt cups served in small terracotta-style pots are the reason kids at a Halloween party migrate to the dessert table every ten minutes. Each cup has its own gummy worm emerging from the dirt like it’s mid-escape, and the terracotta look makes the whole thing feel like you planted something that grew wrong. These also solve the serving problem — no scooping from a shared dish, no extra plates needed. Each guest picks up their own pot and it’s ready to eat.
Ingredients
(Makes 8 individual flowerpot cups)
- 24 Oreo cookies, finely crushed
- 8 oz cream cheese, softened
- ¼ cup butter, softened
- 1 cup powdered sugar
- 1 package (3.4 oz) instant vanilla pudding mix
- 1¾ cups cold milk
- 8 oz Cool Whip
- 1 teaspoon vanilla extract
- 8 gummy worms
- 8 small terracotta pots (clean, food-safe) or small cups
- Plastic tombstone picks or Halloween cupcake toppers (optional)
Instructions
- Beat cream cheese, butter, powdered sugar, and vanilla together until smooth and fluffy. Set aside.
- Whisk pudding mix with cold milk and let set for 5 minutes. Then fold the pudding into the cream cheese mixture. Fold in the Cool Whip in two additions.
- If using real terracotta pots, line each one with a small square of parchment paper pressed into the bottom and up the sides — this prevents the filling from absorbing through the unglazed clay and keeps the dessert food-safe.
- Spoon the cream layer into each pot, filling to about ¾ full.
- Top each pot generously with crushed Oreo crumbs, pressing lightly so the surface looks like packed dirt.
- Place one gummy worm per pot at the surface level, positioning it so it looks like it’s half-buried and actively crawling upward. Tuck one end beneath the Oreo dirt for the full emerging-from-the-earth effect.
- Refrigerate the pots for at least 3 hours before serving. Add tombstone picks or cupcake toppers just before bringing them to the table.
A helpful trick: if you can’t find terracotta-style plastic cups, any 8–10 oz clear or opaque cup works well. Clear cups have the bonus of showing the layers through the sides, which adds its own visual interest without any extra work.
Witch Cauldron Dirt Cake
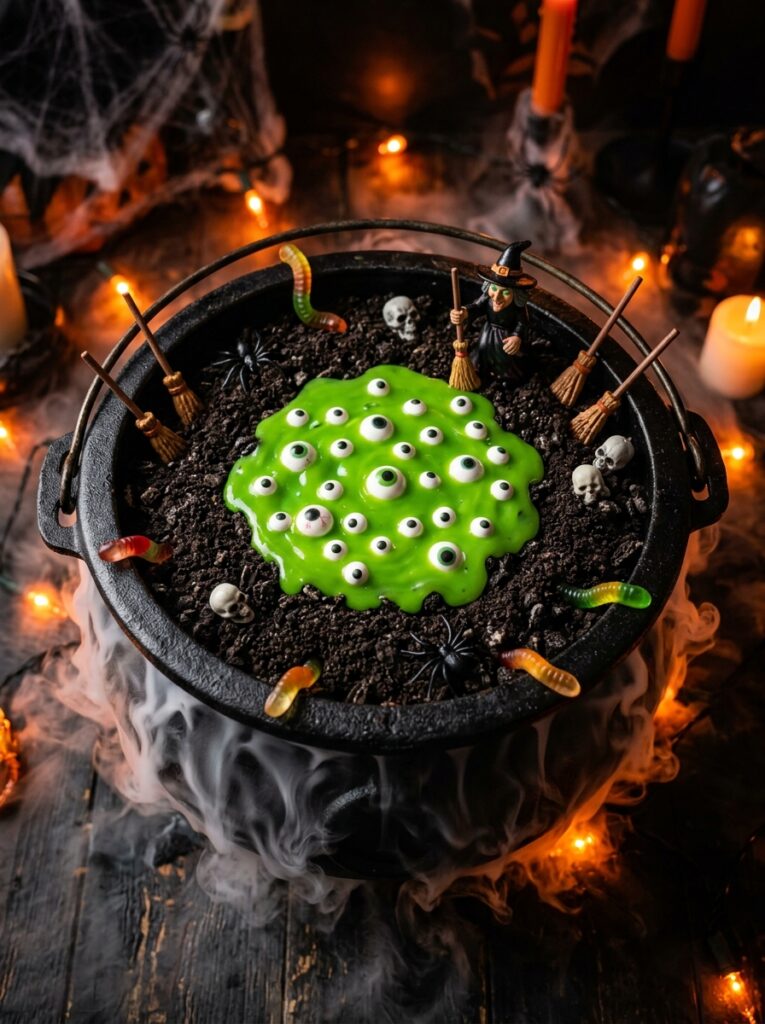
This is the showstopper. A black cauldron-shaped bowl (or a large black mixing bowl staged as a cauldron) holds the classic cream base under crushed Oreo dirt, but the creepy surprise here is a pool of green “witch’s brew” slime poured into a divot in the center. The slime is just green-tinted white chocolate ganache or melted candy melts, but it looks disturbingly like something bubbling in a cauldron. Add a few candy eyeballs floating in it and the whole presentation is genuinely striking.
Ingredients
- 36 Oreo cookies, finely crushed
- 8 oz cream cheese, softened
- ¼ cup butter, softened
- 1 cup powdered sugar
- 2 packages instant vanilla pudding
- 3½ cups cold milk
- 12 oz Cool Whip
- 1 teaspoon vanilla
For the green slime:
- 1 cup white chocolate chips or green candy melts
- 3 tablespoons heavy cream
- Green gel food coloring (if using white chocolate)
- Candy eyeballs, 8–10
- Plastic witch figurines, broomstick picks, or spider rings for decoration
Instructions
- Prepare the cream base: beat cream cheese, butter, powdered sugar, and vanilla together. Fold in the set pudding, then fold in the Cool Whip.
- Spread the cream layer into a large black bowl or cauldron. Cover the entire surface evenly with crushed Oreo crumbs.
- Make the green slime: melt white chocolate chips with heavy cream in a microwave-safe bowl in 30-second bursts, stirring between each, until smooth. Stir in green food coloring until you reach a vivid, slightly unsettling green. Let it cool to a thick but pourable consistency — about 10 minutes at room temperature.
- Create a shallow well in the center of the Oreo surface with a spoon. Pour the green slime into the well and let it settle.
- Place candy eyeballs in the slime while it’s still wet so they stay put. Add witch figurines, broomstick picks, and spider rings around the edges.
- Refrigerate for at least 4 hours. The slime will firm slightly as it chills, which actually looks more like thick potion than thin sauce — and that’s the right effect.
Monster Slime Dirt Cups
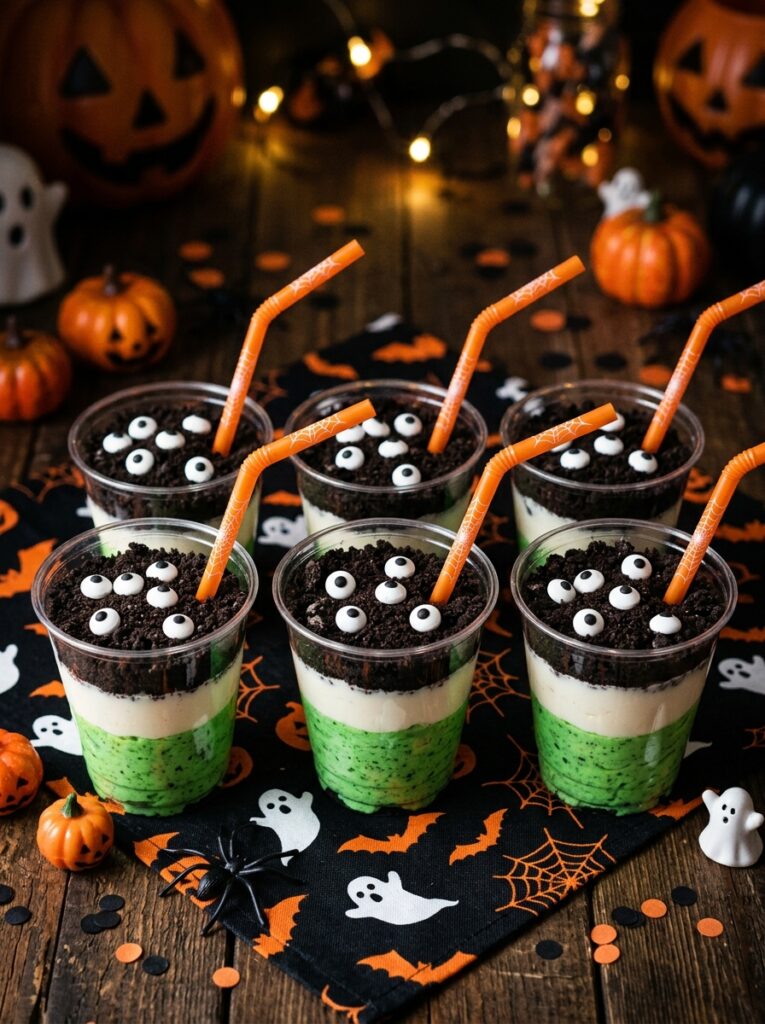
The surprise in these cups isn’t buried under the dirt — it’s hidden underneath, visible only from the side through the clear cup, invisible to anyone looking down from above. A layer of bright green-tinted cream cheese sits at the bottom, waiting under the pudding and Oreo layers. When someone scoops through to the bottom, they hit the slime. The reaction on a child’s face at that moment is worth every second of prep time.
Ingredients
(Makes 8 individual cups)
- 24 Oreo cookies, finely crushed
- 8 oz cream cheese, divided — half plain, half tinted
- ¼ cup butter, softened
- 1 cup powdered sugar, divided
- 1 package (3.4 oz) instant vanilla pudding
- 1¾ cups cold milk
- 8 oz Cool Whip, divided
- 1 teaspoon vanilla extract
- Green gel food coloring
- Candy eyeballs for topping
- 8 clear plastic cups (10–12 oz)
Instructions
- First, make the monster slime layer: beat 4 oz of the softened cream cheese with ½ cup powdered sugar until smooth. Add green gel food coloring — start with 3–4 drops and mix until you reach a vivid, slightly unsettling green. Fold in 4 oz of the Cool Whip to lighten the texture. Divide this green layer evenly among the bottoms of the 8 clear cups, pressing it in an even layer. Refrigerate the cups while you make the rest.
- Make the vanilla cream layer: beat the remaining cream cheese, butter, and ½ cup powdered sugar until fluffy. Whisk pudding mix with cold milk, let set 5 minutes, then fold into the cream cheese mixture. Fold in the remaining Cool Whip.
- Remove the cups from the fridge. Spoon the vanilla cream layer on top of the green monster slime, filling each cup to about ¾ full.
- Top each cup generously with crushed Oreo crumbs to create the dirt surface. Press lightly so the crumbs stay in place.
- Press 2–3 candy eyeballs into the Oreo surface of each cup so they’re staring upward — the effect of multiple eyes looking out from the dirt is consistently the detail that makes kids freeze and then immediately grab one.
- Refrigerate for at least 3 hours. Serve with a spoon so guests can dig all the way to the green surprise at the bottom.
I’ve noticed that gel food coloring produces a much more vibrant, opaque green than liquid food coloring for the slime layer. Liquid coloring makes the layer look washed-out and pale rather than genuinely alarming. A small tube of gel coloring from any craft store makes a significant visual difference.
Spider Web Dirt Cake
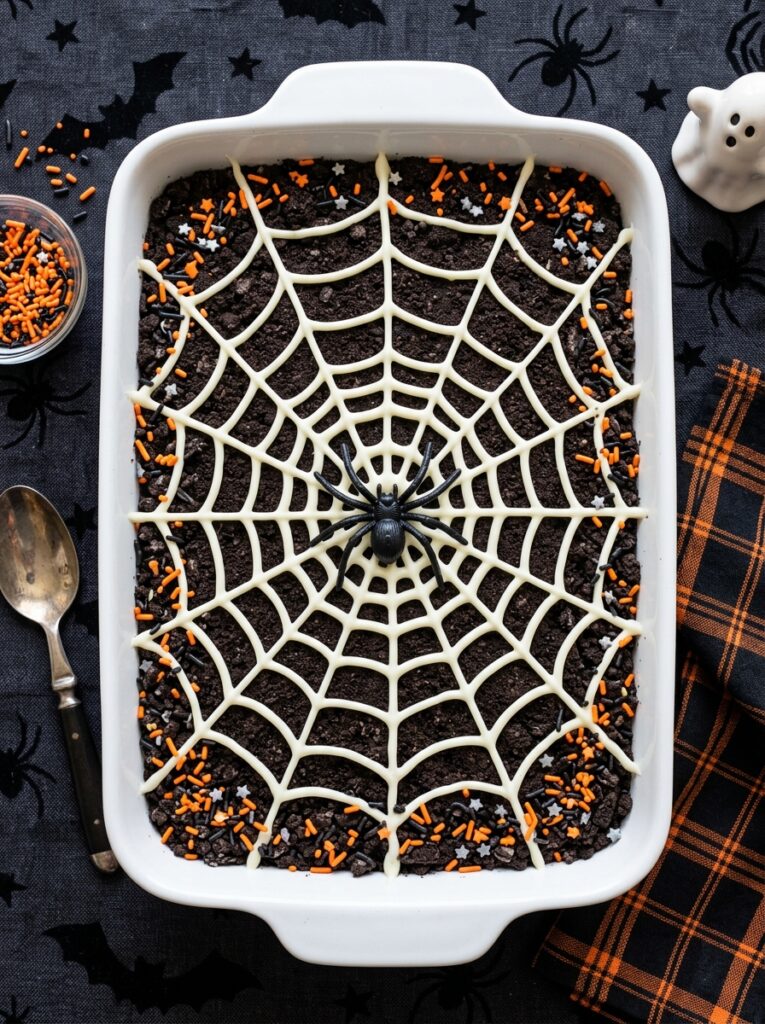
This version is for the people who want the visual payoff without a complex decoration process. The spider web design is just melted white chocolate piped in concentric circles across the Oreo surface, then dragged through with a toothpick to create the web effect — a technique borrowed from dessert decorating that looks intricate but takes about four minutes. The spider in the center is a plastic ring or candy spider pressed lightly into the chocolate. The creepy surprise here is a layer of dark chocolate cream hidden beneath the dirt, which nobody expects until they hit it.
Ingredients
- 36 Oreo cookies, finely crushed
- 8 oz cream cheese, softened
- ¼ cup butter, softened
- 1 cup powdered sugar
- 1 package instant vanilla pudding
- 1¾ cups cold milk
- 1 package (3.4 oz) instant chocolate pudding mix (for the hidden layer)
- 1¾ cups cold milk (for the chocolate pudding)
- 12 oz Cool Whip, divided
- 1 teaspoon vanilla extract
For the web decoration:
- ½ cup white chocolate chips, melted
- 1 plastic spider ring or candy spider
Instructions
- Make the hidden chocolate layer first: whisk the chocolate pudding mix with cold milk and let set for 5 minutes until thickened. Fold in half the Cool Whip. Spread this dark chocolate layer evenly into the bottom of a 9×13-inch dish. Refrigerate for 20 minutes until firm.
- Meanwhile, make the vanilla cream layer: beat cream cheese, butter, powdered sugar, and vanilla until fluffy. Fold in the set vanilla pudding and remaining Cool Whip.
- Gently spread the vanilla cream layer over the chilled chocolate layer. Work slowly so the layers stay distinct rather than mixing at the boundary.
- Cover the entire surface with crushed Oreo crumbs. Smooth with a spoon so you have an even, flat dirt surface to decorate.
- Melt the white chocolate in a microwave-safe bowl in 30-second bursts, stirring between each, until smooth. Transfer to a small zip bag and snip a tiny corner off.
- Pipe the spider web: starting from the center, pipe a small dot, then pipe 4–6 lines radiating outward like spokes. Then pipe concentric circles connecting the spokes, spacing them about an inch apart. Finally, take a toothpick and drag it from the center outward along each spoke line to create the pulled web effect. Place the spider in the center.
- Refrigerate for at least 4 hours before serving. The two distinct layers are the surprise when guests dig through the web and dirt.
A helpful trick: pipe the web while the Oreo surface is still at room temperature. A cold surface causes the white chocolate to harden too quickly as you drag the toothpick, and you lose the feathered web effect. Work at a comfortable room temperature and the chocolate stays workable for about 5–7 minutes.
Mummy Dirt Cake Cups
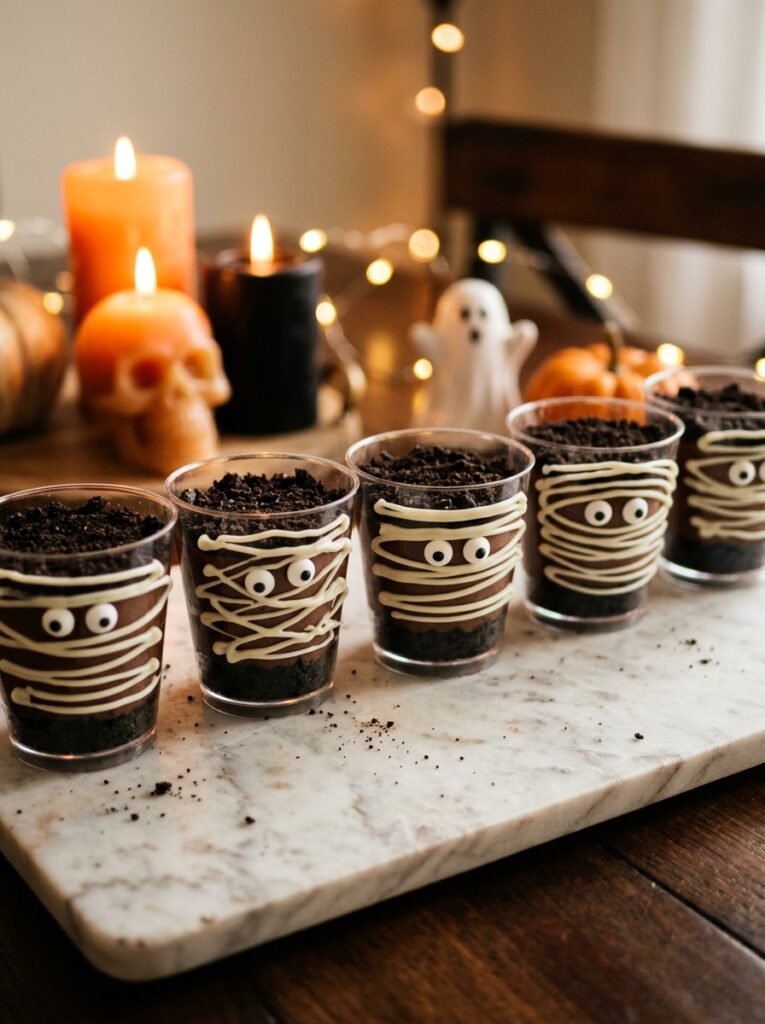
Mummy cups are individual servings that double as edible decorations — each one gets a simple mummy face piped onto the Oreo surface in white chocolate, with two candy eyeballs set into gaps in the bandages. They look like they took significant artistic skill, but the piping is just parallel horizontal lines done with a zip bag. The variations in each mummy’s “expression” based on where the eyeballs land are half the fun. These also work well as party favors sent home in small bags if the cups have lids.
Ingredients
(Makes 8 mummy cups)
- 24 Oreo cookies, finely crushed
- 8 oz cream cheese, softened
- ¼ cup butter, softened
- 1 cup powdered sugar
- 1 package (3.4 oz) instant vanilla pudding
- 1¾ cups cold milk
- 8 oz Cool Whip
- 1 teaspoon vanilla extract
- 8 individual cups (clear or white, 8–10 oz)
For the mummy decoration:
- ½ cup white chocolate chips, melted
- 16 candy eyeballs (2 per cup)
- Orange Halloween sprinkles (optional — for the cup rim)
Instructions
- Beat cream cheese, butter, powdered sugar, and vanilla until smooth. Whisk pudding mix with cold milk, let set 5 minutes, then fold into the cream cheese mixture. Fold in the Cool Whip.
- Divide the cream filling evenly among the 8 cups, filling each about ¾ full.
- Top each cup with a generous layer of crushed Oreo crumbs, pressing lightly into an even surface. The flatter the surface, the cleaner the mummy decoration will look.
- Refrigerate for at least 3 hours until the filling is fully set. Mummy piping works best on a cold, firm surface.
- Melt the white chocolate in short microwave bursts until smooth. Transfer to a small zip bag and snip a tiny corner for piping.
- Pipe the mummy bandages: starting at the top of each cup’s Oreo surface, pipe 4–5 horizontal lines across the width of the cup, spacing them about ½ inch apart. Leave two small gaps in the bandages for the eyeballs — or pipe all the lines first, then press the eyeballs into the chocolate while it’s still soft. Once the eyes are positioned, add 1–2 more bandage lines across them for the wrapped effect.
- Let the white chocolate set for 10 minutes before stacking or covering. Serve within 24 hours for the best visual impact.
Black Cat Dirt Cake
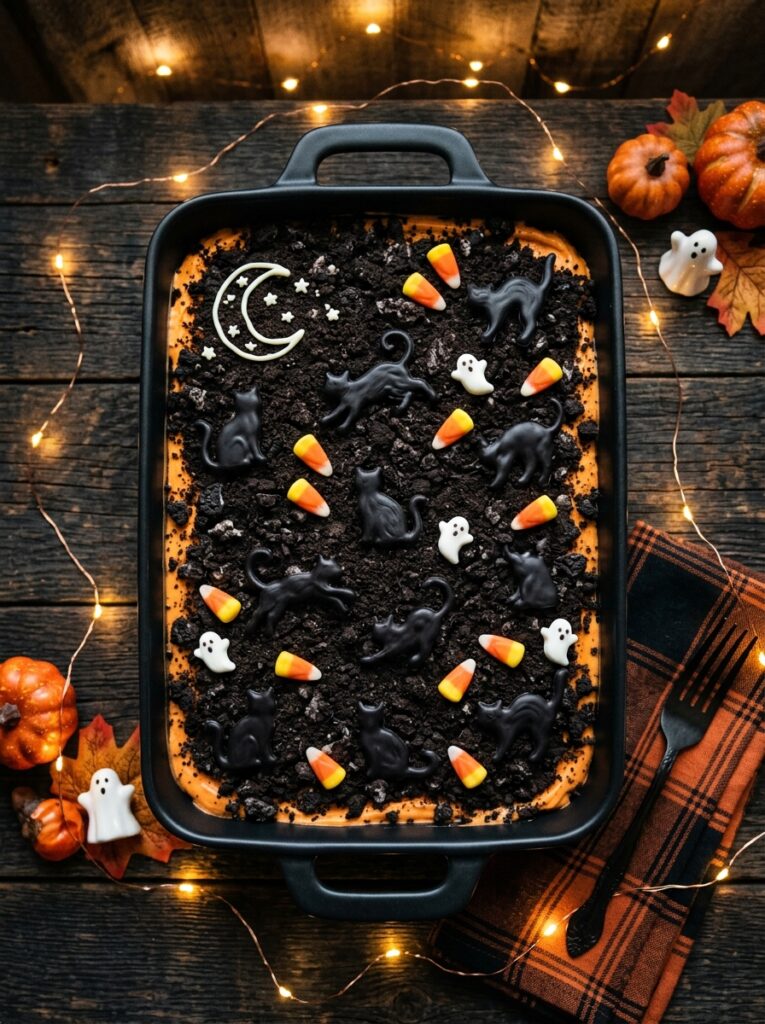
The black cat version is the most color-contrast-forward design in this collection. An orange-tinted cream layer sits underneath the Oreo dirt, creating a pop of Halloween orange when someone scoops through the black surface. On top, black cat silhouette candies or fondant cut-outs stand against the dark Oreo dirt with candy corn scattered around them and a white chocolate crescent moon in one corner. It photographs strikingly well and tastes exactly like the classic version — the cat theme is entirely decorative.
Ingredients
- 36 Oreo cookies, finely crushed
- 8 oz cream cheese, softened
- ¼ cup butter, softened
- 1 cup powdered sugar
- 2 packages instant vanilla pudding
- 3½ cups cold milk
- 12 oz Cool Whip
- 1 teaspoon vanilla extract
- Orange gel food coloring (6–8 drops for the cream layer)
For the decorations:
- Black cat candy silhouettes, fondant cutouts, or cat-shaped cookie picks
- Candy corn, about ¼ cup
- ½ cup white chocolate chips, melted (for the moon)
- Black Halloween sprinkles (optional)
Instructions
- Prepare the cream base: beat cream cheese, butter, powdered sugar, and vanilla until fluffy. Fold in the set pudding and Cool Whip.
- Divide the cream base roughly in half. Add orange gel food coloring to one half and stir until you reach a warm Halloween orange. The other half stays white.
- Spread the orange layer into the bottom of a 9×13-inch dish first. Then gently layer the white cream on top, spreading carefully so the layers stay distinct at the edges — where the orange peeks through will look intentional and dramatic.
- Cover the entire surface with crushed Oreo crumbs, pressing lightly into an even dark layer.
- Pipe the white chocolate crescent moon in one corner of the dish using a zip bag with a snipped corner. Draw a curved C-shape and fill it in, then let it set.
- Arrange the black cat decorations across the surface, pressing them lightly into the Oreo dirt so they stand upright. Scatter candy corn around the base of the cats.
- Refrigerate for at least 4 hours. The orange layer visible at the edges when serving is part of the design — spoon down to it deliberately to show the color reveal to your guests.
I’ve seen this recipe look flat when the orange layer gets mixed into the white rather than staying distinct. The key is adding the white cream layer slowly with a spatula laid almost flat against the orange surface, working from one end of the dish to the other rather than plopping it in the center and spreading outward.
Storage and Make-Ahead Guide
| Method | Container | Duration | Key Notes |
|---|---|---|---|
| Refrigerator (assembled) | Covered dish or individual cups with lids | Up to 3 days | Best texture on day 2 — Oreos absorb moisture and soften slightly |
| Refrigerator (before decorating) | Covered dish | Up to 2 days | Add decorations the day of serving for best appearance |
| Freezer (without toppings) | Airtight freezer-safe container | Up to 1 month | Thaw overnight in fridge; re-apply Oreo topping after thawing |
| Individual cups (to-go) | Cups with snap lids | Up to 2 days chilled | Good for party favors — pack candy decorations separately |
| White chocolate decorations | On top of chilled cake | Same day best | White chocolate may bloom or soften on a warm dessert table after 2+ hours |
Best make-ahead strategy: Prepare the cream filling and spread it in the dish up to two days ahead. Add the Oreo topping the morning of the party. Apply white chocolate piping, candy decorations, and any eyeballs or figurines within a few hours of serving for the cleanest, most dramatic presentation.
Conclusion
Seven ideas, one no-bake base, and enough creepy surprises to make any Halloween table unforgettable. A Halloween Oreo Dirt Cake is the dessert that earns reactions — the graveyard gets photographed, the mummy cups get saved and sent to friends, and the cauldron with green slime gets talked about long after the candy is gone.
Start with whichever version matches your crowd or your comfort level. Save this to your Pinterest Halloween board so it’s there when October arrives. And if you make one of these for a party, take a photo before it disappears — these go fast, and you’ll want proof that you made something this good.