Key Takeaways
- Total recipes: 5 lemon pepper pork chop variations — pan-seared, butter-basted, air fryer, Parmesan-crusted, and grilled
- The crispy golden secret: dry-brine the chops — season with salt and lemon pepper, then leave uncovered in the fridge for at least 1 hour before cooking; the dry surface is what creates the golden crust
- Best pork chop thickness: bone-in chops at 1–1.5 inches thick; thinner chops overcook before the exterior crisps properly
- Internal temperature target: 145°F — pull them from the heat at 140°F and rest for 5 minutes; carryover cooking does the rest
- Why pork chops turn dry: overcooking, not the cut itself; at the correct temperature, pork chops are juicy every time
- Make-ahead advantage: the lemon pepper dry brine can be applied up to 24 hours ahead for even deeper flavor
- Best occasions: weeknight dinners, Sunday family meals, meal prep, and any time you want something that looks impressive with thirty minutes of actual effort
Introduction
A great Lemon Pepper Pork Chop should have a deeply golden, slightly crispy crust on the outside and juicy, tender meat all the way through. The problem is that most home-cooked pork chops don’t look like that — they come out pale, a little grey, and dry, which is why pork chops have a reputation for being difficult.
The secret is one step that almost no recipe mentions: dry-brining. Season the chops with salt and lemon pepper, then leave them uncovered in the refrigerator for at least an hour before cooking. This draws surface moisture out of the meat and then reabsorbs it back in, deeply seasoning the interior. More importantly, the resulting dry surface makes direct contact with the hot pan and crisps immediately — producing that golden, restaurant-quality crust that a wet, cold chop from the package never can.
All five recipes in this article use this same dry-brine technique as the foundation. The cooking methods differ — stovetop, air fryer, oven, and grill — but the secret stays the same across every one. Once you understand why the crust forms the way it does, you’ll never skip this step again.
Quick Comparison: All 5 Lemon Pepper Pork Chop Ideas
| Recipe | Method | Cook Time | Texture | Best For |
|---|---|---|---|---|
| Classic Seared Lemon Pork | Stovetop | 12–15 min | Deeply golden crust, juicy | Weeknight dinner |
| Lemon Butter Pan Chops | Stovetop + baste | 15–18 min | Rich, golden, buttery finish | Date night, special occasions |
| Air Fryer Lemon Chops | Air fryer | 12–14 min | Crispy edges, even cook | Quick weeknight, minimal cleanup |
| Parmesan Lemon Pepper Chops | Oven | 20–25 min | Crunchy crust, tender inside | Family dinner, meal prep |
| Grilled Herb Butter Chops | Outdoor grill | 10–12 min | Char marks, smoky, juicy | Summer cookouts, entertaining |
Classic Seared Lemon Pork
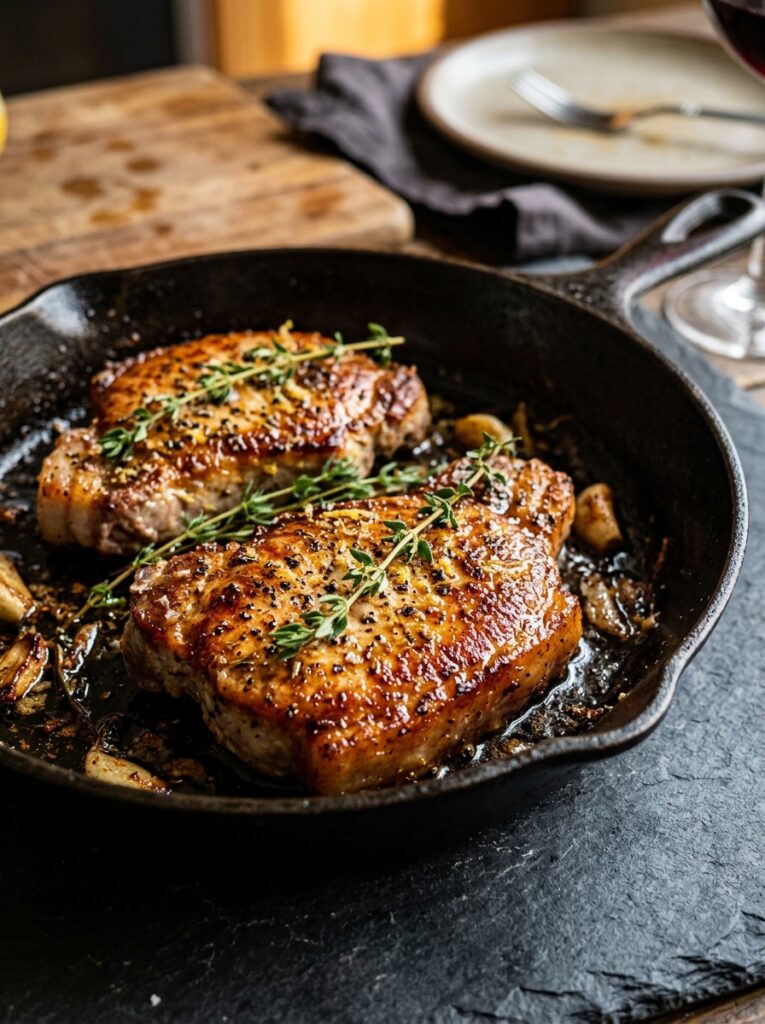
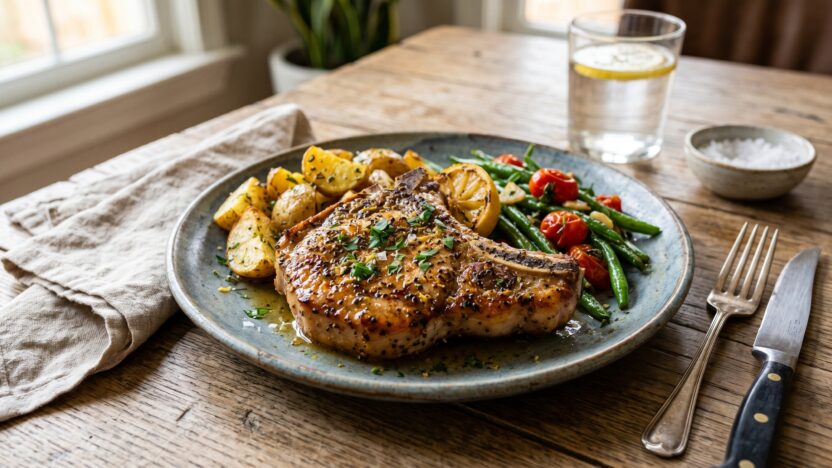
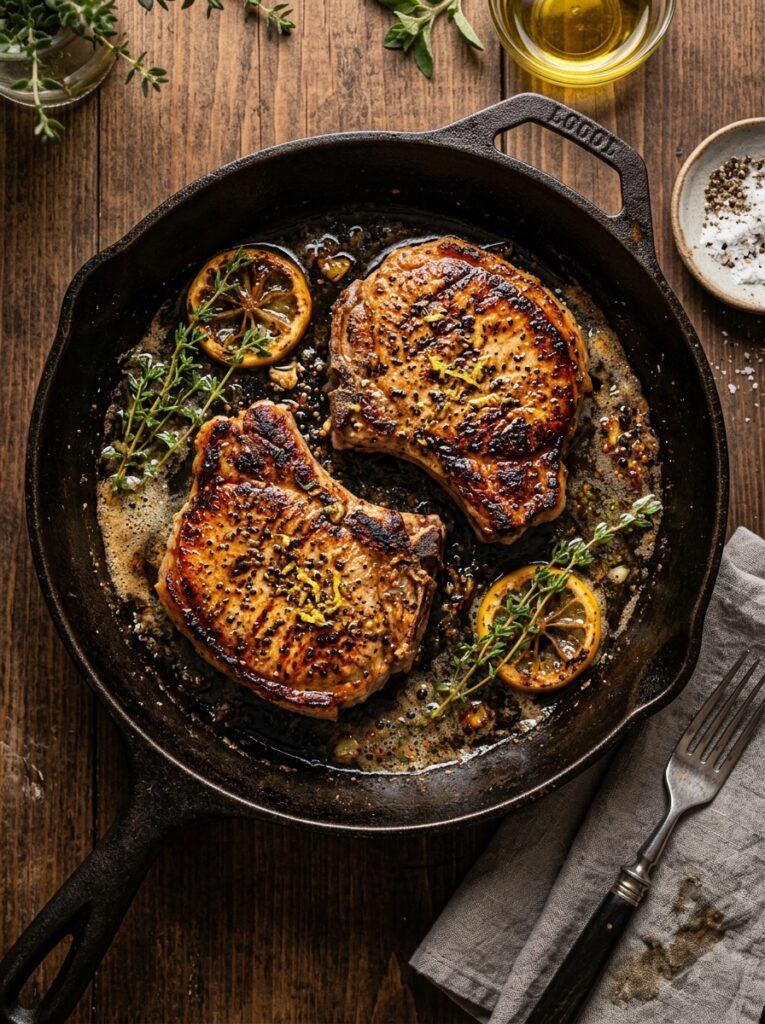
This is the version that proves everything you thought you knew about pork chops might need a reset. Bone-in chops seasoned with lemon pepper and salt, left to dry-brine for an hour, then seared in a blazing hot cast iron skillet until the crust is deep gold and the inside hits 145°F. No cream sauce, no heavy coating — just pork, heat, and the technique that makes the difference. This is the one to make first.
Ingredients
- 2 bone-in pork chops, 1–1.5 inches thick
- 1½ teaspoons lemon pepper seasoning
- 1 teaspoon kosher salt
- ½ teaspoon garlic powder
- 1 tablespoon olive oil
- 1 tablespoon unsalted butter
- 2 garlic cloves, smashed
- 3–4 fresh thyme sprigs
- Lemon wedges for serving
Instructions
- Pat the chops completely dry with paper towels. Season both sides generously with lemon pepper seasoning, salt, and garlic powder. Place uncovered on a wire rack over a sheet pan and refrigerate for at least 1 hour, or up to 24 hours. The surface should look dry and slightly matte when you pull them out.
- Remove the chops from the fridge 20 minutes before cooking to take the chill off — cold chops hitting a hot pan cook unevenly.
- Heat a cast iron skillet over high heat for 2 full minutes until smoking. Add the olive oil and let it shimmer.
- Place the chops in the skillet without moving them. Sear for 3–4 minutes until a deep golden crust forms on the first side. Flip once and sear for another 3 minutes.
- Add the butter, smashed garlic, and thyme to the skillet. Tilt the pan slightly and spoon the foaming butter repeatedly over the chops for 1–2 minutes while cooking.
- Check the internal temperature — pull at 140°F. Transfer to a plate and tent loosely with foil. Rest for 5 minutes before serving; the temperature will reach 145°F during resting.
- Serve with pan drippings spooned over the top and lemon wedges on the side.
In my experience, the two most important variables for a golden crust are a completely dry surface and a completely hot pan. If either condition is missing — wet chop or warm pan — the crust steams instead of searing. Both are easy to control, and both matter every single time.
Lemon Butter Pan Chops
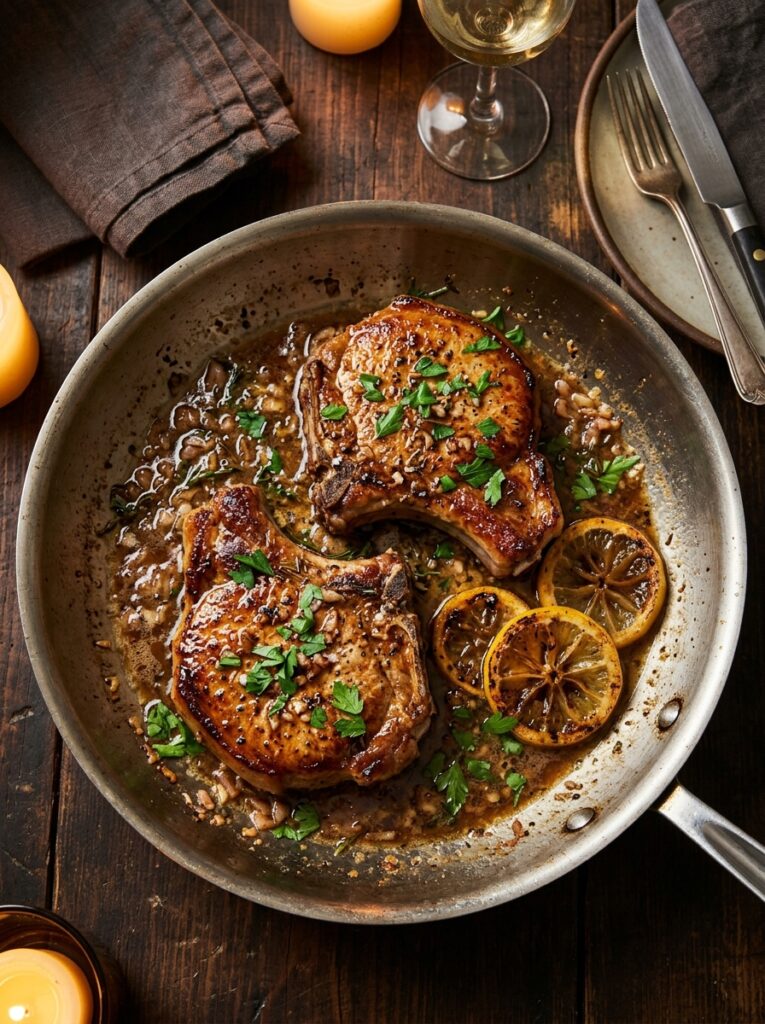
This version goes one step further than the classic by building a quick pan sauce from the drippings left behind after searing — shallots, lemon juice, butter, and a splash of chicken broth come together in under three minutes and turn a simple weeknight pork chop into something that tastes like a proper restaurant plate. The dry-brine step still applies, the sear is still the same, but the sauce is what makes people lean back and ask how you made it.
Ingredients
- 2 bone-in pork chops, 1–1.5 inches thick
- 1½ teaspoons lemon pepper seasoning
- 1 teaspoon kosher salt
- 1 tablespoon olive oil
- 3 tablespoons cold unsalted butter, divided
- 1 shallot, finely diced
- 2 garlic cloves, minced
- ¼ cup dry white wine or chicken broth
- 2 tablespoons fresh lemon juice
- Fresh parsley, chopped, for garnish
Instructions
- Dry-brine the chops with lemon pepper and salt for at least 1 hour uncovered in the fridge. Remove 20 minutes before cooking.
- Sear the chops in 1 tablespoon of olive oil in a hot skillet for 3–4 minutes per side until deeply golden. Remove to a plate and tent loosely with foil.
- In the same skillet, reduce heat to medium. Add 1 tablespoon of butter and the diced shallot. Cook for 2 minutes until softened, stirring up any browned bits from the bottom of the pan.
- Add the minced garlic and cook 30 seconds. Then add the wine or chicken broth and let it reduce by half — about 1 minute.
- Stir in the lemon juice. Remove the pan from heat and whisk in the remaining 2 tablespoons of cold butter, one piece at a time, until the sauce is glossy and slightly thickened.
- Return the chops to the pan and turn them once in the sauce to coat. Spoon the sauce over the top and serve immediately, garnished with fresh parsley.
A helpful trick: adding cold butter off the heat rather than hot butter on the heat is what creates a glossy, emulsified sauce rather than a greasy, separated one. This technique — called monter au beurre — works in any pan sauce and is worth learning.
Air Fryer Lemon Chops
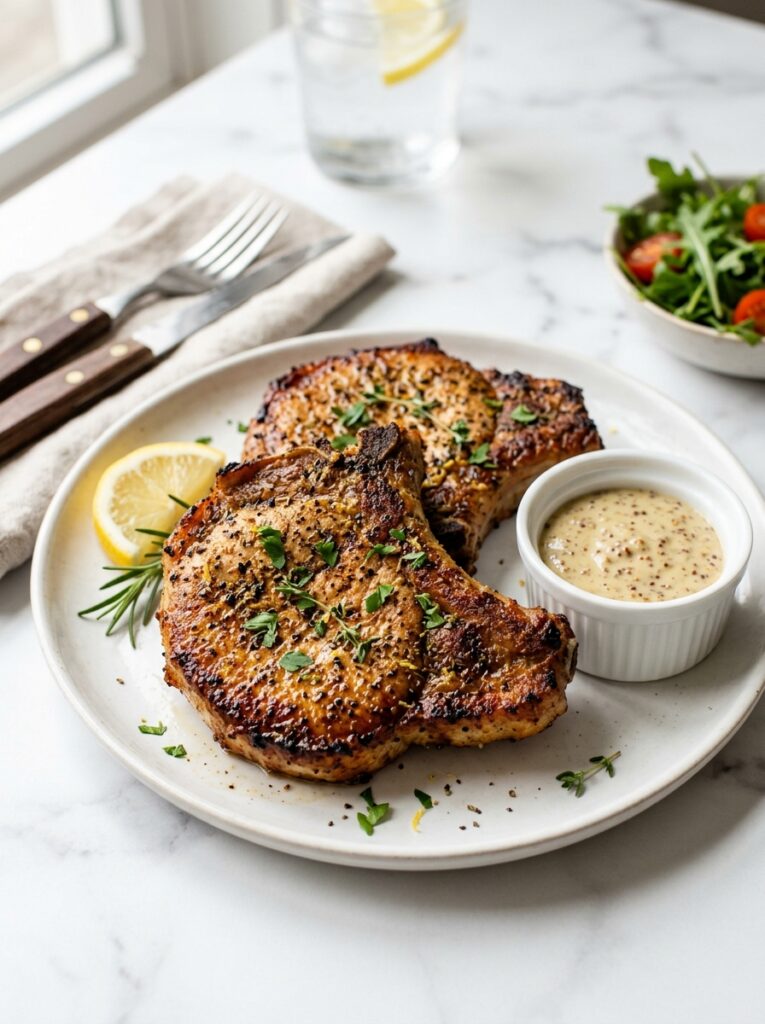
The air fryer produces surprisingly excellent pork chops — the circulating hot air reaches all sides at once, creating an even crust that a stovetop method only achieves on the seared surfaces. Combined with the dry-brine technique, the result is a chop with a genuinely crispy exterior all the way around rather than two golden sides and soft edges. This is also the fastest version in the collection, with cleanup that takes about thirty seconds.
Ingredients
- 2 bone-in pork chops, 1–1.25 inches thick
- 1½ teaspoons lemon pepper seasoning
- 1 teaspoon kosher salt
- ½ teaspoon smoked paprika
- ½ teaspoon garlic powder
- 1 tablespoon olive oil
- Lemon wedges for serving
Instructions
- Pat the chops dry and season with lemon pepper, salt, smoked paprika, and garlic powder. Place uncovered in the fridge for 1 hour. Before cooking, brush lightly with olive oil on both sides.
- Preheat the air fryer to 400°F for 3 minutes.
- Place the chops in the air fryer basket in a single layer with space between them — overlapping prevents the circulating air from reaching all surfaces.
- Cook for 6 minutes, then flip and cook for another 6–7 minutes. Check the internal temperature after flipping — different air fryer models run hotter or cooler, so the first batch is always a calibration.
- Pull at 140°F internal temperature. Rest on a plate tented with foil for 5 minutes.
- Serve with lemon wedges and a simple Dijon mustard sauce if desired.
Parmesan Lemon Pepper Chops
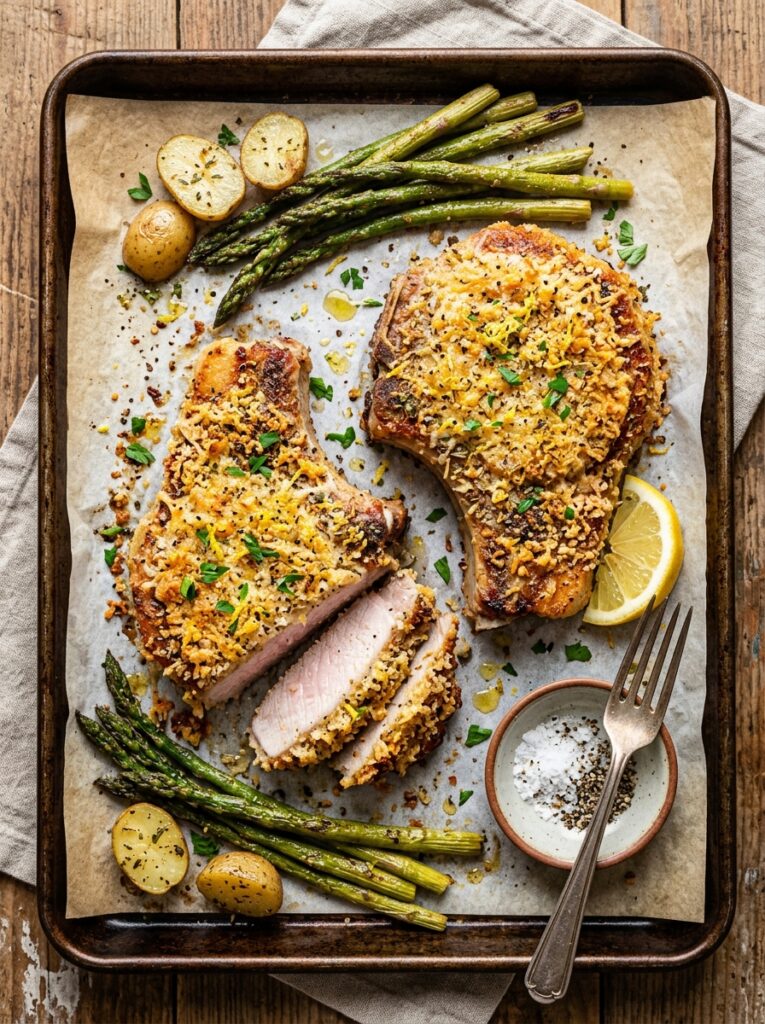
A Parmesan-panko crust pressed onto the dry-brined surface and baked at high heat transforms these into something that eats more like a breaded cutlet than a standard chop — crunchy and golden all across the surface, with that lemon pepper flavor baked into every layer of the crust. Since the oven does most of the work, this version is the most hands-off in the collection and the easiest to scale for a large family dinner without standing over a hot skillet.
Ingredients
- 2 bone-in pork chops, 1–1.25 inches thick
- 1½ teaspoons lemon pepper seasoning
- 1 teaspoon kosher salt
- ½ teaspoon garlic powder
- ⅓ cup panko breadcrumbs
- 3 tablespoons freshly grated Parmesan cheese
- Zest of 1 lemon
- 1 tablespoon fresh parsley, finely chopped
- 2 tablespoons Dijon mustard (acts as the binder for the crust)
- 1 tablespoon olive oil
Instructions
- Dry-brine the chops: season with lemon pepper, salt, and garlic powder, then place uncovered on a wire rack in the fridge for 1–24 hours. Remove 20 minutes before cooking.
- Preheat oven to 425°F. Line a sheet pan with parchment paper.
- In a shallow bowl, combine the panko, Parmesan, lemon zest, and chopped parsley. Drizzle in the olive oil and toss with a fork until the panko looks slightly damp and the mixture clumps loosely — this moistened panko browns better than dry.
- Brush the top surface of each dry-brined chop with a thin layer of Dijon mustard. The mustard acts as glue for the Parmesan crust without adding a strong flavor once baked.
- Press the Parmesan-panko mixture firmly onto the mustard-coated surface of each chop, pressing down so the crust adheres in an even layer. Place crust-side up on the prepared sheet pan.
- Bake for 18–22 minutes until the crust is deeply golden and the internal temperature reaches 140°F. Rest 5 minutes before serving.
I’ve noticed that pressing the panko into the mustard firmly — not just sprinkling it on — is what determines whether the crust stays intact or crumbles off when sliced. Take 30 seconds to really push the coating in and the crust holds together beautifully through baking and resting.
Grilled Herb Butter Chops
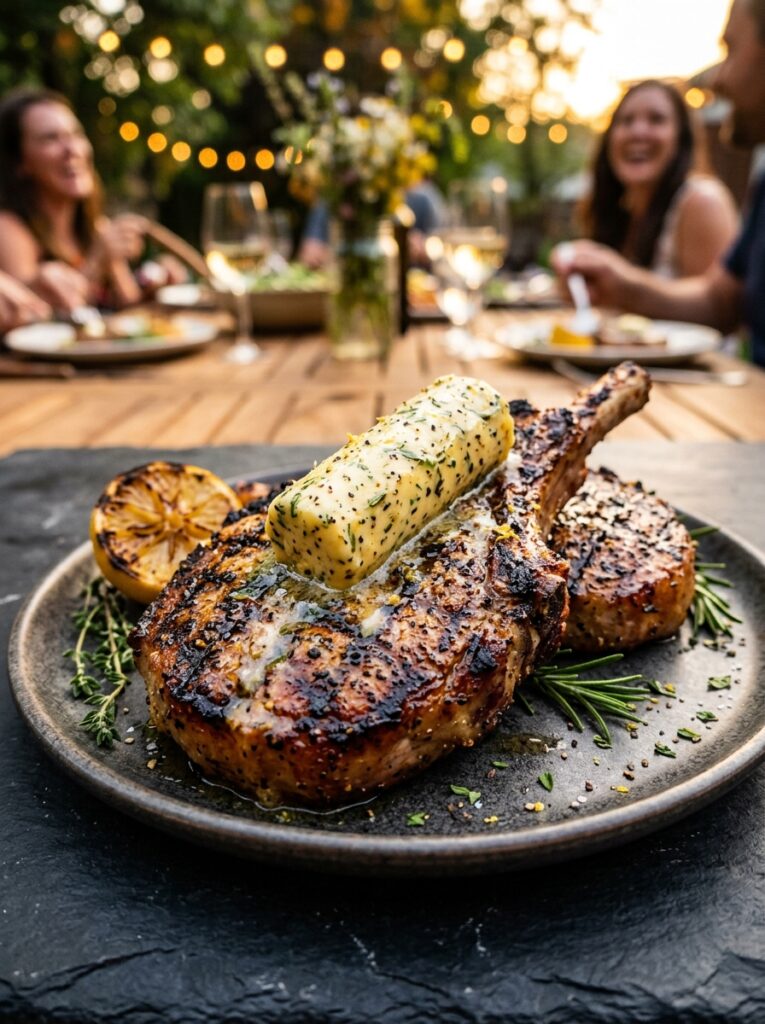
Grilling brings a smoky, slightly charred quality that no indoor cooking method fully replicates, and a slice of compound butter placed on the hot chop right as it comes off the grill melts into all the crevices and lemon pepper seasoning before it reaches the table. The compound butter — softened butter mixed with fresh herbs, lemon zest, and garlic — takes five minutes to make and keeps in the freezer for months, which makes this version the most repeatable and the most impressive-looking of the five.
Ingredients
- 2 bone-in pork chops, 1–1.5 inches thick
- 1½ teaspoons lemon pepper seasoning
- 1 teaspoon kosher salt
- 1 tablespoon olive oil
For the herb compound butter:
- 4 tablespoons unsalted butter, softened to room temperature
- 1 tablespoon fresh parsley, finely chopped
- 1 teaspoon fresh thyme leaves
- Zest of ½ lemon
- 1 small garlic clove, minced or grated
- Pinch of salt and black pepper
Instructions
- Make the compound butter first: beat softened butter with parsley, thyme, lemon zest, garlic, salt, and pepper until combined. Spoon onto a small square of plastic wrap, roll into a log, twist the ends to seal, and refrigerate until firm — at least 30 minutes. This can be made up to 2 weeks ahead.
- Dry-brine the pork chops with lemon pepper and salt for at least 1 hour uncovered in the fridge. Before grilling, brush lightly with olive oil.
- Heat the grill to medium-high (about 400–425°F). Clean and oil the grates just before cooking — a clean grate prevents sticking and produces cleaner grill marks.
- Place the chops on the grill and cook for 4–5 minutes without moving them. Flip once and cook for another 4–5 minutes on the second side.
- Check the internal temperature. Pull at 140°F and transfer to a plate.
- Slice a round of the compound butter and place it directly on each hot chop. Let it melt for 1–2 minutes before serving — the butter will pool slightly around the chop and carry all the herb and lemon flavor into the meat.
A helpful trick: if you want proper crosshatch grill marks, place the chop at a 45-degree angle to the grates, cook 2 minutes, then rotate 90 degrees and cook 2 more minutes before flipping. It’s a small visual detail that makes the plate look significantly more intentional.
Storage and Prep Guide
| Method | Container | Duration | Key Notes |
|---|---|---|---|
| Dry-brined (raw, uncooked) | Uncovered on a wire rack in the fridge | Up to 24 hours | The longer the brine, the deeper the seasoning and the drier the surface |
| Cooked pork chops (fridge) | Airtight container | Up to 3–4 days | Cool completely before sealing to prevent steaming |
| Cooked pork chops (freezer) | Zip freezer bag, individual wrapping | Up to 3 months | Freeze flat, thaw overnight in fridge |
| Herb compound butter | Wrapped log in fridge | Up to 2 weeks | Freeze for up to 3 months — slice from frozen as needed |
| Parmesan crust (after baking) | Airtight container | Up to 3 days | Reheat in oven at 375°F for 8 minutes; microwave softens the crust |
Reheating tip: the oven is the best method for all five versions. Place refrigerated chops on a rack over a sheet pan at 300°F for 12–15 minutes. This gentle reheating warms the meat through without pushing past 145°F and drying them out — which is exactly what a microwave tends to do.
Conclusion
Five different approaches, one technique that changes all of them. The dry-brine step before cooking is the difference between a Lemon Pepper Pork Chop that tastes like a good restaurant made it and one that tastes like Tuesday didn’t go as planned. Salt the chops, leave them uncovered in the fridge, and let time do the work before heat does.
Start with the classic seared version to see the technique in action, then move into whichever variation suits the occasion. Save this to your Pinterest dinner board so it’s there the next weeknight you want something fast, impressive, and genuinely worth sitting down for. And if the compound butter recipe becomes a freezer staple — that’s a very reasonable outcome.