Key Takeaways
- Total recipes: 7 variations of no-bake peanut butter chocolate oatmeal bars
- Core ingredients: rolled oats, peanut butter, honey or maple syrup, and chocolate — the foundation for all seven
- No oven needed: every recipe uses the stovetop or microwave only, then sets in the fridge or freezer
- Set time: most bars need 1–2 hours in the fridge or 30 minutes in the freezer before slicing cleanly
- Skill level: genuinely beginner-friendly — melting, mixing, and pressing into a pan is the extent of the technique
- Make-ahead friendly: all seven recipes keep well for a week or more, making them ideal for school lunches and snack drawers
- Best occasions: after-school snacks, road trip food, lunchbox additions, and anytime a craving hits and the oven isn’t an option
Introduction
No Bake Peanut Butter Chocolate Oatmeal Bars are the answer to the specific kind of craving that hits when it’s too hot to bake, too late to wait for an oven to preheat, or you just don’t want to deal with the cleanup. Oats, peanut butter, chocolate, and a sweetener melted together, pressed into a pan, and left to set — that’s the entire process, and the result tastes like a bakery treat that happens to require zero baking.
The reason these bars work so well as a category is that the base formula is incredibly forgiving. Swap the chocolate type, add a layer, change the sweetener, fold in different mix-ins — the structure holds together the same way every time because oats and peanut butter create a binding texture that doesn’t depend on eggs, flour, or heat from an oven.
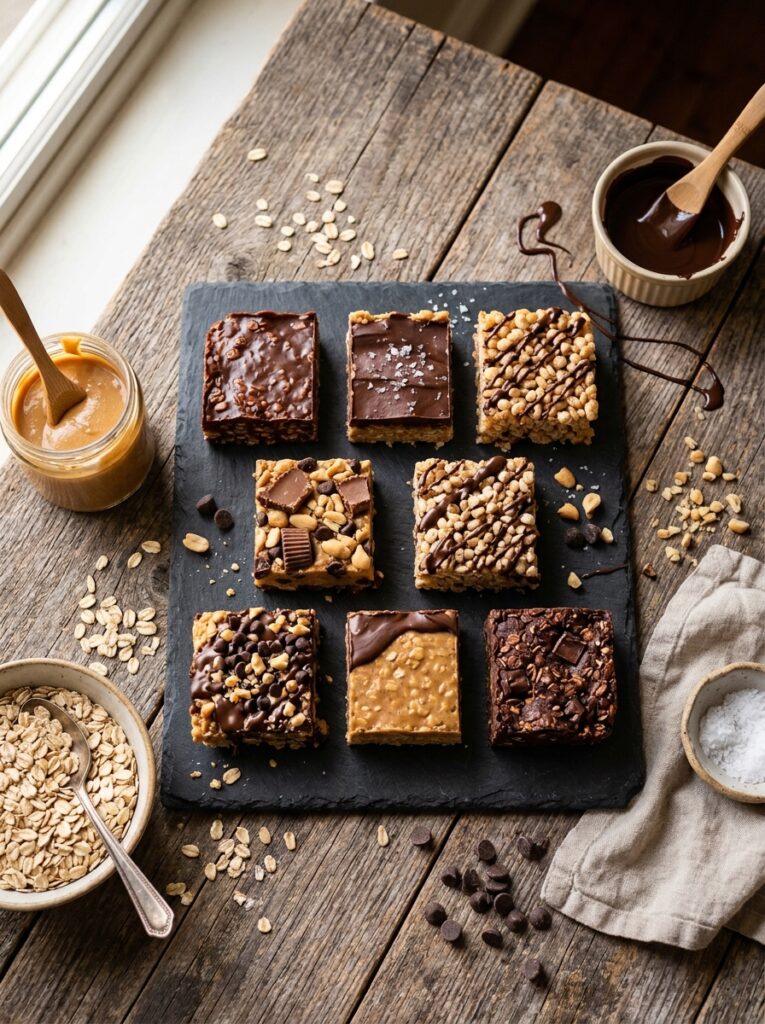
This article covers seven distinct directions: a classic version that’s the gold standard, a fudgy brownie-like version, a crispy rice-textured variation, a layered version with a separate chocolate topping, a protein-boosted version for post-workout snacking, a chunky trail-mix style bar loaded with extras, and a dark chocolate sea salt version that tastes more sophisticated than the ingredient list suggests. All seven start with the same basic stovetop method and take under twenty minutes of hands-on time.
Quick Comparison: All 7 No-Bake Bar Ideas
| Recipe | Texture | Chocolate Style | Set Time | Best For |
|---|---|---|---|---|
| Classic PB Chocolate Bars | Chewy, dense | Mixed throughout | 1–2 hours fridge | Everyday snacking |
| Fudgy Brownie Oat Bars | Soft, fudge-like | Cocoa-based fudge layer | 2 hours fridge | Dessert-style treat |
| Crispy Rice Crunch Bars | Light, crispy | Drizzled topping | 30 min fridge | Quick energy snack |
| Layered Chocolate Top Bars | Dense base, firm chocolate top | Separate hardened layer | 1.5 hours fridge | Gifting, presentation |
| Protein Power Bars | Dense, slightly chewy | Mixed + drizzle | 1–2 hours fridge | Post-workout snacking |
| Trail Mix Loaded Bars | Chunky, varied | Mixed + chunks | 1–2 hours fridge | Road trips, hiking |
| Dark Chocolate Sea Salt Bars | Rich, dense | Dark chocolate layer | 2 hours fridge | Adult snacking, gifting |
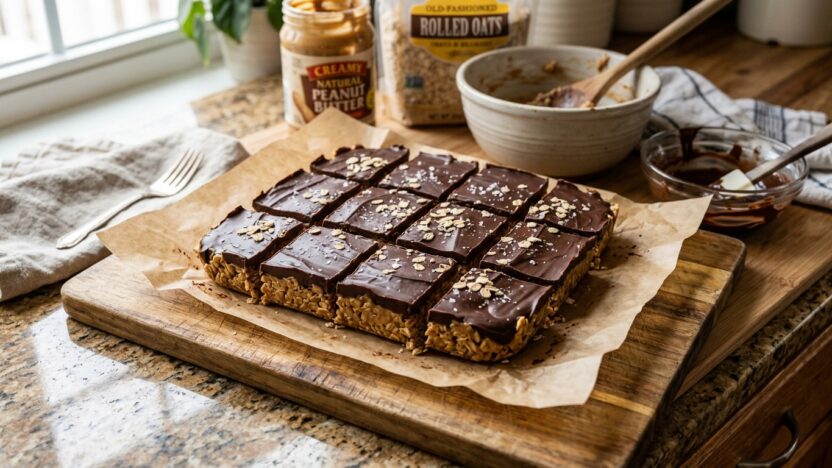
Classic PB Chocolate Bars
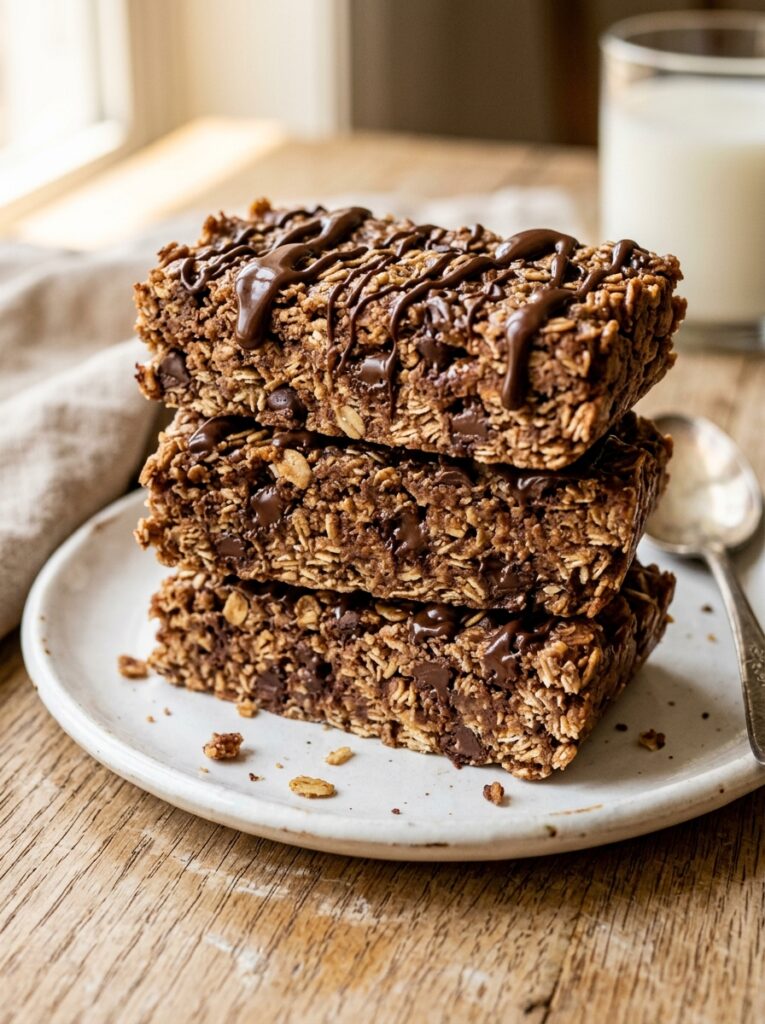
This is the bar that started it all — the recipe everyone’s grandmother seemed to have a version of, with peanut butter and oats melted together with honey and chocolate chips folded straight in. No layers, no fancy technique, just a single mixture pressed into a pan. The texture is dense and chewy, the flavor is straightforward peanut butter and chocolate, and the whole thing comes together in about fifteen minutes. This is where to start if you’ve never made no-bake bars before.
Ingredients
- 2½ cups rolled oats
- 1 cup creamy peanut butter
- ½ cup honey or maple syrup
- 2 tablespoons unsalted butter
- 1 teaspoon vanilla extract
- ½ teaspoon salt
- ¾ cup semi-sweet chocolate chips
Instructions
- Line an 8×8-inch pan with parchment paper, leaving overhang on two sides for easy lifting later.
- In a medium saucepan over low heat, combine peanut butter, honey, and butter. Stir continuously until melted and smooth — about 3–4 minutes. Don’t let it bubble or boil; gentle melting is all that’s needed.
- Remove from heat and stir in vanilla and salt.
- Add the rolled oats to the warm mixture and stir until every oat is coated. The mixture will be thick and sticky.
- Fold in the chocolate chips quickly while the mixture is still warm — they’ll melt slightly and create streaks through the bars, which is part of the appeal.
- Press the mixture firmly and evenly into the prepared pan using the back of a spoon or your hands (lightly oiled to prevent sticking). Press hard — a loosely packed mixture falls apart when sliced.
- Refrigerate for at least 1–2 hours until firm, then lift out using the parchment overhang and slice into bars.
In my experience, pressing the mixture into the pan is the step people rush the most, and it’s the one that determines whether the bars hold together or crumble apart. Use real pressure — lean into it with the back of the spoon — until the surface is compact and even.
Fudgy Brownie Oat Bar
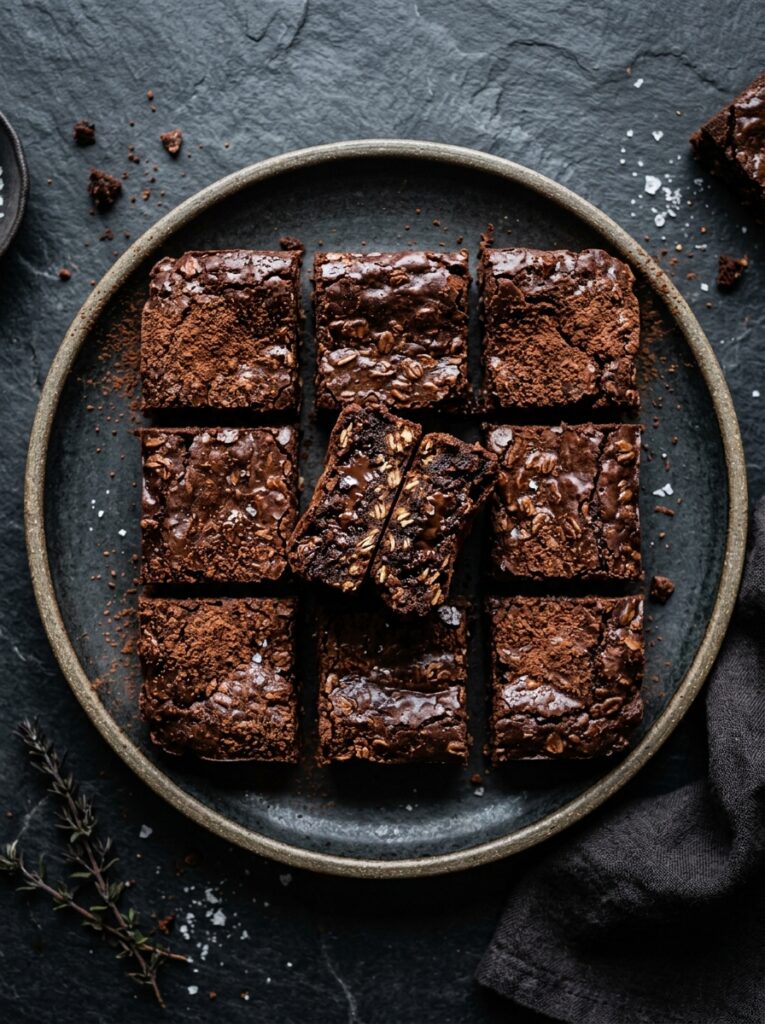
This version doubles down on cocoa to create something closer to a fudgy brownie than a granola bar. Extra cocoa powder mixed into the peanut butter base, plus a higher ratio of chocolate, produces bars that are dense, rich, and noticeably more chocolate-forward than the classic. They’re also slightly softer — closer to fudge than to a chewy granola texture — which makes them feel more like a dessert than a snack. These are the bars that disappear fastest at a gathering.
Ingredients
- 2 cups rolled oats
- 1 cup creamy peanut butter
- ½ cup honey or maple syrup
- 3 tablespoons unsalted butter
- ¼ cup unsweetened cocoa powder
- 1 teaspoon vanilla extract
- ½ teaspoon salt
- 1 cup semi-sweet chocolate chips, divided
Instructions
- Line an 8×8-inch pan with parchment paper.
- Melt peanut butter, honey, and butter together over low heat, stirring until smooth.
- Remove from heat and whisk in the cocoa powder, vanilla, and salt until completely combined and the mixture looks uniformly dark.
- Add the oats and stir until fully coated. The cocoa makes this mixture slightly stickier than the classic version.
- Fold in ¾ cup of the chocolate chips. Press the mixture firmly into the prepared pan.
- Melt the remaining ¼ cup chocolate chips in the microwave in 20-second bursts, stirring between each, until smooth. Drizzle over the top of the pressed mixture.
- Refrigerate for at least 2 hours until firm. This version benefits from the full 2 hours — the higher cocoa content makes it softer than the classic, and it needs the extra chill time to slice cleanly.
Crispy Rice Crunch Bars
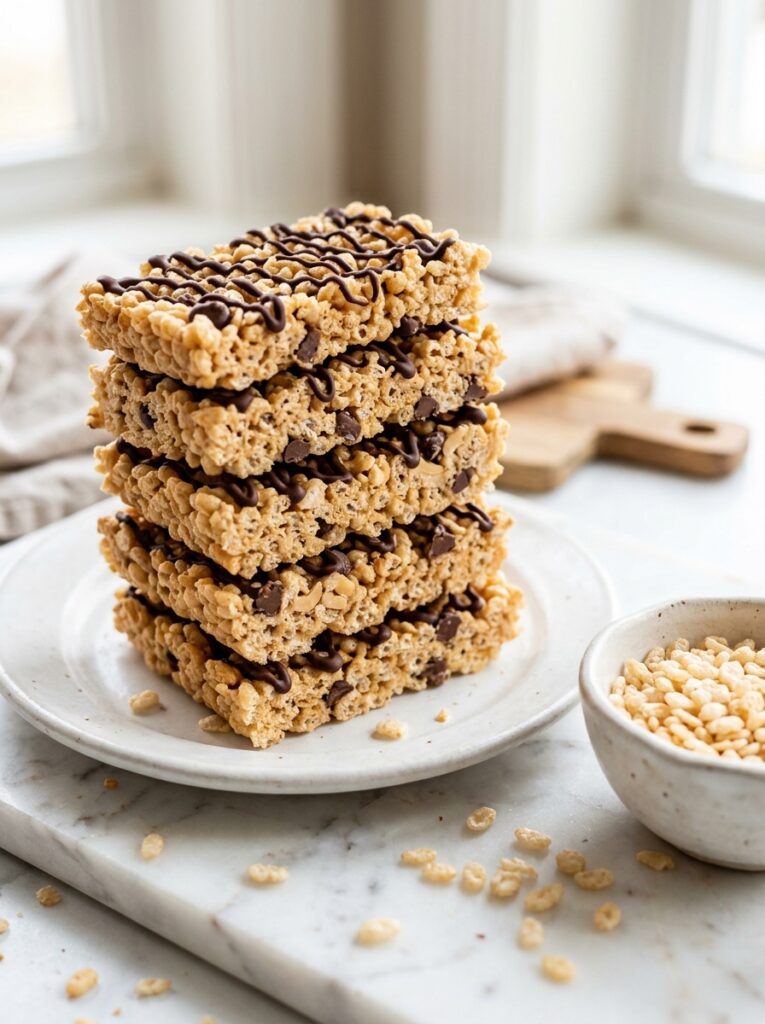
Swapping half the oats for crispy rice cereal completely changes the texture — instead of a dense, chewy bar, you get something light, airy, and crunchy, closer to a rice cereal treat with peanut butter and chocolate worked in. These are the easiest bars in the collection to eat quickly, and kids tend to prefer this texture over the denser oat-only versions. The set time is also the shortest — just 30 minutes in the freezer gets these firm enough to slice.
Ingredients
- 1½ cups rolled oats
- 1½ cups crispy rice cereal
- 1 cup creamy peanut butter
- ½ cup honey or maple syrup
- 2 tablespoons unsalted butter
- 1 teaspoon vanilla extract
- ¼ teaspoon salt
- ½ cup chocolate chips (for drizzling on top)
Instructions
- Line an 8×8-inch pan with parchment paper.
- Melt peanut butter, honey, and butter together over low heat until smooth.
- Remove from heat and stir in vanilla and salt.
- Add the rolled oats and crispy rice cereal together. Stir gently but thoroughly — the cereal is delicate and breaks if stirred too aggressively, which loses some of the crunch.
- Press the mixture into the prepared pan. Since the cereal makes this mixture lighter and more delicate, press gently but evenly rather than packing it down hard, which can crush the cereal pieces.
- Melt the chocolate chips in the microwave in 20-second bursts and drizzle over the top.
- Freeze for 30 minutes or refrigerate for 1 hour until firm, then slice into bars.
A helpful trick: if your crispy rice cereal has gone slightly stale, toast it in a dry skillet over low heat for 2–3 minutes before using. This restores some crunch and actually improves the texture compared to using fresh cereal straight from the box.
Layered Chocolate Top Bars
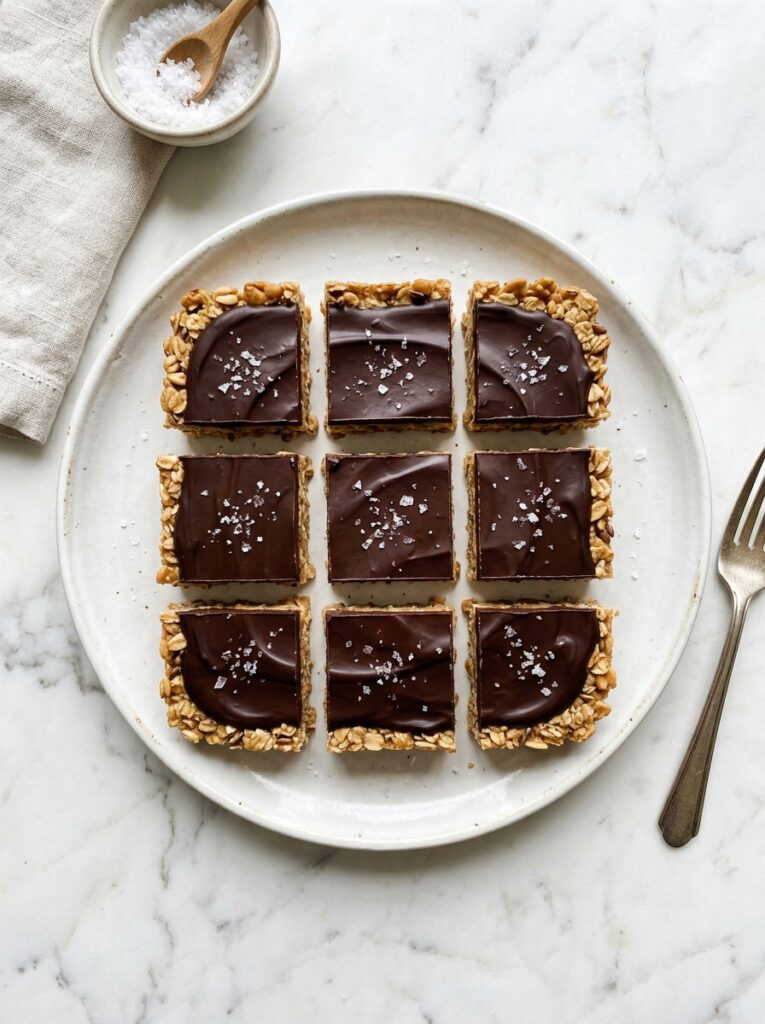
Instead of mixing chocolate chips throughout, this version pours a separate layer of melted chocolate over the firmed-up oat base and lets it harden into a distinct, glossy top. The result looks noticeably more polished — like something from a bakery case rather than a homemade snack — and the contrast between the dense oat layer and the firm chocolate shell creates a satisfying snap when you bite into it. These are the bars to make when presentation matters, whether that’s a bake sale, a gift box, or a photo for Pinterest.
Ingredients
- 2½ cups rolled oats
- 1 cup creamy peanut butter
- ½ cup honey or maple syrup
- 2 tablespoons unsalted butter
- 1 teaspoon vanilla extract
- ½ teaspoon salt
For the chocolate layer:
- 1 cup semi-sweet chocolate chips
- 1 tablespoon coconut oil (for a smoother, more snappable finish)
- Flaky sea salt for topping (optional)
Instructions
- Line an 8×8-inch pan with parchment paper.
- Melt peanut butter, honey, and butter together over low heat until smooth, then stir in vanilla and salt.
- Add the oats and stir until fully coated. Press the mixture firmly and evenly into the prepared pan.
- Refrigerate the base for 30 minutes until firm to the touch — this step matters, since pouring warm chocolate onto a soft base causes the layers to blend together rather than staying distinct.
- Melt the chocolate chips and coconut oil together in the microwave in 20-second bursts, stirring between each, until completely smooth.
- Pour the melted chocolate evenly over the chilled base, tilting the pan gently so it spreads into an even layer covering every corner. Sprinkle with flaky sea salt while the chocolate is still wet, if using.
- Refrigerate for at least 1 more hour until the chocolate layer is fully set and hard. Slice with a sharp knife, wiping the blade between cuts for clean edges.
In my experience, the coconut oil in the chocolate layer makes a real difference here. Chocolate melted on its own sets slightly soft and can smear when sliced; adding even a tablespoon of coconut oil produces a firmer, glossier layer that snaps cleanly under a knife.
Protein Power Bars
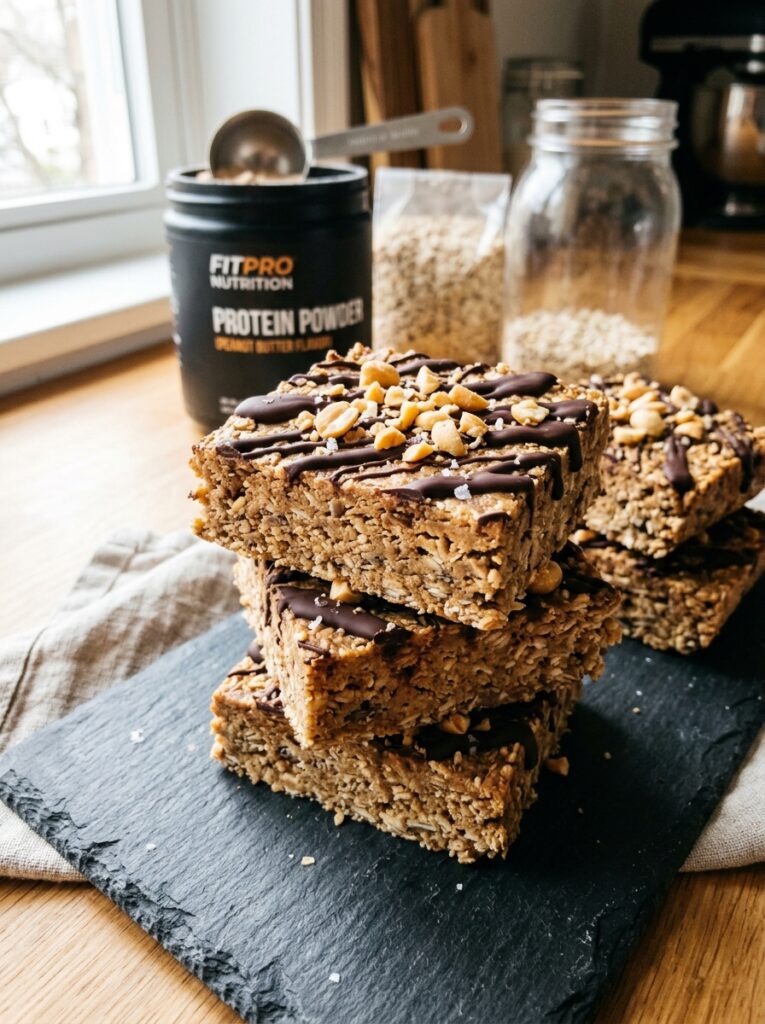
A scoop of protein powder mixed into the base turns these from a snack into something that can genuinely double as a meal replacement or post-workout recovery bar. The protein powder absorbs some of the liquid in the mixture, so these bars come out slightly denser and chewier than the classic version — closer to the texture of a store-bought protein bar but without the chalky aftertaste many of those have. Chocolate or vanilla protein powder both work, since the peanut butter and chocolate chips dominate the flavor either way.
Ingredients
- 2 cups rolled oats
- 1 cup creamy peanut butter
- ⅓ cup honey or maple syrup
- 2 tablespoons unsalted butter
- 1 scoop (about 25-30g) vanilla or chocolate protein powder
- 2–3 tablespoons milk (added as needed — protein powder absorbs more liquid than oats alone)
- 1 teaspoon vanilla extract
- ½ teaspoon salt
- ½ cup chocolate chips
- 2 tablespoons crushed peanuts for topping (optional)
Instructions
- Line an 8×8-inch pan with parchment paper.
- Melt peanut butter, honey, and butter together over low heat until smooth. Remove from heat and stir in vanilla and salt.
- Add the protein powder and stir until fully incorporated — it will thicken the mixture noticeably. Add the oats and stir until coated.
- If the mixture feels too dry or crumbly to hold together (this varies by protein powder brand), add milk one tablespoon at a time, stirring after each addition, until the mixture clumps together when pressed.
- Fold in the chocolate chips, then press the mixture firmly into the prepared pan. This mixture requires firmer pressing than the classic version since the protein powder makes it less naturally sticky.
- Sprinkle crushed peanuts over the top, pressing them in lightly.
- Refrigerate for at least 1–2 hours until firm before slicing.
I’ve noticed that different protein powder brands absorb liquid very differently — some need an extra 3 tablespoons of milk, others need almost none. Add milk gradually and judge by texture rather than following a fixed amount; the mixture should hold together when squeezed but not feel wet.
Trail Mix Loaded Bars
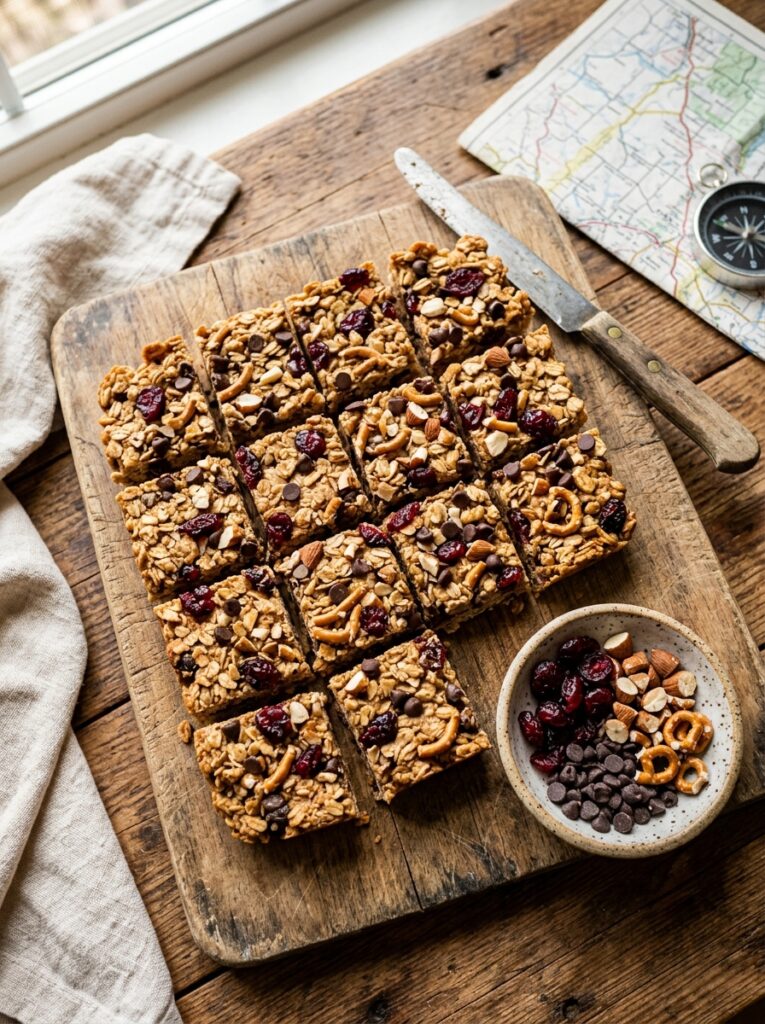
This is the version for people who load up a trail mix bag and eat the chocolate first — except here, everything gets locked into the bar together so there’s no picking favorites. Dried fruit, nuts, pretzel pieces, and chocolate chips all fold into the base, creating a chunky, varied texture where every bite is a little different. These travel exceptionally well, which makes them the obvious choice for road trips, hiking, or packed lunches where a more delicate bar might fall apart.
Ingredients
- 2 cups rolled oats
- 1 cup creamy peanut butter
- ½ cup honey or maple syrup
- 2 tablespoons unsalted butter
- 1 teaspoon vanilla extract
- ½ teaspoon salt
- ⅓ cup dried cranberries
- ⅓ cup chopped almonds or peanuts
- ⅓ cup mini pretzels, broken into small pieces
- ½ cup mini chocolate chips
Instructions
- Line an 8×8-inch pan with parchment paper.
- Melt peanut butter, honey, and butter together over low heat until smooth, then stir in vanilla and salt.
- Add the oats and stir until coated.
- Fold in the dried cranberries, chopped almonds, and broken pretzel pieces. Stir gently so the pretzel pieces don’t crush completely — some texture variation is part of the appeal.
- Fold in the mini chocolate chips last, since they’re the most heat-sensitive ingredient and folding them in late keeps them from melting completely into the mixture.
- Press the mixture into the prepared pan. Because this version has more chunky add-ins than the others, press with extra care to make sure everything is compacted — gaps around larger pieces are where bars tend to crumble when sliced.
- Refrigerate for at least 1–2 hours until firm, then slice with a sharp knife.
Dark Chocolate Sea Salt Bars
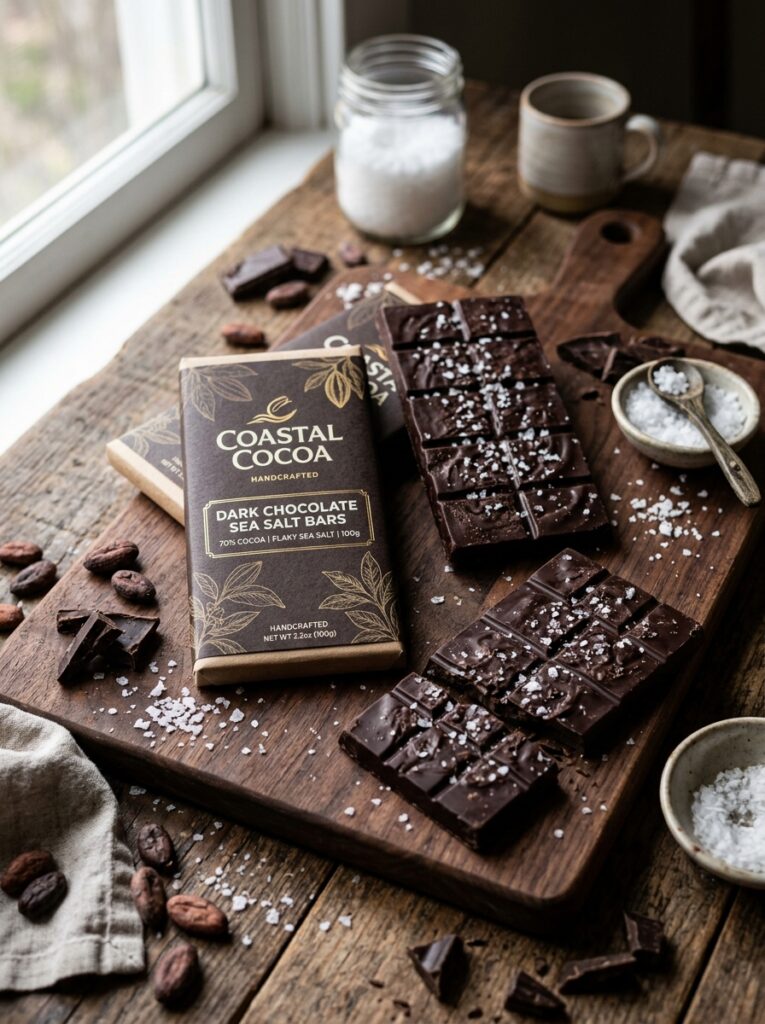
If the classic version is the everyday favorite, this one is the grown-up version. Rich dark chocolate paired with flaky sea salt creates a sweet-salty balance that feels far more sophisticated than the simple ingredient list suggests. The dark chocolate layer firms up beautifully in the refrigerator, creating a satisfying snap on top of the chewy peanut butter oat base. These bars are perfect for gifting, serving with coffee, or keeping in the fridge for those moments when a square of chocolate just isn’t enough.
Ingredients
For the Base
- 2½ cups rolled oats
- 1 cup creamy peanut butter
- ½ cup honey or maple syrup
- 2 tablespoons unsalted butter
- 1 teaspoon vanilla extract
- ½ teaspoon salt
For the Topping
- 1 cup dark chocolate chips (60–70% cacao)
- 1 tablespoon coconut oil
- 1 teaspoon flaky sea salt
Instructions
- Line an 8×8-inch baking pan with parchment paper.
- In a saucepan over low heat, melt the peanut butter, honey, and butter until smooth.
- Remove from heat and stir in the vanilla and salt.
- Add the rolled oats and stir until evenly coated.
- Press the mixture firmly into the prepared pan and refrigerate for 30 minutes.
- Melt the dark chocolate chips and coconut oil together in 20-second microwave intervals, stirring between each interval.
- Pour the melted chocolate over the chilled base and spread evenly.
- Sprinkle the flaky sea salt across the surface while the chocolate is still wet.
- Refrigerate for at least 2 hours until completely firm.
- Slice into bars and serve chilled or at room temperature.
The combination of dark chocolate and flaky sea salt creates the kind of flavor contrast that makes you reach for a second bar before you’ve finished the first.
Expert Tips for Perfect No-Bake Oatmeal Bars
Even though these bars are incredibly simple, a few small details can make the difference between bars that hold together perfectly and bars that crumble apart.
Use Rolled Oats
Old-fashioned rolled oats provide the best texture. Instant oats can become mushy, while steel-cut oats remain too firm.
Don’t Overheat the Peanut Butter Mixture
The goal is gentle melting, not cooking. Overheating can create dry, crumbly bars.
Press Firmly
A firmly packed mixture equals cleaner slices and bars that stay intact.
Chill Completely Before Slicing
Trying to cut warm bars is the fastest route to messy edges and broken pieces.
Line the Pan with Parchment Paper
The overhang acts like handles, making removal effortless.
Common Mistakes to Avoid
Bars Falling Apart
Usually caused by not pressing the mixture firmly enough or using too many dry ingredients.
Bars Too Hard
Excessive chilling or adding too much chocolate can create overly firm bars.
Chocolate Layer Cracking
Allow bars to sit at room temperature for 5 minutes before slicing.
Dry Texture
Protein powders and extra mix-ins absorb moisture. Add a splash of milk if the mixture seems crumbly.
Uneven Slices
Use a sharp knife and wipe it clean between cuts.
Easy Variations to Try
One of the best things about these bars is how customizable they are.
Almond Butter Version
Replace peanut butter with almond butter for a slightly milder flavor.
Coconut Chocolate Bars
Add ½ cup shredded coconut to the mixture.
White Chocolate Drizzle
Swap dark chocolate for melted white chocolate on top.
Peanut Butter Cup Style
Add chopped peanut butter cups before chilling.
Banana Chocolate Oat Bars
Mix in ¼ cup mashed banana for extra sweetness and softness.
Espresso Chocolate Bars
Add 1 teaspoon instant espresso powder to deepen the chocolate flavor.
Nut-Free Version
Use sunflower seed butter instead of peanut butter.
Storage and Freezing
These bars are ideal for meal prep because they store exceptionally well.
Refrigerator
Store in an airtight container for up to 1 week.
Freezer
Freeze for up to 3 months.
To freeze:
- Slice bars completely.
- Place parchment paper between layers.
- Store in a freezer-safe container.
- Thaw in the refrigerator overnight or enjoy partially frozen.
Many people actually prefer them straight from the freezer because they become pleasantly chewy and fudge-like.
Frequently Asked Questions
Can I use quick oats?
Yes, but the texture will be softer and less chewy.
Can I make these vegan?
Absolutely. Use maple syrup instead of honey and choose dairy-free chocolate.
Do I need coconut oil?
No, but it helps chocolate toppings set more smoothly.
Can I reduce the sweetness?
Yes. Reduce the honey or maple syrup slightly, though too little may affect how well the bars hold together.
Why are my bars crumbly?
The mixture was likely too dry or not pressed firmly enough into the pan.
Can I use crunchy peanut butter?
Yes. It adds extra texture and works well in every variation.
Conclusion
No-Bake Peanut Butter Chocolate Oatmeal Bars prove that great desserts don’t require complicated techniques or hours in the kitchen. With just a handful of pantry ingredients and a few minutes of hands-on work, you can create everything from classic chewy bars to protein-packed snacks and bakery-style layered treats. Whether you’re meal-prepping for the week, packing lunchboxes, or satisfying a late-night chocolate craving, these seven variations offer something for everyone. Pick your favorite version, stock the fridge, and enjoy having a homemade treat ready whenever the craving strikes.