Key Takeaways
- Total time: 15 minutes, no baking required
- Main ingredients: ripe bananas, rolled oats, peanut butter, chocolate chips, and walnuts
- Best for: meal prep snacks, after-school treats, pre-workout bites, or healthy desserts
- Dietary notes: easily made gluten-free, vegan, or nut-free with simple swaps
- Storage: keeps in the fridge up to 1 week, or freeze for 3 months
- Kid-friendly: yes — the rolling part is basically just playing with food
Introduction
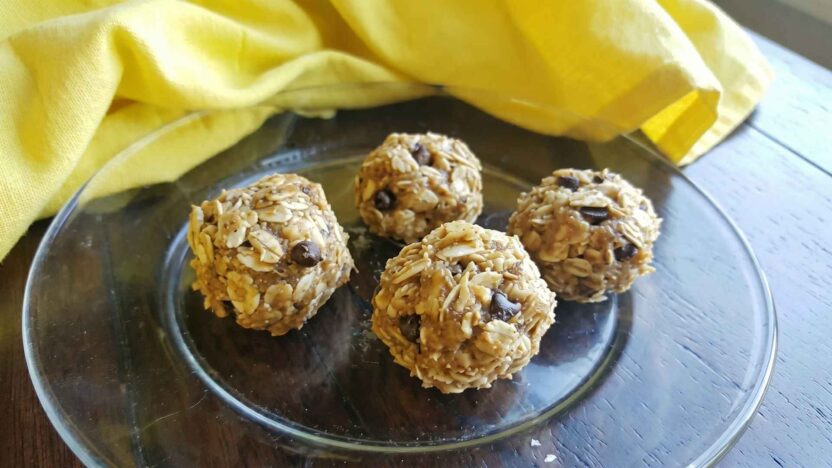
Chunky Monkey Oatmeal Bites are the kind of recipe you make once by accident and then find yourself making every single week. Banana, peanut butter, chocolate chips, walnuts — all mixed together, rolled into little balls, done in fifteen minutes without turning on the oven.
I made the first batch on a Tuesday when three very ripe bananas were sitting on the counter looking sad. I figured I’d throw something together, taste one, and stash the rest in the fridge. I ate six before I even put the others away. Not my proudest moment, but not a surprise either.
These have been in my regular rotation ever since. They’re chewy, a little fudgy, naturally sweet from the banana. They feel like a treat, but nothing in them is particularly alarming — just oats, fruit, nut butter, and a handful of chocolate chips. I’ve brought them to potlucks where people assumed I’d spent actual effort. I’ve packed them in my bag at 7am and been genuinely glad they were there by 11.
If you’ve got ripe bananas and fifteen minutes, this is exactly where they should go.
Why You’ll Love This Recipe
I’ll be honest — I’m a little skeptical of recipes that call themselves “quick” and then require thirty minutes of active prep plus chilling time overnight. This isn’t that.
Fifteen minutes is the real number. You mash the banana, stir in the peanut butter and oats, fold in the chocolate chips and walnuts, roll them into balls. The optional chill step adds ten minutes in the fridge, but you’re not doing anything during that time.
The flavor combination is hard to argue with. Ripe banana is already sweet enough that you barely need added sugar. Peanut butter makes it rich and filling — two of these before a workout actually does something for you, which is more than I can say for most snacks. The chocolate chips are non-negotiable in my house. My partner once suggested leaving them out to make the bites “healthier” and I chose not to engage with that.
They also pack well, which matters. Room temperature for a few hours, fridge for a week, freezer for three months. I keep a bag of them frozen most of the time and just pull out a few the night before.
Kids can make these too — there’s no heat, nothing sharp, and the rolling step is genuinely the most fun part. My niece is seven and she makes them mostly independently now. She does eat about four of them during the process, but the yield is still fine.
Ingredients
One batch makes about 16–18 bites:
- 2 large ripe bananas (brown spots are what you want — don’t use yellow ones)
- 1½ cups rolled oats (old-fashioned, not instant — this matters, see tips below)
- ½ cup peanut butter (creamy or chunky, both work)
- ⅓ cup mini chocolate chips (dark or semi-sweet)
- ¼ cup chopped walnuts
- 2 tablespoons honey or maple syrup (optional — only add this if your bananas aren’t very ripe)
- ½ teaspoon vanilla extract
- Pinch of salt
Ingredient Substitutions
| Original Ingredient | Easy Swap | Notes |
|---|---|---|
| Peanut butter | Almond butter or sunflower seed butter | Sunflower butter keeps it nut-free |
| Walnuts | Pecans, almonds, or pumpkin seeds | Pumpkin seeds work well for nut-free versions |
| Honey | Maple syrup or agave | Makes the recipe fully vegan |
| Mini chocolate chips | Cacao nibs or raisins | Cacao nibs are less sweet but still good |
| Rolled oats | Certified GF rolled oats | Easy swap if you need gluten-free |
| Banana | ¼ cup unsweetened applesauce | Banana is really the binder here — swapping it changes the texture noticeably |
Step-by-Step Instructions
Step 1: Mash the Bananas
Add both bananas to a large mixing bowl and mash them with a fork. You want mostly smooth with maybe a few small lumps — they won’t affect the final texture, and perfect smoothness isn’t the goal. The riper the banana, the easier this goes and the sweeter the result.
If your bananas are only lightly spotted, add the optional honey or maple syrup at this stage. Under-ripe bananas taste a bit starchy and don’t bind as well, so compensating with sweetener helps on both fronts.
Step 2: Stir in the Peanut Butter and Vanilla
Add the peanut butter, vanilla extract, and salt. Stir until it comes together into a thick, slightly sticky paste. If your peanut butter is cold and stiff from the fridge, microwave it for 20–30 seconds first — it’ll blend in much more smoothly.
Step 3: Add the Oats
Pour in the rolled oats and stir until everything is evenly coated. Check the bottom of the bowl — dry oats have a way of hiding down there. The mixture should be thick and scoopable, not runny or crumbly.
If it seems too wet (very ripe bananas or a looser peanut butter can cause this), add another tablespoon or two of oats and let it sit for a few minutes. Oats absorb moisture as they rest, and what feels unworkably sticky at first usually settles into something rollable.
Step 4: Fold in the Chocolate Chips and Walnuts
Add the chocolate chips and walnuts and stir to distribute them evenly. This is also a good moment to taste and adjust — a bit more honey if it needs sweetness, a small pinch more salt if it tastes flat.
Step 5: Chill the Mixture (Recommended)
Transfer the bowl to the fridge for 10 minutes. You can skip this and roll them straight away, but the chilled mixture holds its shape much better and is less sticky to work with. It’s a small wait for noticeably cleaner results.
Step 6: Roll into Balls
Scoop out about 1½ tablespoons of mixture at a time and roll it between your palms. Set each ball on a parchment-lined plate or baking sheet.
Wet hands are the trick here. The mixture sticks to dry palms. Just rinse your hands with cold water, shake off the excess, and the dough releases cleanly. You’ll probably need to re-wet your hands every four or five bites.
You should get 16–18 bites from a single batch.
Step 7: Serve or Chill Again
Eat them right away if you want — they’re good at this stage. Or put the plate in the fridge for another 15–20 minutes to firm up fully. Chilled bites hold their shape better and feel more like a structured snack than a soft ball of oats. Both versions taste the same.
Expert Tips for the Best Results
Use old-fashioned rolled oats. Instant oats absorb too much moisture and turn the texture pasty. Old-fashioned oats stay chewier and give the bites some substance. This is the one ingredient note I’d push hardest on.
Don’t skip the salt. I know a pinch of salt seems inconsequential, but it makes the chocolate taste more like chocolate and brings out the peanut butter. Batches without it taste a little dull side by side.
Mini chocolate chips hold together better. Regular chips are heavier and tend to fall out when you’re rolling the balls. Minis disperse more evenly through the mixture and stay put.
Let the mixture rest if it’s too sticky. If you’re fighting the mixture while rolling, stop and wait five minutes. Oats keep pulling in moisture, and most sticky batches fix themselves with a short rest.
Account for peanut butter brand variation. This one surprises people. Natural peanut butter (the kind you have to stir) is often much looser than standard commercial peanut butter. If you’re using natural, expect to add extra oats — sometimes two or three tablespoons worth.
Common Mistakes to Avoid
Using bananas that aren’t ripe enough. A yellow banana with no spots will mash unevenly, won’t sweeten the mixture properly, and doesn’t bind as well. Leave them on the counter another day or two if that’s what you’re working with.
Overloading the mix-ins. It’s very easy to throw in coconut flakes, protein powder, dried fruit, chia seeds, and hemp hearts all at once. I’ve done it. The bites crumble and the flavors compete with each other. Make the base recipe as written first, then add one variation at a time once you know what the texture is supposed to feel like.
Rolling before chilling. Warm mixture rolls into soft blobs that don’t hold well. Ten minutes in the fridge isn’t long — it’s worth it.
Making them too small. Tiny bites dry out faster in the fridge and don’t have much chew. Aim for something around the size of a large marble. Go bigger if anything.
Storing them uncovered. They dry out and harden pretty quickly if left exposed. Airtight container every time.
Recipe Variations
Tropical Monkey Bites: Swap the walnuts for shredded toasted coconut and stir in 2 tablespoons of dried pineapple. The coconut picks up a light toast on the outside of the bites and the whole thing smells like summer.
Double Chocolate: Add a tablespoon of cocoa powder to the base and use white chocolate chips instead of dark. The contrast is really good — bitter-ish base, sweet chips.
Protein-Packed: One scoop of vanilla or chocolate protein powder blends in without changing the texture much, though you’ll probably need to add a tablespoon of peanut butter or a splash of milk to compensate for the dryness.
Peanut-Free: Sunflower seed butter and pumpkin seeds instead of peanut butter and walnuts. Earthier flavor, works well. Good to know for school lunches.
Spiced Banana: Half a teaspoon of cinnamon and a pinch of nutmeg mixed into the base. These taste like banana bread in snack form. My personal favorite variation.
Vegan: Use maple syrup instead of honey and double-check that your chocolate chips are dairy-free. Everything else is already plant-based.
Serving Suggestions
On their own is fine — they don’t need anything. But a few combinations are worth knowing about.
With coffee, the pairing is surprisingly good. The banana-chocolate combo against a bitter espresso or strong drip coffee is one of those things that just works.
As a post-workout snack, two or three bites with a glass of milk (any kind) covers the carb-and-protein angle without being heavy or sweet in a way that makes you feel worse afterward.
If you want to make them look like you tried, drizzle a little melted dark chocolate over the finished bites. Takes two extra minutes and the presentation goes from “homemade energy ball” to something that looks intentional.
And if a bite or two breaks apart in the fridge, don’t throw them out. Crumble them over Greek yogurt. It works better than it sounds.
Storage and Reheating Guide
| Storage Method | Container | Duration | Notes |
|---|---|---|---|
| Refrigerator | Airtight container | Up to 7 days | Best texture after at least 30 min of chilling |
| Freezer | Airtight bag or container | Up to 3 months | Freeze in a single layer first, then transfer |
| Room Temperature | Covered plate | 2–3 hours | Fine for parties; refrigerate after that |
| Lunchbox (with ice pack) | Small zip bag | 4–6 hours | Holds up well cold |
To thaw from frozen: Leave them in the fridge overnight, or let them sit on the counter for 20–30 minutes. They come back to the same texture as fresh. Don’t microwave them — they get too soft and the chocolate chips melt into a mess.
FAQs
Can I make these without peanut butter? Yes. Sunflower seed butter is the cleanest swap — it’s nut-free and has a similar consistency. Almond butter works too if tree nuts aren’t an issue. Both hold the mixture together the same way; the flavor is just a little different.
Do they need to be refrigerated? For storage, yes. They’re fine sitting out for a couple of hours, but the banana in the mixture means they get soft and sticky if left at room temperature too long.
Can I use quick oats? You can, but the texture comes out softer and denser. Quick oats absorb more moisture and don’t have the same chew. If that’s all you have, reduce the banana slightly and chill the mixture longer before rolling.
How do I know when the mixture is ready to roll? Scoop out a small amount and roll it in your palm. If it holds a ball shape without crumbling or plastering itself to your hand, it’s ready. Too sticky — add oats a tablespoon at a time and wait a few minutes. Crumbling — your bananas may have been on the smaller side; add another tablespoon of peanut butter.
Are these actually good for kids? They’re one of the better snacks I’ve found for kids. Naturally sweet, hold together in small hands, and don’t feel like a health-food compromise. Just check for nut allergies before sending them to school, and swap to sunflower seed butter if needed.
What about adding protein powder? One scoop works fine. Vanilla or chocolate both blend in cleanly. Expect to add a tablespoon of liquid — water, milk, or a bit more mashed banana — to keep the mixture from getting crumbly.
Conclusion
Fifteen minutes, one bowl, ingredients you probably already own. That’s the whole pitch, and it holds up every time I make these.
I’ve brought them to potlucks where people asked for the recipe. I’ve eaten them out of a ziplock bag in a parking lot before a workout. I’ve crumbled them into yogurt at 6am because I didn’t want to think about breakfast. They’re just a genuinely useful thing to know how to make.
If you try them, save this to your Pinterest snack board — ripe bananas have a way of appearing at inconvenient times and it’s good to have this recipe somewhere you can actually find it again. And if yours turn out well, I’d really love to see a photo.