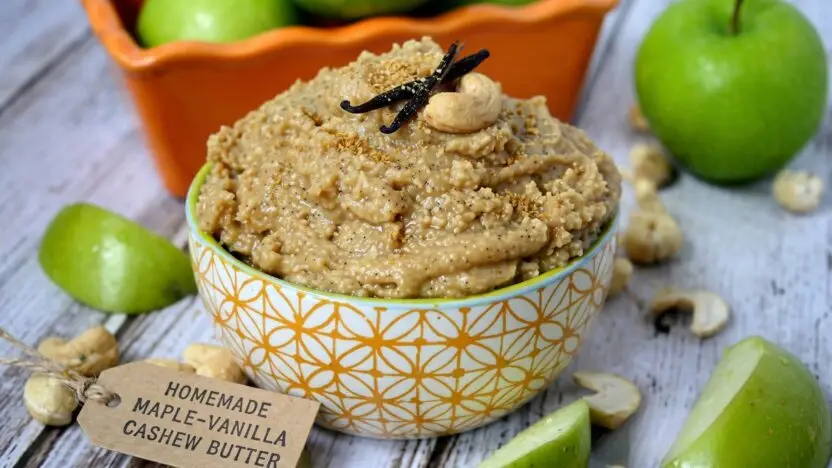
Are you ready to transform your morning routine with a homemade treat? Crafting your own nut-based spreads at home is a rewarding experience that elevates any kitchen pantry. Whether you enjoy it on warm toast or as a quick snack, maple vanilla cashew butter offers a perfect balance of sweetness and creaminess.

Many people find store-bought options lack the fresh, vibrant flavor of a DIY version. By making this simple spread yourself, you control the quality of every ingredient. We want to help you feel confident in your culinary journey as you explore these unique variations.
This guide introduces seven distinct ways to prepare your new favorite snack. From subtle flavor twists to bold additions, this maple vanilla cashew butter will quickly become a staple in your home. Let’s get started on creating something truly delicious today.
Key Takeaways
- Homemade nut spreads offer superior freshness compared to store-bought alternatives.
- You maintain full control over ingredient quality and sweetness levels.
- These recipes are versatile enough for breakfast toast or healthy snacking.
- Building confidence in the kitchen starts with simple, rewarding DIY projects.
- Each of the seven variations provides a unique flavor profile to enjoy.
The Benefits of Making Homemade Maple Vanilla Cashew Butter
There is something truly special about the taste of fresh, homemade spreads made right in your own kitchen. When you take control of the process, you move away from mass-produced items and toward a healthier, more vibrant way of eating. Creating your own nut butter is a simple way to ensure that every bite is packed with pure, wholesome goodness.
Why Choose Organic and Natural Ingredients
Opting for organic and natural ingredients makes a world of difference in the final flavor profile. Store-bought versions often contain hidden preservatives or stabilizers that mask the true essence of the nuts. By selecting high-quality, raw components, you ensure that your spread remains free from unnecessary additives.
Using clean ingredients also supports sustainable farming practices. You can taste the difference that quality sourcing makes in every spoonful. It is a small change that leads to a significantly superior product for your pantry.
Nutritional Advantages of Cashews
Cashews are more than just a delicious snack; they are a nutritional powerhouse. These nuts are loaded with healthy fats that support heart function and provide sustained energy throughout the day. They also contain essential minerals like magnesium and zinc, which are vital for your overall well-being.
When you process them at home, you preserve the integrity of these nutrients. You avoid the high-heat processing that can sometimes degrade the quality of fats in commercial products. This makes your nutritious spread a perfect addition to a balanced diet.
The Appeal of Small Batch Artisan Spreads
The beauty of a small batch approach lies in the complete control you have over the final result. You can adjust the sweetness of the maple syrup or the depth of the vanilla to suit your personal palate perfectly. This artisan method allows you to experiment with textures, ensuring your butter is exactly how you like it.
Creating these spreads in limited quantities ensures maximum freshness every time. You are not just making a condiment; you are crafting a gourmet experience. Enjoying something you made yourself adds a unique layer of satisfaction to your daily meals.
Essential Equipment for Perfect Nut Butter
Investing in quality equipment is the secret to achieving that smooth, store-bought texture at home. When you prepare your own gluten-free spreads, the power of your machine determines the final consistency of the nut butter. A robust motor ensures that your cashews break down into a silky paste without overheating.

Choosing the Right High-Speed Blender or Food Processor
To achieve an artisan quality result, you need a machine capable of handling dense ingredients. High-speed blenders are excellent for creating ultra-smooth textures, while food processors offer more control for those who prefer a slightly chunkier spread. Always check that your device has a tamper or a wide base to keep the nuts moving toward the blades.
Consistency is key when you are working in small batch quantities. If your machine struggles, try adding a tiny amount of neutral oil to help the blades catch the cashews more effectively. This simple trick prevents the motor from straining during the blending process.
Spatulas and Storage Containers for Best Results
Once your butter reaches the desired consistency, you must transfer it carefully. Using a high-quality silicone spatula ensures you scrape every bit of goodness from the sides of your blender jar. These tools are flexible enough to reach tight corners, which helps minimize waste.
Proper storage is just as important as the blending process itself. Always use airtight glass jars to keep your spread fresh and prevent oxidation. Keeping your butter in a cool, dark place or the refrigerator will extend its shelf life significantly.
| Equipment Type | Best Use Case | Texture Result |
|---|---|---|
| High-Speed Blender | Ultra-creamy spreads | Very smooth |
| Food Processor | Textured or chunky | Slightly grainy |
| Silicone Spatula | Scraping and mixing | N/A |
| Glass Jar | Long-term storage | Maintains freshness |
Selecting Quality Ingredients for Your Cashew Butter
The secret to a delicious cashew butter lies in the integrity of your base ingredients. When you prioritize premium components, you transform a simple snack into a gourmet experience. Every choice you make at the grocery store directly impacts the final texture and depth of flavor in your jar.

Sourcing Raw Versus Roasted Cashews
Choosing between raw and roasted cashews is the first step in defining your flavor profile. Raw cashews offer a neutral, creamy base that allows the sweetness of maple syrup to shine through clearly. They are perfect if you prefer a clean, mild taste.
On the other hand, roasted cashews provide a deeper, nuttier aroma that adds complexity to the spread. Many home cooks prefer a light roast to bring out the natural oils, which helps achieve a smoother consistency during the blending process.
Selecting Pure Maple Syrup and Vanilla Extract
To achieve an authentic, organic flavor profile, you must avoid artificial sweeteners or imitation extracts. Pure maple syrup provides a rich, woody sweetness that pairs perfectly with the buttery nature of cashews. Always check the label to ensure you are buying 100% pure syrup rather than pancake syrup blends.
High-quality vanilla extract is equally vital for a professional finish. Using a pure vanilla bean paste or extract ensures that the aromatic notes remain vibrant even after blending. These high-quality, organic ingredients are the foundation of a truly superior spread.
Adding Salt and Optional Enhancements
Salt acts as a flavor enhancer that balances the natural sweetness of the nuts and syrup. A small pinch of sea salt can make the other flavors pop, preventing the butter from tasting flat or one-dimensional.
Consider these optional additions to customize your batch:
- Sea salt flakes for a subtle crunch.
- Organic coconut oil to improve spreadability.
- A dash of cinnamon for added warmth.
By carefully selecting each element, you ensure that your homemade creation remains wholesome and delicious. Taking the time to source the best items will always pay off in the final taste.
Classic Maple Vanilla Cashew Butter Recipe
Creating your own maple vanilla cashew butter at home is a rewarding and simple culinary project. This foundational recipe provides a gluten-free base that you can easily customize for any occasion. By following these specific steps, you will achieve a professional-quality spread that tastes far better than store-bought versions.

Preparing and Toasting the Cashews
Start by preheating your oven to 350°F. Spread your raw cashews in a single layer on a large baking sheet to ensure they toast evenly.
Bake the nuts for about 8 to 10 minutes until they turn a light golden brown. This process is essential because it releases the natural oils, which are critical for achieving a smooth and creamy consistency later on.
Blending to Creamy Perfection
Once the cashews have cooled slightly, place them into your high-speed blender or food processor. Process the nuts on high for several minutes, stopping occasionally to scrape down the sides with a spatula.
You will notice the mixture transition from a coarse meal into a thick, glossy paste. Patience is key here, as the friction from the blades will eventually transform the nuts into a perfectly creamy spread.
Incorporating Maple and Vanilla
After the cashews reach a smooth consistency, add your pure maple syrup and high-quality vanilla extract. Pulse the blender just enough to combine these ingredients thoroughly without over-processing the butter.
The maple syrup adds a delicate sweetness that balances the earthy flavor of the cashews. This final step ensures your maple vanilla cashew butter is ready to be stored or enjoyed immediately.
| Ingredient | Quantity | Purpose |
|---|---|---|
| Raw Cashews | 2 Cups | Base Texture |
| Maple Syrup | 2 Tablespoons | Natural Sweetness |
| Vanilla Extract | 1 Teaspoon | Flavor Profile |
| Sea Salt | 1/4 Teaspoon | Gluten-free Enhancer |
Salted Caramel Maple Vanilla Cashew Butter
Elevate your pantry staples by transforming simple cashew butter into a decadent salted caramel treat. This variation offers a sophisticated twist that turns a standard spread into a truly gourmet experience. By carefully layering flavors, you can create a snack that feels like a luxury indulgence right in your own kitchen.
Adjusting the Salt Ratio for a Gourmet Profile
The secret to a balanced spread lies in the precise measurement of sea salt. You want to enhance the natural sweetness of the maple syrup without overpowering the delicate nuttiness of the cashews. Start with a small pinch of high-quality flaky sea salt and adjust to your personal preference for a gourmet finish.
Consistency is key when working with salt. If you find the flavor too sweet, add a tiny bit more salt to cut through the sugar. This careful calibration ensures that every spoonful provides a complex, savory-sweet harmony that keeps you coming back for more.
Achieving the Perfect Caramelized Flavor Profile
To capture that deep, toasted essence, you must focus on the blending process. You can achieve a rich, caramelized flavor profile by lightly toasting your cashews until they reach a golden-brown hue before blending. Be careful not to burn the nuts, as this will introduce a bitter note that ruins the final product.
Once the cashews are perfectly toasted, combine them with the maple syrup and vanilla. The heat from the freshly toasted nuts helps the syrup incorporate smoothly, creating a velvety texture. This method allows the natural sugars to deepen in flavor, resulting in a gourmet spread that rivals any store-bought version.
Cinnamon Spiced Maple Vanilla Cashew Butter
Adding a touch of spice transforms your standard nut butter into a cozy, aromatic treat. This variation highlights the natural sweetness of cashews while introducing a comforting depth that feels like a warm hug in a jar. It is the perfect spread for crisp autumn mornings or whenever you crave something truly special.

Selecting the Best Cinnamon Varieties
Not all cinnamon is created equal, and your choice will significantly impact the final flavor profile. Ceylon cinnamon, often called “true” cinnamon, offers a delicate, citrusy, and floral note that pairs beautifully with the subtle profile of cashews. It is a wonderful choice if you prefer a sophisticated and light finish.
On the other hand, Cassia cinnamon provides a much bolder, spicier, and more intense punch. This variety is ideal if you want the spice to stand out against the richness of the nuts. Both options are natural choices, so select the one that best matches your personal palate.
Balancing Warm Spices with Natural Sweetness
Achieving the perfect balance is the secret to a gourmet spread. You want the cinnamon to enhance the maple syrup rather than mask its complex, natural sugar profile. Start by adding a small amount of spice, then taste as you blend to ensure the flavors harmonize.
If you find the spice is becoming too dominant, simply add a few more raw cashews or a tiny splash of extra maple syrup to mellow the intensity. Remember that the flavors will continue to meld and deepen after the butter sits for a few hours. Patience is key when crafting the perfect batch of this aromatic, spiced delight.
Coconut Infused Maple Vanilla Cashew Butter
For those who enjoy a bit of texture, this coconut-infused recipe offers a delightful tropical escape in every spoonful. By combining the rich, buttery profile of cashews with the exotic sweetness of coconut, you create a spread that feels truly gourmet. This creamy base serves as the perfect canvas for a hint of island-inspired flavor.

Adding Texture with Shredded Coconut
The secret to a great texture lies in the type of coconut you choose. Using unsweetened shredded coconut provides a pleasant, chewy mouthfeel that contrasts beautifully with the smooth nut butter. You should fold the coconut in during the final stages of processing to ensure it remains distinct.
If you prefer a finer consistency, pulse the coconut in a food processor before adding it to the cashews. This allows the natural oils to release, enhancing the overall flavor profile. Consider these options for your next batch:
- Unsweetened Shredded: Best for a noticeable, chewy texture.
- Desiccated Coconut: Ideal for a finer, more subtle mouthfeel.
- Toasted Coconut: Adds a deeper, nutty aroma to the spread.
Blending Techniques for a Tropical Twist
Achieving a creamy consistency while maintaining texture requires a careful approach to blending. Start by processing your roasted cashews until they reach a smooth, liquid state. Once the base is ready, add your maple syrup and vanilla extract to lock in the sweetness.
Finally, incorporate the shredded coconut using short pulses rather than continuous blending. This technique ensures the coconut is evenly distributed without breaking down completely into the butter. The result is a balanced, exotic spread that stands out from traditional nut butters.
| Coconut Type | Texture Impact | Flavor Profile |
|---|---|---|
| Shredded | High (Chewy) | Mild & Sweet |
| Desiccated | Low (Fine) | Subtle & Nutty |
| Toasted | Medium (Crunchy) | Rich & Bold |
Espresso Bean Maple Vanilla Cashew Butter
Transform your pantry staples into a gourmet treat by blending the rich notes of espresso with creamy cashews. This bold recipe is designed for coffee lovers who want to combine their morning caffeine fix with a nutritious snack. It offers a sophisticated flavor profile that bridges the gap between a morning pick-me-up and a satisfying afternoon treat.

Incorporating Finely Ground Coffee Beans
The secret to a professional-grade spread lies in the texture of your coffee. You must use extra-fine espresso grounds to ensure the butter remains silky smooth rather than gritty. Coarser grinds can create an unpleasant texture that distracts from the creamy nature of the cashews.
Add your coffee grounds during the final stage of the blending process. This prevents the oils from the coffee from becoming too bitter while ensuring the flavor is evenly distributed throughout the batch. Patience is key when you want to achieve that perfect, velvety consistency.
Managing the Intensity of Espresso Flavor
Balancing the strength of the coffee with the sweetness of maple syrup requires a careful touch. Start with a smaller amount of espresso grounds and taste your mixture before adding more. You want the coffee to complement the vanilla notes, not overpower them.
Consider these tips to maintain the perfect harmony in your jar:
- Start small: Begin with one teaspoon of finely ground espresso per two cups of cashews.
- Taste test: Adjust the maple syrup if the coffee flavor feels too sharp or acidic.
- Quality matters: Use a high-quality dark roast to ensure a deep, chocolatey undertone that pairs well with vanilla.
- Chill before serving: Letting the butter sit in the refrigerator for an hour helps the coffee oils infuse more deeply into the cashews.
By following these simple steps, you create a luxurious spread that feels like a treat from a high-end cafe. It is the perfect way to enjoy a unique, energizing snack that keeps you fueled throughout the day.
Storage Tips and Shelf Life for Homemade Spreads
Once you have crafted your delicious spread, knowing how to store it is vital. Proper storage is the best way to ensure your healthy, homemade creations remain fresh and flavorful for as long as possible. By following a few simple guidelines, you can enjoy your nut butter without worrying about quality loss.
Proper Sealing and Refrigeration Techniques
The key to longevity is minimizing exposure to air and light. Always use clean, airtight glass jars to seal your nut butter tightly after every use. This simple step prevents oxidation and keeps the texture consistent.
While nut butter can sit in a cool, dark pantry for a short time, refrigeration is highly recommended for long-term storage. Keeping your jars in the fridge helps maintain the integrity of the natural oils. Consider these storage best practices:
- Use glass mason jars for an airtight seal.
- Store in the back of the refrigerator to avoid temperature fluctuations.
- Always use a clean spoon to prevent introducing bacteria into the jar.
Signs of Spoilage and How to Prevent Separation
Natural nut butter will eventually experience oil separation, which is perfectly normal. Because there are no stabilizers, the oil naturally rises to the top over time. You can easily fix this by giving the jar a thorough stir before each serving.
To keep your homemade spread in top shape, pay attention to its appearance and smell. If you notice a sharp, metallic, or rancid odor, it is time to discard the batch. A healthy, fresh spread should always smell nutty and sweet, just like the day you made it.
| Storage Method | Estimated Shelf Life | Best For |
|---|---|---|
| Pantry | 2-3 Weeks | Frequent use |
| Refrigerator | 2-3 Months | Long-term freshness |
| Freezer | 6 Months | Bulk batches |
Conclusion
Crafting your own nut butter transforms simple pantry staples into a culinary masterpiece. This rewarding process invites you to explore bold flavors while maintaining full control over every ingredient.
You now possess the skills to produce a gourmet spread that rivals high-end artisan brands. These recipes provide a solid foundation for your future kitchen experiments.
Try swapping different nuts or adding unique spices to create your own signature blend. Your friends and family will appreciate the rich, fresh taste of a homemade treat.
Start your next batch today and enjoy the satisfaction of creating a truly gourmet experience at home. Your blender is ready to help you master these delicious, creamy spreads.