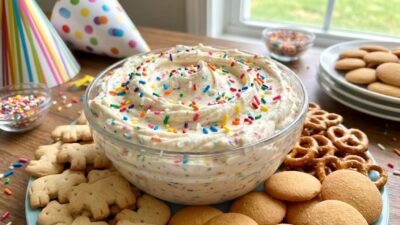
Finding the perfect centerpiece for your next festive gathering does not have to be a stressful chore. These spooky halloween treats offer a delightful way to celebrate the season while keeping things simple in the kitchen. By choosing fruit-based options, you provide a healthier alternative to traditional sugary candies that everyone will love.
Creating these diy halloween snacks is a fantastic way to involve your little ones in the kitchen. These kid-friendly halloween recipes are designed for busy parents who want to craft memorable moments without spending hours on preparation. Whether you need easy halloween desserts or just some fun halloween food ideas, this guide has you covered.
Mastering these creative halloween treats is easier than you might think. With just a few basic ingredients, you can transform simple fruit into the ultimate halloween party food. Let’s dive into the essential techniques required to assemble your very own halloween banana mummy pops today.

Key Takeaways
- Discover how to make healthier, fruit-based festive snacks.
- Learn simple techniques for crafting impressive holiday food.
- Save time with quick and stress-free preparation methods.
- Engage children with fun and interactive kitchen activities.
- Elevate your next party with unique and visually appealing bites.
Essential Tools and Ingredients for Halloween Banana Mummy Pops
A successful batch of halloween banana mummy pops relies on high-quality supplies and careful preparation. Taking the time to organize your workspace ensures that the assembly process remains stress-free and enjoyable. Proper preparation is truly the foundation for achieving professional-looking results in your own kitchen.
Selecting the Perfect Bananas
The secret to a sturdy treat lies in the fruit itself. You should always choose bananas that are firm and just ripe for the best structural integrity. Avoid using fruit that is overly soft, as it will struggle to hold up during the dipping process.
Choosing Your Coating: White Chocolate vs. Candy Melts
Deciding on the right exterior is a matter of personal preference and desired finish. High-quality white chocolate offers a rich, creamy flavor profile that many people love. On the other hand, candy melts provide an incredible ease of use and come in a variety of vibrant color options for your halloween banana mummy pops.
Must-Have Kitchen Supplies
To keep your project organized, gather a few essential items before you start. Having these tools ready will help you maintain a clean and efficient workflow:
- Parchment paper to prevent sticking during the cooling phase.
- Sturdy popsicle sticks for easy handling.
- A cooling rack to allow excess coating to drip off cleanly.
- A piping bag or a simple plastic bag with the corner snipped for creating those iconic mummy bandages.
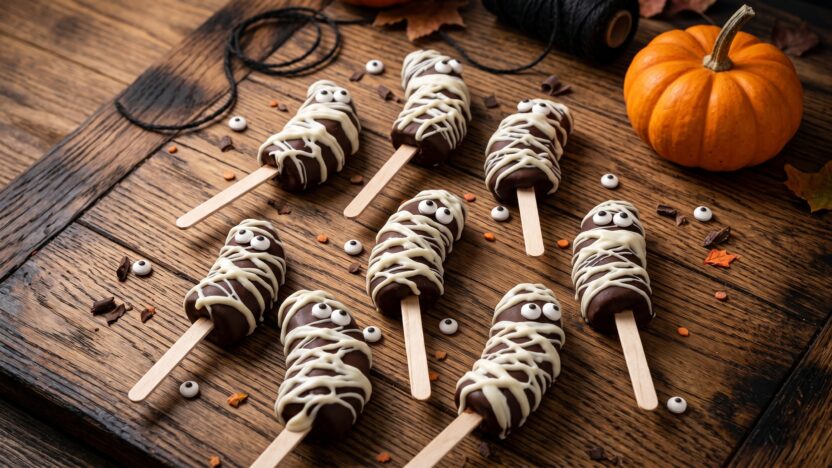
Classic White Chocolate Mummy Pops
You can easily transform simple fruit into festive treats with these classic halloween banana mummy pops. This traditional method relies on high-quality white chocolate to create a smooth, ghostly finish that everyone will love. Getting the texture just right is the secret to making these snacks look professional and delicious.

Step-by-Step Dipping Technique
Achieving a flawless coating requires a bit of patience and the right temperature. Follow these steps to ensure your fruit is perfectly covered without any messy drips or uneven patches.
- Ensure your bananas are fully frozen before you begin the dipping process.
- Use a tall, narrow glass to hold the melted chocolate, which makes dipping much easier.
- Dip the banana quickly and lift it straight up, allowing the excess chocolate to drip off back into the glass.
- Place the coated treat on a parchment-lined tray to set immediately.
Creating the Perfect Mummy Wrap
Once your base layer has hardened, it is time to add the signature bandages that define these halloween banana mummy pops. Use a piping bag or a simple plastic bag with the corner snipped off to create thin, consistent lines. Drizzle the chocolate in a random, crisscross pattern across the surface to mimic the look of ancient linen wraps.
Do not worry about making the lines perfectly straight or uniform. The beauty of these treats lies in their slightly chaotic, spooky appearance. A little bit of overlap adds depth and makes the mummy effect much more convincing.
Adding Candy Eyes for Character
The final step is giving your creation a personality by adding candy eyes. You should place these while the drizzle is still slightly tacky so they stick firmly to the surface. Strategic placement is key; putting the eyes close together creates a funny, confused look, while spacing them out can make the mummy appear more alert.
Feel free to experiment with different sizes of candy eyes to give each of your halloween banana mummy pops a unique expression. Whether you want them to look silly or slightly eerie, these small details bring the entire project to life. Enjoy the process of decorating these festive snacks for your next holiday gathering.
Creative Variations with Nut Butters and Spreads
Discover how creamy spreads can turn ordinary fruit into extraordinary holiday snacks. By incorporating protein-rich layers, you add depth and flavor to your spooky halloween treats while creating a better surface for your chocolate coating.

Peanut Butter Base Mummy Pops
A thin layer of creamy peanut butter acts as a delicious adhesive for your chocolate shell. Simply spread a light coating over your frozen banana halves before dipping them into melted white chocolate. This classic combination provides a satisfying balance of salty and sweet in every bite.
Almond Butter and Honey Mummy Treats
For a slightly more sophisticated flavor profile, try using almond butter mixed with a touch of honey. This pairing creates creative halloween treats that feel a bit more gourmet. The natural sweetness of the honey complements the earthy notes of the almond butter perfectly.
SunButter Mummy Pops for Nut-Free Schools
Safety is essential when preparing snacks for classroom parties. Sunflower seed butter serves as an excellent, nut-free alternative that mimics the texture of traditional spreads. It ensures that every child can enjoy these festive snacks without any dietary concerns.
| Spread Type | Flavor Profile | Best For |
|---|---|---|
| Peanut Butter | Salty & Rich | Classic Taste |
| Almond Butter | Earthy & Sweet | Gourmet Appeal |
| Sunflower Butter | Neutral & Creamy | Nut-Free Schools |
Festive Toppings and Texture Additions
Texture is a secret weapon for creating memorable spooky halloween treats. While the creamy banana and chocolate coating provide a solid base, adding extra layers creates a professional finish. These small adjustments turn simple snacks into eye-catching desserts that guests will love.

Adding Shredded Coconut for a Spooky Effect
If you want to achieve a cobweb-like appearance, shredded coconut is your best friend. Simply sprinkle the coconut over the wet chocolate before it sets completely. This creates a fuzzy, eerie texture that perfectly complements the mummy theme.
Using Crushed Graham Crackers for Crunch
Incorporating crushed graham crackers adds a delightful contrast to the soft banana center. This simple addition makes your fun halloween food ideas stand out by providing a satisfying snap in every bite. You can press the crumbs gently into the chocolate to ensure they stay in place.
Sprinkling Edible Glitter for a Magical Mummy
For those who want a touch of enchantment, edible glitter is the perfect finishing touch. A light dusting of gold or silver sparkle makes your mummy pops look truly magical under party lights. It is an easy way to elevate your spooky halloween treats without extra effort.
To help you choose the right finish for your next batch of fun halloween food ideas, consider the following texture guide:
| Topping Type | Visual Effect | Texture Profile |
|---|---|---|
| Shredded Coconut | Cobweb/Fuzzy | Soft and Chewy |
| Graham Crackers | Rustic/Earthy | Crispy and Crunchy |
| Edible Glitter | Sparkling/Magical | Smooth/Neutral |
Healthy and Fruit-Forward Mummy Variations
Creating easy Halloween desserts does not have to mean loading up on heavy sugars or artificial candy coatings. You can easily transform fresh fruit into spooky treats that are both nutritious and fun for the whole family to enjoy.

Greek Yogurt Coated Mummy Pops
For those seeking a lighter approach, Greek yogurt serves as a fantastic, protein-packed alternative to traditional chocolate. Simply dip your banana halves into thick, plain or vanilla Greek yogurt before freezing them on a parchment-lined tray.
The yogurt creates a creamy, tangy coating that mimics the look of mummy bandages perfectly. Once frozen, these snacks provide a refreshing bite that feels much lighter than standard confectionery options.
Frozen Banana and Strawberry Mummy Pops
Combining frozen bananas with fresh strawberries creates a vibrant, fruit-forward treat that is ideal for warmer autumn days. By layering these fruits, you add a burst of natural sweetness and a beautiful color contrast to your platter.
These wholesome snacks are excellent for parents who want to offer something special without sacrificing the festive spirit of the holiday. They are truly some of the most refreshing easy Halloween desserts you can prepare.
Dark Chocolate Drizzle Mummy Pops
If you prefer a more sophisticated flavor profile, a light dark chocolate drizzle is the perfect finishing touch. This method allows you to maintain the classic mummy aesthetic while adding a rich, antioxidant-packed layer to your fruit.
Simply melt high-quality dark chocolate and use a fork or piping bag to create thin, crisscross lines over your yogurt-coated pops. This final step elevates these easy Halloween desserts into a gourmet experience that guests of all ages will love.
Advanced Decoration Techniques for Professional Results
You can easily transform simple fruit into gourmet-looking treats with just a few expert adjustments. While basic designs are fun, mastering a few professional skills will help you create easy halloween desserts that stand out at any party. These methods allow you to add personality and flair to your kitchen projects.

Using Piping Bags for Precise Bandages
A high-quality piping bag is your best friend when you want to achieve clean, professional lines. By using a small round tip, you gain total control over the width and spacing of your chocolate bandages. Consistency is key to making your mummies look polished rather than messy.
Try varying the pressure on the bag to create thicker or thinner lines across the banana. Overlapping these lines at different angles adds a realistic, wrapped texture that elevates your creative halloween treats to a new level.
Creating Different Mummy Expressions
The secret to a great mummy lies in the eyes and the placement of the bandages. You can make your mummies look silly and friendly by placing the candy eyes close together or slightly askew. For a spookier vibe, leave a larger gap between the bandages to reveal more of the banana underneath.
Experimenting with the spacing of your chocolate drizzle changes the entire character of the treat. A tighter wrap often looks more modern, while a loose, chaotic wrap feels more like a classic monster.
Incorporating Colored Candy Melts for Themed Mummies
Do not feel limited to just white chocolate when designing your snacks. Using colored candy melts like vibrant green, deep purple, or even orange can give your mummies a festive, modern twist. These colors are perfect for matching specific party themes or school spirit events.
You can use these colors for the base drizzle or as a secondary accent to make the eyes pop. Combining different shades ensures your easy halloween desserts are as visually exciting as they are delicious.
| Technique | Difficulty | Best For |
|---|---|---|
| Standard Drizzle | Beginner | Quick snacks |
| Piping Bag | Intermediate | Professional look |
| Colored Melts | Advanced | Themed parties |
Tips for Successful Freezing and Storage
When preparing diy halloween snacks, the way you store them makes all the difference. Proper handling ensures your treats remain fresh and visually appealing until the moment they are served. By following a few simple guidelines, you can maintain the quality of your hard work.

How to Prevent Browning
Bananas naturally oxidize when exposed to air, which can lead to unsightly browning. To keep your halloween party food looking bright and appetizing, you should lightly brush the banana slices with a small amount of lemon or lime juice before coating them. This acidic barrier effectively slows down the oxidation process.
Alternatively, you can dip the bananas in a mixture of water and a touch of pineapple juice. This method adds a subtle sweetness while keeping the fruit looking fresh. Always ensure the fruit is completely dry before applying your chocolate or candy coating.
Proper Freezing Methods for Best Texture
The secret to a perfect texture is the flash-freezing technique. Start by placing your decorated pops on a parchment-lined baking sheet in a single layer. This prevents the decorations from sticking together while they firm up.
Once the pops are solid, usually after about two hours, you can transfer them to a freezer-safe bag or container. This method locks in the moisture of the banana while keeping the outer shell crisp. Consistency is key to ensuring every bite is as delicious as the first.
Storing and Transporting for Parties
If you are bringing your creations to a gathering, keep them in an insulated cooler with ice packs. This prevents the chocolate from melting during transit, which is vital for maintaining the intricate mummy bandages. Always keep your halloween party food in a rigid container to avoid crushing the delicate candy eyes.
When you arrive at your destination, place the pops back into the freezer if possible. If a freezer is not available, keep them in the coolest part of the room away from direct sunlight. These diy halloween snacks are best enjoyed slightly chilled for the most refreshing experience.
| Storage Method | Ideal Temperature | Maximum Duration |
|---|---|---|
| Flash Freezing | 0°F (-18°C) | 2 Hours |
| Long-term Storage | 0°F (-18°C) | 2 Weeks |
| Transporting | Below 40°F (4°C) | 1 Hour |
Kid-Friendly Assembly Ideas for Halloween Parties
Creating a DIY halloween snacks station turns a simple kitchen task into a memorable holiday event. Involving children in the preparation process builds excitement and allows them to take pride in their spooky creations. By setting up a dedicated space, you can foster creativity while keeping the chaos to a minimum.

Setting Up a Mummy Pop Decorating Station
To host a successful decorating event, organize your ingredients in small, accessible bowls. Arrange the melted chocolate, candy eyes, and various toppings in a logical flow so children can move down the line easily. This setup ensures that even the youngest chefs can participate in creating these fun halloween food ideas without feeling overwhelmed.
Consider using a large tray or a plastic tablecloth to define the workspace. This simple trick keeps the ingredients contained and makes the cleanup process much faster once the decorating is finished. Providing each child with their own small spatula or spoon helps prevent cross-contamination and keeps the station tidy.
Safety Tips for Working with Children
Safety is the most important aspect when working with melted chocolate and kitchen tools. Always ensure that the chocolate is warm rather than piping hot to prevent accidental burns. It is essential to supervise children closely whenever they are near the stove or handling sharp items like skewers.
Teach the children how to hold their pops by the stick to keep their fingers clean and away from the warm coating. If you are using a microwave to melt your chocolate, have an adult handle the transfer to the station. These small precautions allow everyone to enjoy the process safely and with confidence.
Making the Process Fun and Mess-Free
Focusing on kid-friendly halloween recipes means embracing a little bit of mess while keeping the stress levels low. Use squeeze bottles for the chocolate drizzle to give children better control over their designs. This method is much cleaner than dipping and allows for more intricate bandage patterns on the mummies.
Encourage the kids to experiment with different expressions for their mummies using the candy eyes. When the decorating is complete, place the finished pops on parchment paper for easy removal after they set. Celebrating their creativity is the best part of the experience, so be sure to take plenty of photos of their unique, spooky masterpieces.
Conclusion
These 12 creative recipes provide a simple way to celebrate the season with your favorite people. Mastering these techniques allows you to build a unique spread that delights guests of all ages.
Incorporating these kid-friendly halloween recipes into your holiday plans creates lasting memories. You can experiment with different toppings to match your personal style or party theme.
Your guests will love the playful presentation of these treats. They serve as the perfect halloween party food for any gathering, from school events to neighborhood get-togethers.
We hope this guide inspires you to get creative in the kitchen. Embrace the festive spirit and enjoy the joy these snacks bring to your home this October.