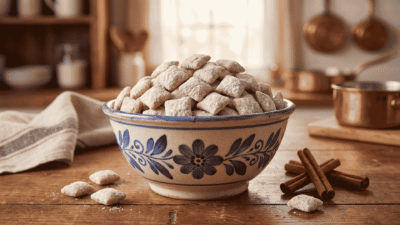
The holiday season brings a magical atmosphere to every kitchen. As the air turns crisp, many families find joy in crafting homemade treats that fill their homes with warmth and festive scents.
Among the most beloved seasonal snacks, Peppermint Chocolate Chip Cookies stand out as a true winter classic. These sweets perfectly capture the spirit of the holidays by blending refreshing mint with rich, melted cocoa.

Preparing your workspace is the first step toward baking success. Ensure your ingredients reach room temperature before you begin mixing to achieve the best texture. With the right approach, you can create professional-quality results that will impress your friends and family all season long.
Key Takeaways
- Holiday baking creates a festive atmosphere in your home.
- Mint and cocoa combinations are staples of winter desserts.
- Room temperature ingredients are essential for perfect dough.
- Proper kitchen preparation leads to professional baking results.
- Seasonal sweets make excellent gifts for loved ones.
Essential Baking Tools and Ingredients for Holiday Success
Every great cookie recipe relies on a foundation of high-quality components and reliable equipment. When you prepare for holiday baking, the difference between a good cookie and a masterpiece often comes down to the details in your pantry.
Selecting High-Quality Chocolate Chips
The secret to a decadent cookie lies in the quality of your chocolate chips. You should look for options with a high cocoa butter content, as these melt evenly without losing their structural integrity during the baking process.
Avoid generic brands that contain excessive fillers or stabilizers. Premium chocolate provides a rich, velvety mouthfeel that elevates your dessert from simple to gourmet.
Choosing the Right Peppermint Extract
Peppermint is the star of the show, so do not settle for anything less than the best. Always reach for pure peppermint extract rather than imitation versions to ensure a clean, refreshing taste in every bite.
Imitation extracts often leave a synthetic aftertaste that can overpower the delicate balance of your dough. A high-quality extract offers a crisp, cooling sensation that perfectly complements the sweetness of the chocolate.
Must-Have Kitchen Equipment
Consistency is the hallmark of successful holiday baking. To achieve uniform results, invest in heavy-duty, light-colored baking sheets that distribute heat evenly across the surface.
Pair these sheets with high-quality silicone baking mats to prevent sticking and ensure a perfect golden bottom. Having the right tools, such as a sturdy spatula and a reliable hand mixer, makes the entire process more enjoyable and efficient.
Mastering the Basic Dough for Peppermint Chocolate Chip Cookies
Mastering your dough is the secret to professional-quality treats at home. When you focus on the foundational steps of mixing, you ensure that your Peppermint Chocolate Chip Cookies turn out perfectly every single time. Proper technique transforms simple pantry staples into a holiday masterpiece.
Creaming Butter and Sugar for Texture
The journey to a great cookie begins with the creaming process. You must beat your softened butter and sugar together until the mixture looks light, pale, and fluffy. This step incorporates tiny air bubbles into the fat, which provides the necessary lift for a soft, tender crumb.
Do not rush this stage, as it creates the structural backbone of your dough. When the butter and sugar are properly aerated, the resulting texture becomes significantly more refined. This simple effort makes a world of difference in the final mouthfeel of your dessert.
Incorporating Dry Ingredients Properly
Once your wet ingredients are ready, it is time to add the flour and leavening agents. You should mix these dry components only until they are just combined. Overworking the dough at this stage develops too much gluten, which can lead to tough or rubbery cookies.
Gently folding in your ingredients helps maintain a delicate structure. By keeping the mixing to a minimum, you ensure that your cookies remain soft and chewy. This careful approach is vital for achieving that professional bakery quality in your own kitchen.
The Importance of Chilling Your Dough
Many bakers skip this step, but chilling your dough for at least two hours is a non-negotiable requirement. Cold dough prevents the cookies from spreading too thin while they bake in the oven. It also allows the flour to hydrate fully, which results in a much better texture.
Furthermore, resting the dough helps the peppermint flavor deepen and distribute evenly throughout the batch. A chilled dough ensures that the bold peppermint flavor remains distinct and delicious. Taking this extra time guarantees that your cookies hold their shape and deliver the best possible taste experience.
Classic Chewy Peppermint Chocolate Chip Cookies
If you are looking for an easy cookie recipe that delivers professional results, you have come to the right place. These Peppermint Chocolate Chip Cookies are the ultimate holiday treat, combining rich cocoa undertones with a bright, cooling finish. By following a few simple steps, you can achieve that bakery-style texture right in your own kitchen.

Step-by-Step Mixing Instructions
Start by creaming your softened butter and sugars until the mixture is light and fluffy. This aeration process is the secret to a soft, tender crumb that holds its shape beautifully.
Next, incorporate your eggs and peppermint extract, ensuring everything is fully combined before adding the dry ingredients. Gently fold in your chocolate chips last to prevent overworking the dough, which keeps the cookies perfectly chewy.
Baking for the Perfect Soft Center
To achieve that coveted soft center, you must avoid overbaking your cookies. Pull them from the oven when the edges look set but the centers still appear slightly underdone.
The residual heat on the baking sheet will finish the cooking process without drying out the middle. This technique ensures your Peppermint Chocolate Chip Cookies remain moist and delicious for days.
Adding the Peppermint Glaze Drizzle
Once your cookies have cooled completely, it is time for the final touch. A simple glaze made from powdered sugar, a splash of milk, and a drop of peppermint extract adds a festive flair.
Use a fork or a piping bag to create thin, elegant lines across the surface. This delightful drizzle not only enhances the visual appeal but also adds an extra layer of refreshing flavor.
| Baking Stage | Temperature | Texture Result |
|---|---|---|
| Under-baked | 325°F | Very Gooey |
| Perfectly Baked | 350°F | Soft & Chewy |
| Over-baked | 375°F | Crispy & Firm |
Double Chocolate Peppermint Indulgence
For those who crave a richer experience, these double chocolate treats are the ultimate indulgence. This festive dessert combines the deep, earthy notes of premium cocoa with the sharp, refreshing zing of peppermint extract. It is a sophisticated upgrade that will surely impress your guests during any holiday gathering.

Creating a Rich Cocoa Base
To achieve a truly decadent cookie, you must start with high-quality Dutch-processed cocoa powder. This type of cocoa provides a darker color and a smoother, less acidic flavor profile than standard natural cocoa. Sifting your dry ingredients is essential to ensure a lump-free dough that bakes evenly every single time.
Balancing Dark Chocolate and Peppermint
The secret to a perfect festive dessert lies in the balance of flavors. Using dark chocolate chips with at least 60% cacao content prevents the cookie from becoming overly sweet. When adding peppermint extract, start with a small amount to ensure the minty notes complement the chocolate rather than overpowering it.
| Chocolate Type | Flavor Profile | Best Use |
|---|---|---|
| Dark Chocolate | Intense and Bitter | Balancing sweetness |
| Semi-Sweet | Balanced and Classic | General cookie dough |
| White Chocolate | Creamy and Sweet | Contrast for peppermint |
Tips for Preventing Overbaking
Because dark chocolate cookies are naturally darker, it is difficult to judge doneness by color alone. You should look for edges that appear set while the center remains slightly soft to the touch. Removing the tray early is a pro tip, as the residual heat will finish the baking process perfectly on the counter.
Always keep a close eye on your oven during the final two minutes of the timer. A perfectly baked festive dessert should be chewy, moist, and intensely chocolatey. Following these simple steps ensures your holiday treats remain soft and delicious for days.
White Chocolate Peppermint Crunch Cookies
These cookies offer a beautiful contrast between rich, sweet white chocolate and a sharp, cooling peppermint flavor. The visual appeal of snowy white chips against vibrant red candy cane bits makes them a standout addition to any holiday cookie tray. You will love how the creamy texture balances the bold, refreshing notes in every single bite.

Using Crushed Candy Canes for Texture
To achieve the perfect crunch, it is best to crush your candy canes into small, uneven pieces rather than a fine powder. Larger shards provide a satisfying snap that contrasts beautifully with the soft, buttery dough. Always fold the candy pieces in at the very last second to prevent the red color from bleeding into your cookie base.
Achieving the Ideal White Chocolate Melt
Melting white chocolate requires patience because it is prone to seizing if exposed to high heat. Use a double boiler or microwave in short, 15-second bursts, stirring constantly until the chocolate is smooth and glossy. Avoid adding any water or steam to the bowl, as even a tiny drop can ruin the consistency of your glaze.
Storage Tips for Candy Cane Toppings
If you plan to add candy cane toppings after baking, store your cookies in an airtight container at room temperature. To maintain that signature peppermint flavor and crunch, avoid humid environments which can cause the sugar in the candy to become sticky. If you are worried about moisture, place a small piece of parchment paper between layers to keep the toppings crisp and fresh for your guests.
Gluten-Free Peppermint Chocolate Chip Variations
Baking for dietary restrictions is a rewarding challenge that yields a truly delicious cookie recipe. You do not have to sacrifice the festive spirit of the holidays just because you are avoiding wheat. With the right approach, your gluten-free treats will be just as soft and chewy as the traditional versions.

Selecting the Best Flour Blends
The foundation of any great gluten-free treat is the flour blend you choose. Look for high-quality 1-to-1 baking flours that are specifically designed to replace wheat flour in a 1:1 ratio. These blends usually contain a mix of rice flour, potato starch, and tapioca flour to mimic the structure of gluten.
Always check the label to ensure the blend includes xanthan gum. If it does not, you will need to add it separately to prevent your cookies from crumbling. Using a reliable blend ensures your delicious cookie recipe maintains its integrity during the baking process.
Binding Agents for Cookie Stability
Gluten acts as the glue that holds traditional cookies together. When you remove it, you need a substitute to provide that necessary structure. Xanthan gum is the gold standard for binding gluten-free dough, as it provides the elasticity that mimics wheat proteins.
Without a proper binder, your cookies might spread too thin or fall apart when you try to lift them from the pan. Adding just a small amount of xanthan gum helps your cookies hold their shape perfectly. This simple step is essential for achieving that professional, bakery-style finish.
Flavor Enhancements for Gluten-Free Dough
Gluten-free flours can sometimes have a slightly earthy or neutral taste compared to wheat. You can easily mask this by boosting the flavor profile of your dough. A high-quality peppermint extract and a pinch of sea salt will brighten the overall flavor of your delicious cookie recipe.
Consider the following comparison of common gluten-free flour components to help you choose the right base for your next batch:
| Flour Type | Texture Profile | Best Use |
|---|---|---|
| Almond Flour | Moist and dense | Chewy cookies |
| Rice Flour Blend | Light and airy | Crispy edges |
| Oat Flour | Hearty and soft | Thick, soft cookies |
| Tapioca Starch | Very smooth | Binding and shine |
By experimenting with these ingredients, you can create a truly memorable dessert. Always remember to chill your dough before baking to ensure the best possible texture for your gluten-free peppermint chocolate chip cookies.
Vegan Peppermint Chocolate Chip Delights
Embracing a plant-based lifestyle does not mean you have to sacrifice your favorite holiday sweets. You can easily create decadent treats that satisfy even the most traditional cookie lovers by using simple, effective ingredient swaps. With the right approach, your holiday baking will remain just as festive and delicious as ever.

Egg Substitutes That Work Best
Finding the right binder is essential for achieving the perfect texture in your cookies. A flax egg, made by mixing one tablespoon of ground flaxseed meal with three tablespoons of water, is a fantastic choice for providing moisture and structure.
Alternatively, commercial egg replacers work wonders if you prefer a more neutral flavor profile. These options provide the necessary lift to ensure your cookies stay soft and chewy rather than dense or flat.
Choosing Dairy-Free Chocolate Chips
The quality of your ingredients truly defines the final result of your dessert. When selecting chocolate chips, look for brands that specifically label their products as dairy-free or vegan to ensure they meet your dietary needs.
High-quality dairy-free chocolate chips melt beautifully in the oven, creating those signature pockets of gooey goodness. Always check the label for cocoa butter content, as this helps achieve that smooth, indulgent mouthfeel we all crave in a holiday cookie.
Achieving a Buttery Flavor Without Dairy
To replicate that classic rich taste, swap traditional butter for high-quality vegan butter sticks. These products are formulated to mimic the water-to-fat ratio of dairy butter, which is crucial for proper spreading and browning.
If you prefer a more natural approach, refined coconut oil can also provide a lovely texture. Just remember to keep your dough chilled before baking to ensure your cookies maintain their shape and don’t spread too thin on the baking sheet.
Soft-Baked Peppermint Frosted Cookies
Nothing says holiday cheer quite like a soft-baked cookie finished with a swirl of peppermint buttercream. These treats offer a tender, cake-like crumb that provides the perfect canvas for rich, flavorful toppings. Serving this festive dessert at your next gathering will surely impress your guests and satisfy every sweet tooth in the room.

Creating a Cake-Like Cookie Base
To achieve that signature airy texture, you must adjust your standard mixing technique. Start by creaming your butter and sugar until the mixture is pale and fluffy, which incorporates essential air bubbles into the dough. Using a slightly higher ratio of cake flour or adding a touch of sour cream can also help ensure the final result remains soft and tender.
Be careful not to overmix the dough once you add your dry ingredients. Gently folding the flour into the wet mixture keeps the gluten development low, which is the secret to a delicate, cake-like bite. Always chill your dough for at least thirty minutes before baking to prevent the cookies from spreading too thin in the oven.
Preparing the Peppermint Buttercream
The secret to a great frosting lies in the balance of fat and sugar. Use high-quality unsalted butter at room temperature to ensure a smooth, pipeable consistency. Gradually add powdered sugar and a splash of heavy cream, whipping the mixture on high speed until it reaches a light, cloud-like state.
Add your peppermint extract slowly, tasting as you go to avoid an overpowering flavor. A tiny drop of red food coloring can create a beautiful swirl effect if you want to add a pop of color to your festive dessert. Keep the frosting covered with a damp cloth while you wait to use it to prevent a crust from forming.
Decorating Techniques for a Festive Look
Once your cookies have cooled completely, it is time to get creative with your decorations. Use a star-shaped piping tip to create elegant swirls that hold their shape beautifully. You can finish the look by sprinkling crushed candy canes or edible silver glitter over the top for extra sparkle.
If you prefer a more rustic appearance, use an offset spatula to spread the frosting in a thick, smooth layer. Adding a small piece of peppermint bark or a fresh mint leaf can provide a professional touch that elevates your presentation. Remember that the visual appeal is just as important as the taste when you are crafting a festive dessert for the holidays.
| Cookie Type | Texture | Best Topping |
|---|---|---|
| Soft-Baked | Cake-like | Peppermint Buttercream |
| Classic Chewy | Dense | Chocolate Drizzle |
| Shortbread | Crumbly | Powdered Sugar |
Peppermint Chocolate Chip Cookie Bars
Baking cookies in a pan is a clever hack that saves you from the tedious task of scooping individual dough balls. This easy cookie recipe approach allows you to enjoy the same festive flavors while significantly reducing your time in the kitchen. Whether you are hosting a holiday party or just need a quick treat, bars provide a consistent and delicious result every single time.
Adjusting Ratios for Bar Pan Baking
When converting a standard dough into bars, you must ensure the structure remains stable. You should slightly increase the flour content to prevent the bars from becoming too greasy or spreading into a thin puddle. A firmer dough holds its shape better when baked in a deep pan, resulting in a satisfying, thick bite.
Even Baking Techniques for Thick Bars
To achieve perfectly baked bars, focus on your oven temperature and pan material. Using a light-colored metal pan helps the edges bake at the same rate as the center, preventing burnt sides. If you find your bars are browning too quickly, tent the top with aluminum foil for the final ten minutes of the baking process.
This easy cookie recipe technique ensures that your dessert stays soft and chewy throughout. Always check for doneness by inserting a toothpick into the center; it should come out with just a few moist crumbs attached.
Slicing and Serving Suggestions
Patience is the secret to getting professional-looking squares. You must allow the bars to cool completely in the pan before attempting to slice them. Using a sharp, non-serrated knife will give you clean edges, especially if you wipe the blade with a warm, damp cloth between each cut.
| Feature | Standard Cookies | Cookie Bars |
|---|---|---|
| Prep Time | Moderate | Fast |
| Baking Time | 10-12 Minutes | 25-30 Minutes |
| Texture | Crispy Edges | Uniformly Soft |
| Serving | Individual | Shareable Squares |
Once sliced, you can dust the tops with a little extra powdered sugar or a drizzle of melted chocolate for a beautiful finish. These bars are the ultimate easy cookie recipe for busy bakers who refuse to compromise on quality.
Troubleshooting Common Baking Issues
Mastering the art of holiday baking means knowing how to fix common kitchen mishaps. Even experienced bakers encounter challenges when the oven does not cooperate with their favorite recipes. Understanding the science behind your ingredients helps you save a batch before it is too late.
Why Cookies Spread Too Much
Excessive spreading is often caused by butter that is too soft or warm. When butter melts too quickly in the oven, the structure of the cookie collapses before it can set. Always ensure your butter is at room temperature, not oily or melted, before you begin mixing.
Another common culprit is a lack of chilling time. Placing your dough in the refrigerator for at least thirty minutes allows the fats to firm up again. This simple step ensures your cookies maintain their shape and thickness during the baking process.
Fixing Dry or Crumbly Dough
If your dough feels dry or crumbly, you likely added too much flour or not enough liquid. Measuring flour by scooping directly from the bag often packs it down, leading to an inaccurate measurement. Try using a kitchen scale or the “spoon and level” method to keep your ratios precise.
You can often rescue a dry batch by adding a teaspoon of milk or water at a time. Mix gently until the dough holds together without being sticky. Do not overwork the mixture, as this can lead to tough cookies rather than the soft, chewy texture you desire.
Adjusting Baking Times for High Altitudes
Baking at high altitudes requires specific adjustments because air pressure is lower. Leavening agents like baking soda or powder react more quickly, which can cause cookies to rise and then fall rapidly. You may need to slightly reduce your leavening agents to prevent this collapse.
Additionally, moisture evaporates faster in higher elevations, which can dry out your holiday baking projects. Consider increasing your oven temperature by about 15 to 25 degrees Fahrenheit to set the structure faster. Keep a close eye on your oven, as baking times often decrease significantly when you are living at a higher altitude.
Conclusion
The kitchen becomes a magical space when the scent of peppermint and chocolate fills the air. You now possess the skills to craft professional-grade sweets that impress every guest at your table.
Every delicious cookie recipe in this collection offers a unique way to celebrate the season. You can experiment with different textures and flavors to find your personal favorite.
Sharing these homemade treats creates lasting memories with your loved ones. Quality ingredients like Ghirardelli chocolate or King Arthur flour make a noticeable difference in your final results.
Take your time with each batch to ensure the best outcome. Your patience during the mixing and chilling stages pays off with every perfect bite.
We invite you to share your baking journey with us. Post photos of your creations on social media and tag your favorite local bakeries for inspiration. Your kitchen is ready for your next sweet masterpiece.